Prop Help Hotline
WARNING: This post is picture heavy. It's about 90% pictures because if all these tutorials were in text form, LiveJournal would kick me in the face with their character limit and I would have to split this post up into about 8 separate posts. Please be patient and eat a sandwich or something while this page loads. Thank you!
After so many people asking for prop help on cosplay.com and elsewhere, I've decided to make a guide, here on my LJ. :) In this post, I'll put tutorials, and people can come to ask questions. If you wish to ask how to make a certain prop, please put the name of the prop in the subject to make it easier for other users to find it. Also, include reference pictures. As time goes on, I'm sure that people will start to ask for help on the same prop over and over, so I ask that you please read through the comments first to see if your question has already been answered. Also, if you happen to find any bugs in the links, please let me know! ^.^v
This link has also been shared here on cosplay.com. So check there to see if a question you have may have already been answered.
I'm no longer taking commissions, but feel free to browse my cosplay prop store at tsuki_sales!
If you'd like to leave a comment or question about a specific prop, please put the name of the item in the subject for easy finding for both me and others. That way, if someone has a question about the same prop, they'll be able to see if their question has already been answered within a few moments of searching and then I won't have to repeat myself several dozen times. ^^; Also, please don't delete your comments. There's no such thing as dumb questions. I should know. :)
Supplies most commonly used:
Model Magic
Sculpey
Painter's Caulk (white)
Sand Paper
Super glue
Dowel Rods (3/4" or 1" thick, usually)
Pre-cut wooden shapes (predominantly circles and hearts)
Rhinestones and assorted beads and gems
20 gague wire
Styrofoam balls and disks
PVC pipe (3/4" thick, usually) and misc. PVC pipe parts
Hot glue gun (High temp ONLY!! Low temp is for things things that run the risk of melting. Nothing here qualifies as such. Here, you'll need the strength of high temp!!)
E-6000 epoxy glue (Recently discovered! For extra strength and flexibility, consider using this in place of hot glue if you don't need a quick set time. STRONGER THAN HOT GLUE!!)
Brooch pins (they look like safety pins, but one side has a flat base)
Craft Foam
Modge Podge (see above link)
Sailor Moon Prop Tutorials:
Note: If I have not made the specific prop before, there will be a disclaimer. If I have, there will be a difficulty rating on a scale of 1 to 5 (1 being easy, and 5 being very difficult).
Moon's hair pearls
Moon's 1st season wand
Moon's 1st season brooch
Moon's 2nd season wand
Moon's 2nd season brooch
Moon's 3rd season wand
Moon's 3rd season brooch
Moon's 4th season brooch
Moon's 4th season wand: anime
Moon and Chibi Moon's 4th season wand: manga
Moon's 5th season brooch
Moon's tall crescent wand from the artbooks
Neo Queen Serenity's crown
King Endymion's medals
King Endymion's staff
Tuxedo Kamen's mask
Luna-P
Chibi-Usa's Time Key
Chibi-Moon's 3rd season wand
Chibi-Moon's 3rd season brooch
Chibi-Moon's 4th season brooch
Chibi-Moon's Twinkle Bell: anime
Chibi-Moon's Twinkle Bell: manga
Generic inner senshi 1st henshin pen
Venus' manga henshin pen
Generic inner senshi 2nd henshin wand
Generic inner senshi 3nd henshin wand
Generic round senshi brooch
Generic heart-shaped senshi brooch
Outer senshi henshin wand
Neptune's Deep Aqua Mirror
Black Crystal Earrings
Princess Kakyuu's Crown
PGSM Princess Sailor Moon's Sword
Card Captor Sakura Prop Tutorials:
Sakura's Staff of Sealing
Sakura's Star Wand
Sakura's keys
Sakura's really tall staff (episode 69)
The Suggestion Corner - Basically, it would have been a pain to re-write all the code on this entry! >P
Sewing Tutorials (Sailor Moon-based)
Basic Model Magic Use:
Model Magic is a plastic-based polymer, produced by Crayola. It comes in a variety of different colors, but mostly I just use white to make things simpler (plus, it's cheaper that way).
A lot of people have come to me saying "I tried to use model magic for this prop, but it just didn't work for me! How'd you do it?"
There's a simple fact about most clays, and that's that they shrink a bit when they're drying. Model Magic is no exception. Because Model Magic is plastic-based, it cracks when it dries.
Steps you can take to reduce cracking
If you have to make a big shape, like a big heart or sphere, use a Styrofoam shape that closely resembles what needs to be made, and cover it in a thin layer of model magic. If you use a thin layer, it's less likely to crack because it dries faster and more evenly. If the shape you have to make is about an inch thick, turn the piece over periodically while it's drying so that air can access as much of the piece as possible, to promote even drying. Otherwise, the top side will dry much faster than the side touching a table top and then you're left with a crack on the front because it took the bottom longer to dry than the top did. I suggest flipping it every 8 hours or so.
Smooth out all wrinkles in the clay while it's still wet. An easy way of doing this is to pinch the wrinkle between your fingers until you have a raised area. Then, gently rub it down with the pad of your index finger. Repeat until the wrinkle disappears. Any wrinkles that are not smoothed down will deepen into a large crack.
Work with your model magic quickly. Your hands absorb moisture and if the model magic starts to take on a rough, scaly appearance while you're working with it, it's only going to get worse while drying. If you need to make a detailed, intricate shape, made a general blob and do the difficult stuff later (see below).
Troubleshooting: Help!! I've got cracks everywhere!!
If you have small, rough imperfections, use fine grade sandpaper to smooth them out. DO NOT use a mechanical sanding machine of any type. Don't push down too hard, or you'll end up with scaly spots that won't go away with sanding. It takes time, so don't rush it. Any time you use sandpaper, though, go back with some diluted mod podge (1 part water : 8 parts mod podge) and give it a few coats. This will fill in all the pores and give a smooth finish once you paint your project.
If you've got a large crack reminiscent of the grand canyon, sand the surrounding area how you want it, then fill in the crack with white painter's caulk. You can find caulk and caulk guns at your local home improvement store (ACE hardware, Home Depot, Lowe's, etc.). Scrape away the excess with a clay tool of the proper curve or use a flat one, depending on the area you're filling. If it's still not quite smooth, let the caulk dry and do it again. Keep doing this until you get the desired result. Be sure you make the surface completely smooth. Caulk isn't sandable. Be sure to keep your clay tools clean by wiping the excess away with a paper towel and scrubbing them under warm water every 30 minutes.
Basic Construction tips:
If you have a shape that looks like it's a bunch of shapes put together, make the pieces separately and glue them together later. If you put them together while they're wet, they won't stick as well and will cause more of a headache later down the road. Attach them with super glue, high temp hot glue, epoxy (E-6000 is my preferred type), or whatever other kind of glue you would like to use. For extra stability and smoothness, you can go around the connection site with caulk and smooth it with your finger or clay tool of a suitable shape.
If you have to make a very detailed shape like a small crown or a multi-pointed star, make a generic blob and shape it later, using an exacto knife and fine grade sandpaper.
If you have any specific questions, please do not hesitate to ask, as I'm sure I haven't thought of everything. Please include pictures of your project, if applicable.
Moon's hair pearls
Difficulty: *
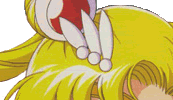

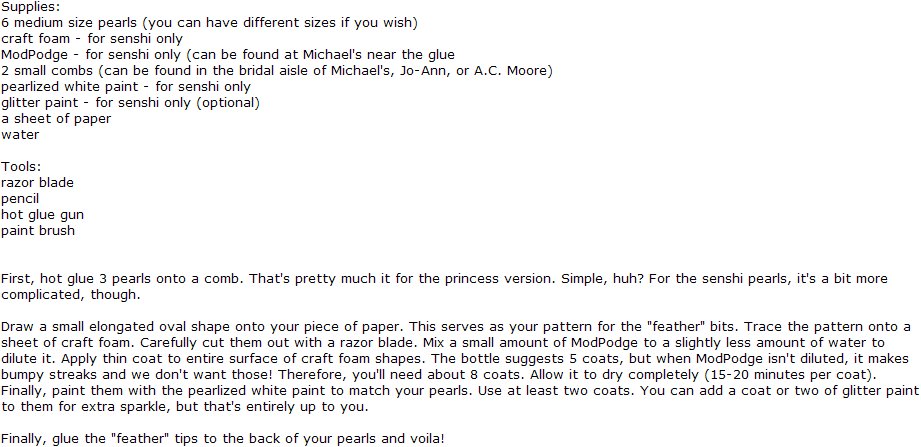
Assistance with this tutorial was provided by windofthestars
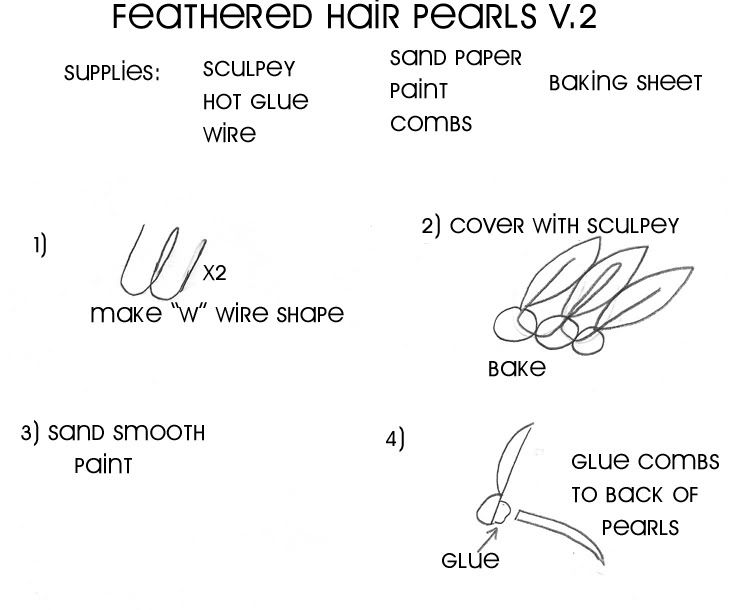
Version 2
Difficulty: *
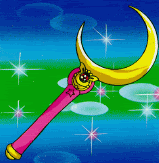
Moon's 1st season wand
Difficulty: **
::EDIT NOTES:
This should say 3/4" or 1" dowel, rather than 5/8" dowel. 5/8" is WAAAAAAAAY too thin!
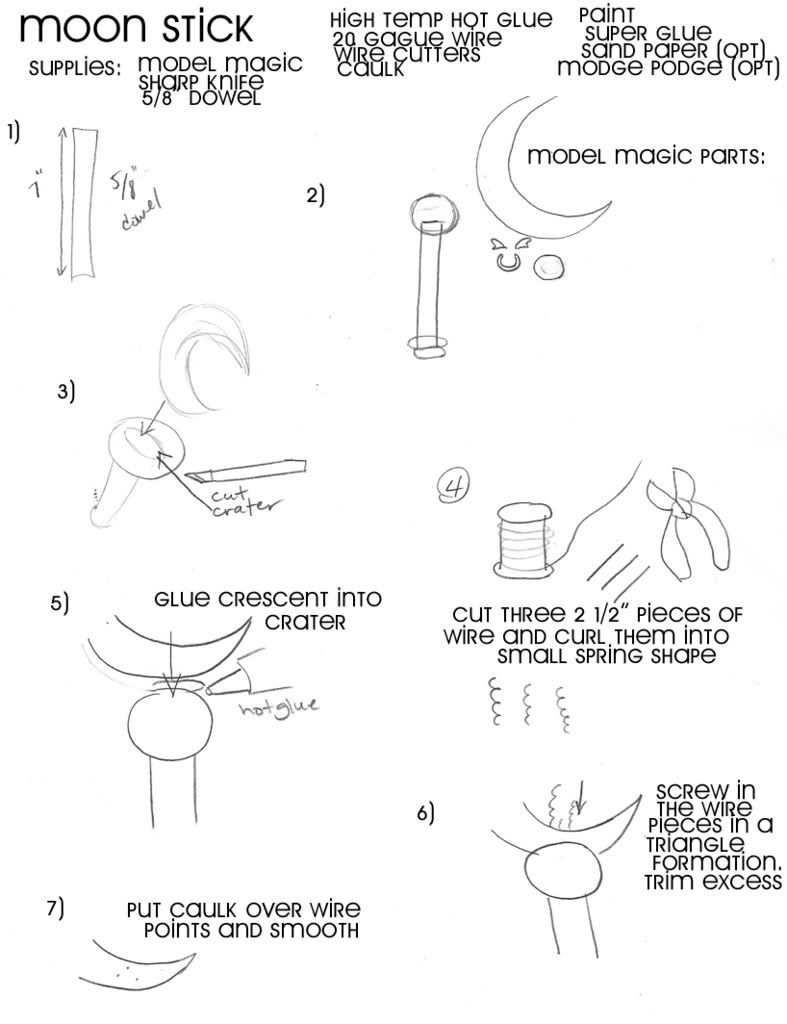
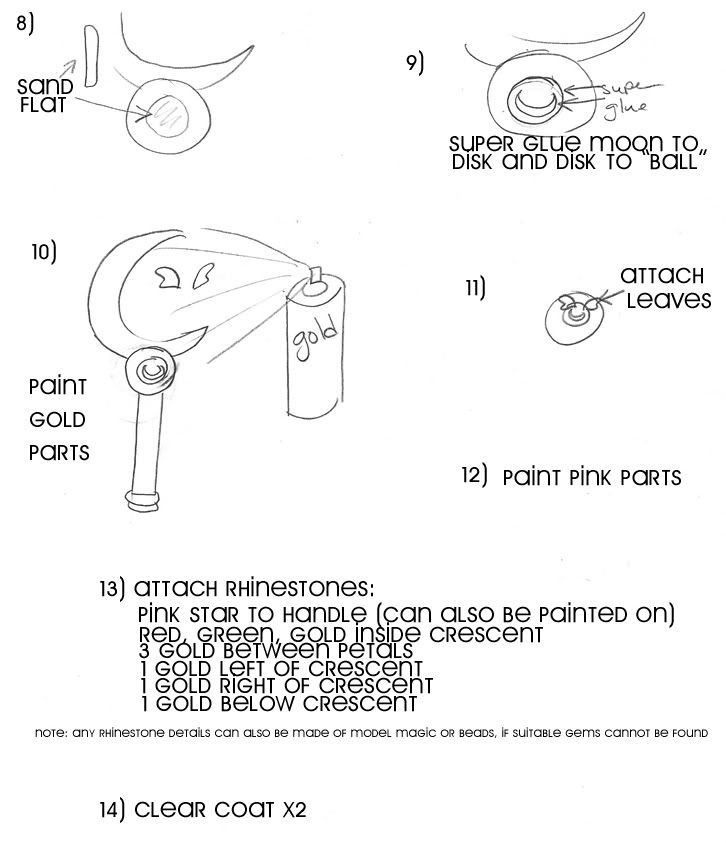
Finished Product
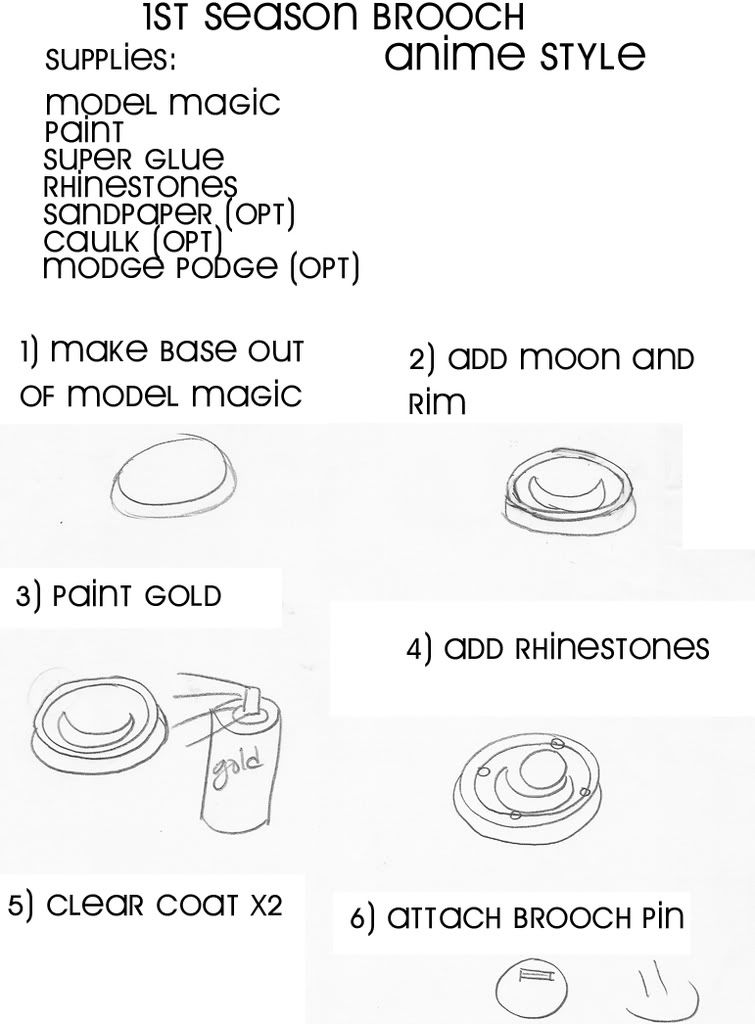
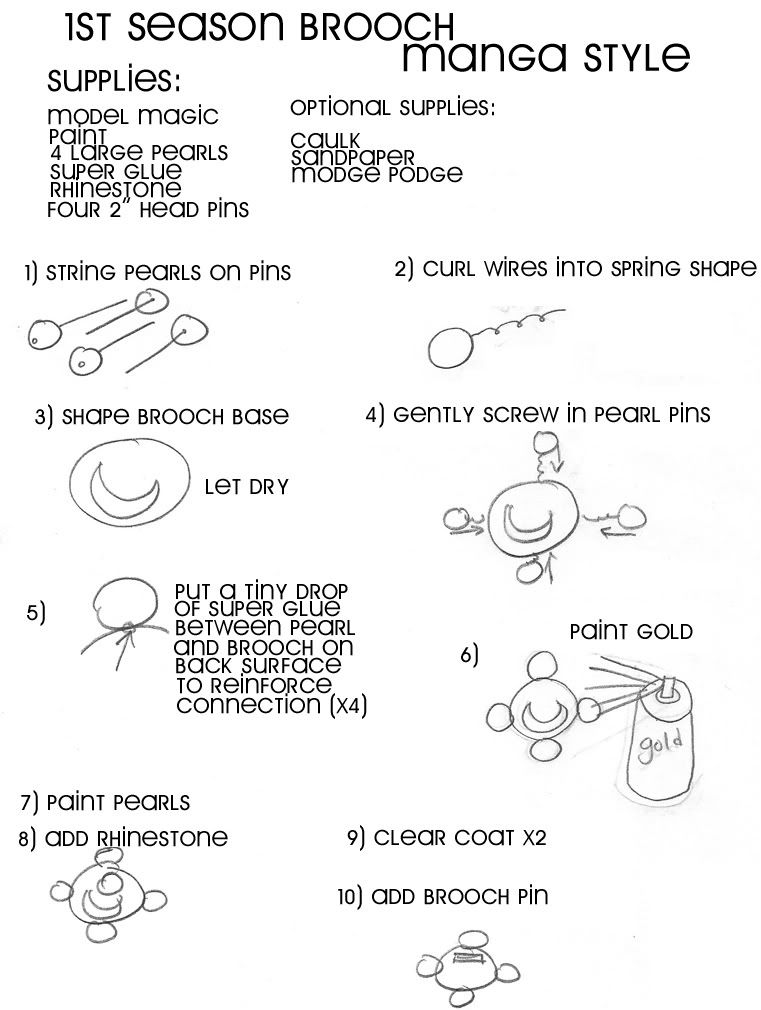
Moon's 1st season brooch
Difficulty: * (anime) ** (manga)
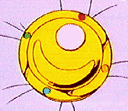
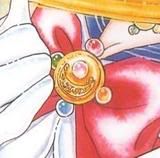
Finished Product
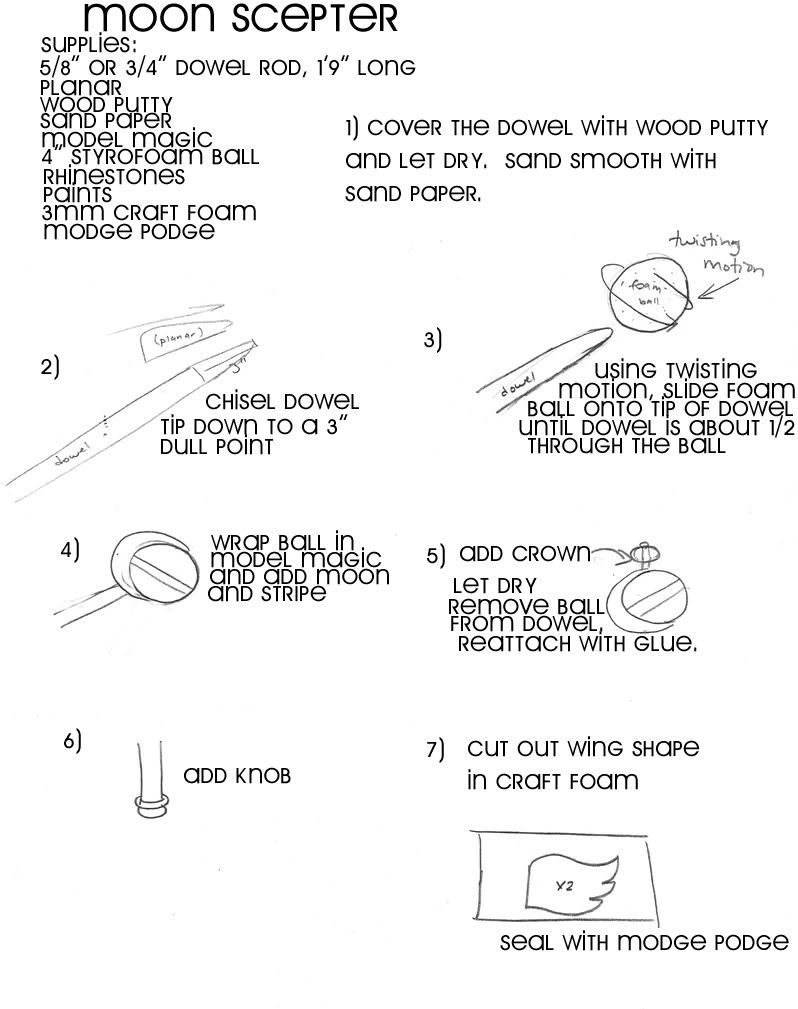
Moon's 2nd season wand
Difficulty: **
::EDIT NOTES:
This should say 3/4" or 1" dowel, rather than 5/8" or 3/4" dowel. 5/8" is WAAAAAAAAY too thin!
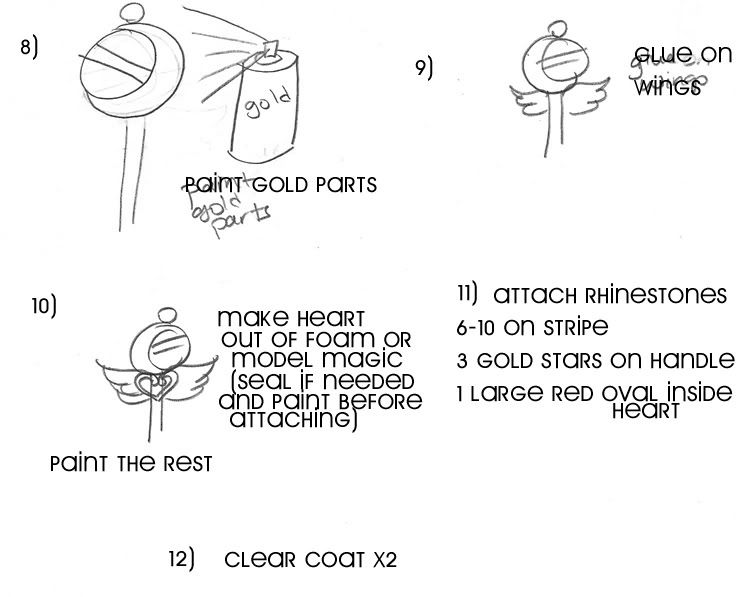
Finished Product
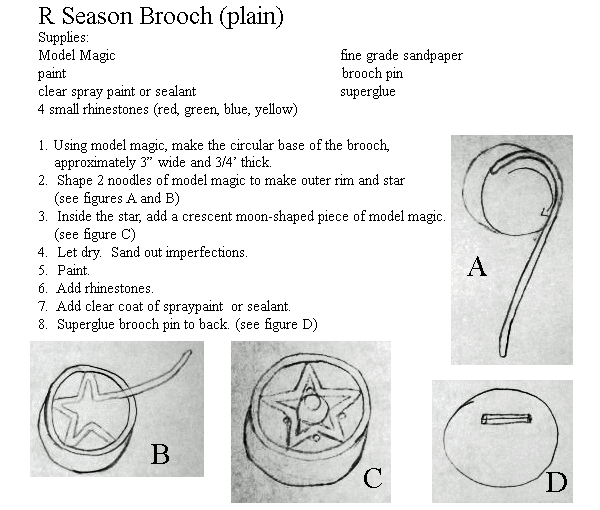
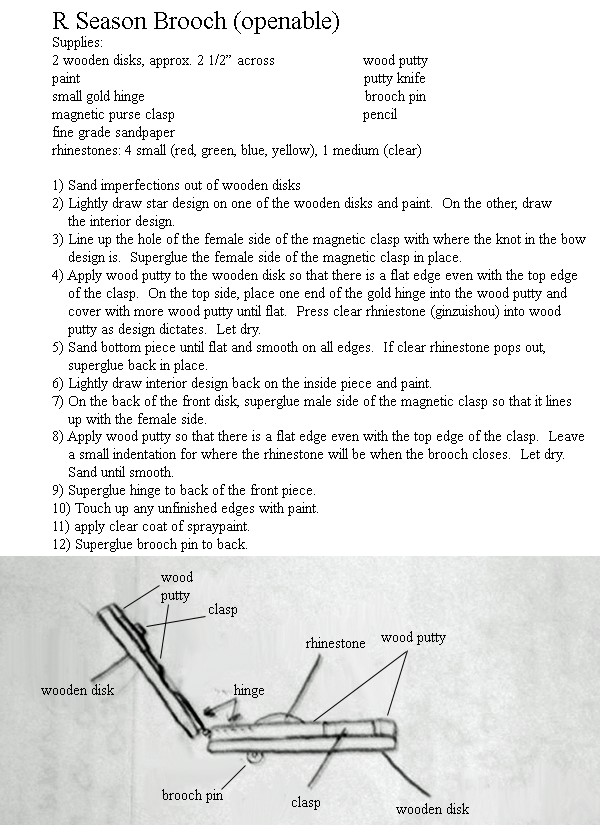
Moon's 2nd season brooch
Difficulty: * (non-openable), **** (openable)
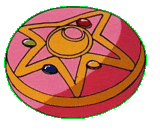
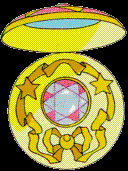
Finished product
Finished product
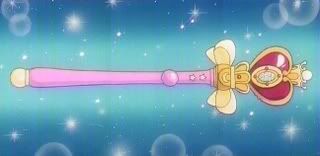
Moon's 3rd season wand
Difficulty: ****
::EDIT NOTES:
This should say 3/4" or 1" dowel, rather than 3/4" or 5/8" dowel. 5/8" is WAAAAAAAAY too thin!
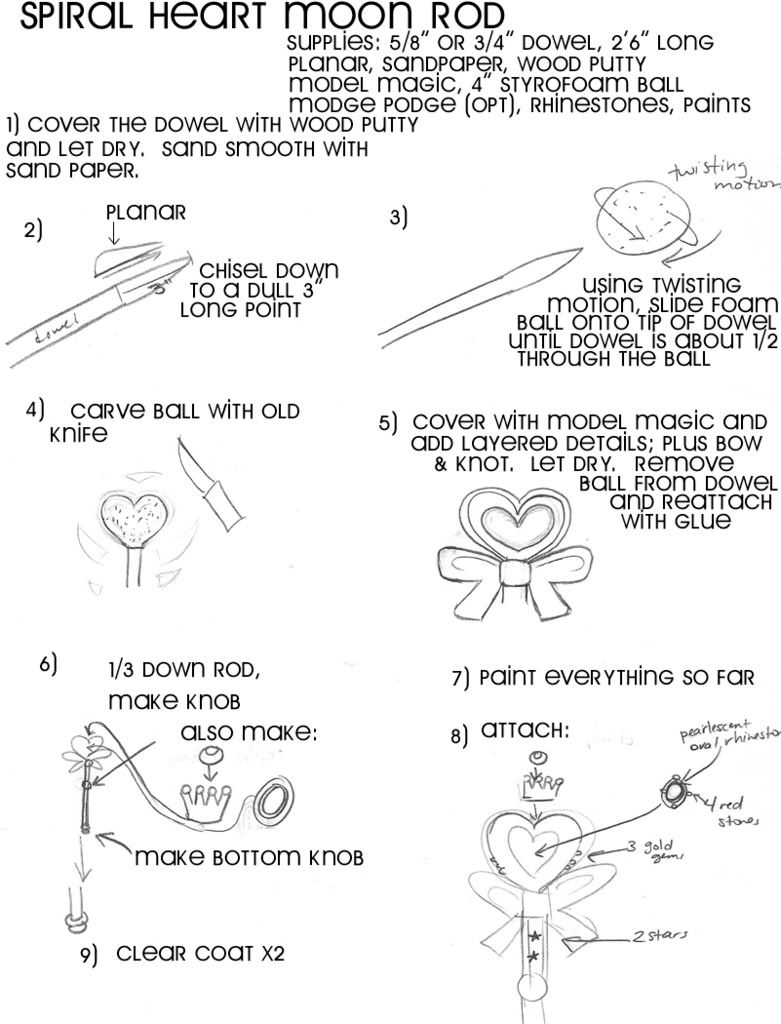
::EDIT::
I forgot to draw the "petal crown" part between the bow and heart. I knew something looked weird, but that's what happens when you're drawing up a tutorial from memory and you don't have any pictures to look at! :P Basically, you want to make 6 U-shaped petals with a thumb imprint so they curve outward and have dimension. Let them dry separately. Then glue them together to the wand in the space between the bow and heart. If the pieces are too big to go around the stick, use sandpaper to grind them down to size. If they're too small, fill in one of the gaps with caulk either in the back or on one of the sides where the bow will cover it.
Finished Product
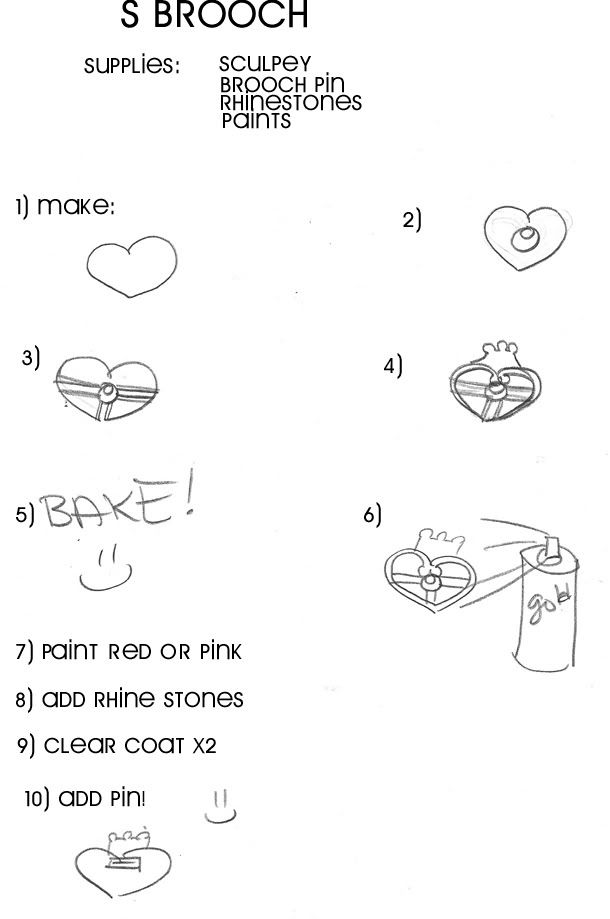
Moon's 3rd season brooch
Difficulty: **



Finished Product
Moon's 4th season brooch: anime
Disclaimer: I've never made this prop myself. This tutorial is solely based on previous experience and speculation.
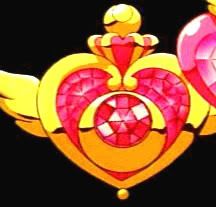
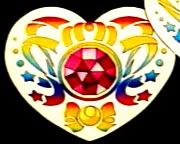
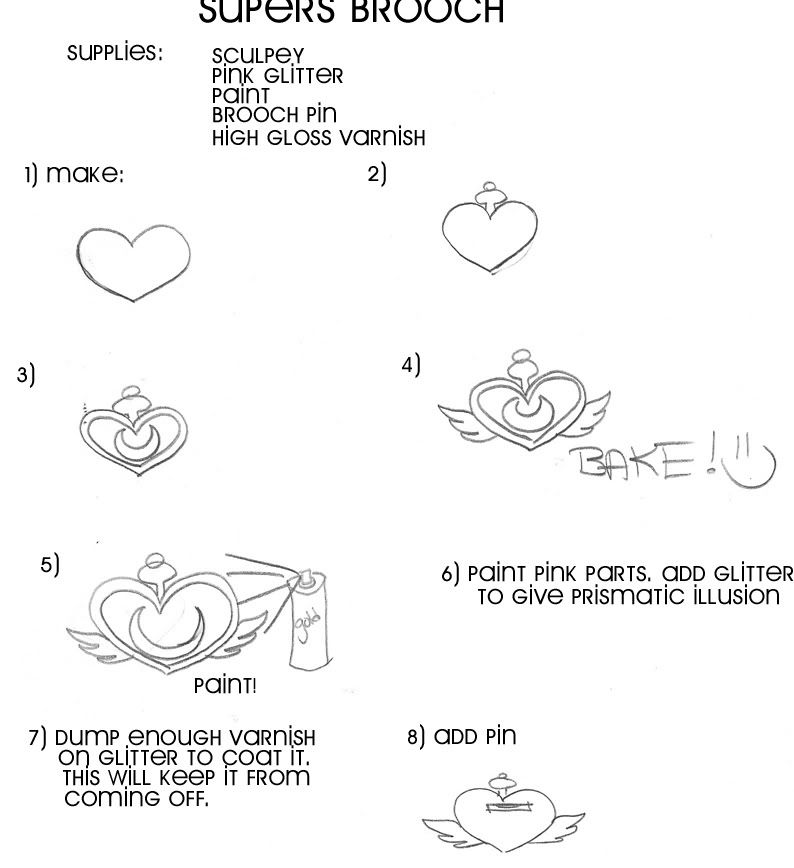
Note: Pink seed beads can used instead of glitter, to add more dimension. I suggest using high-temp hotglue to attach them. (Practice is good! ^_^)
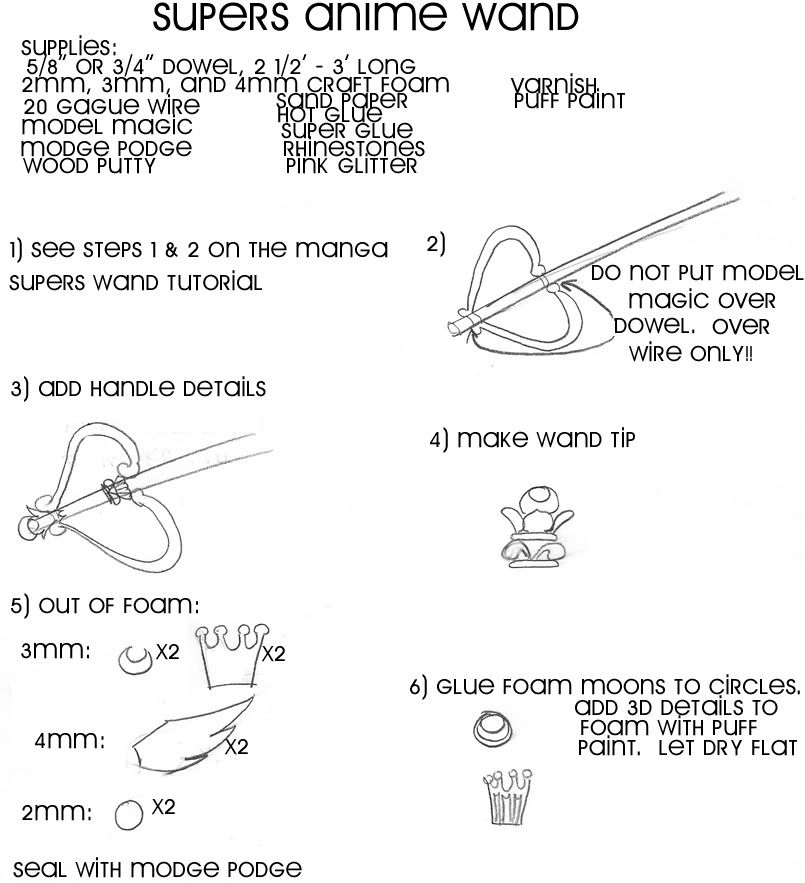
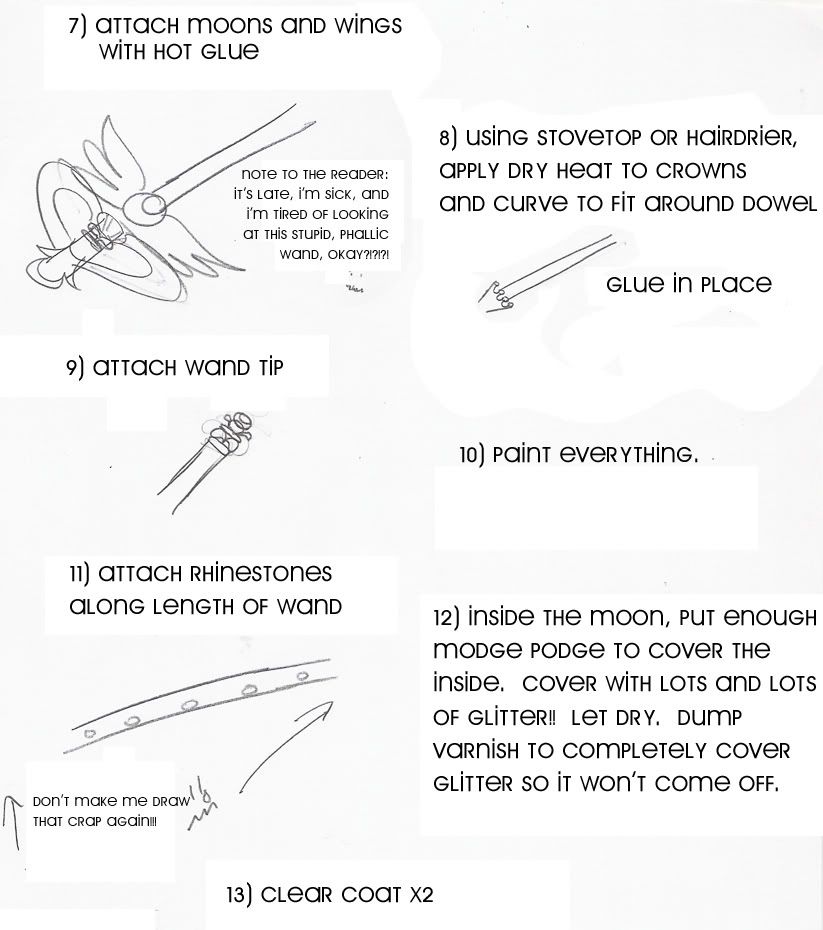
Moon's 4th season wand: anime
Disclaimer: I've never made this version of this prop myself. This tutorial is solely based on previous experience and speculation.
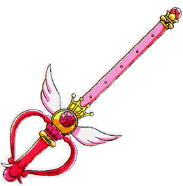
::EDIT NOTES::
This should say 3/4" or 1" dowel, rather than 3/4" or 5/8" dowel. 5/8" is WAAAAAAAAY too thin!
Moon and Chibi Moon's 4th season wand: manga
Difficulty: ****
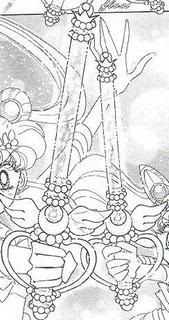
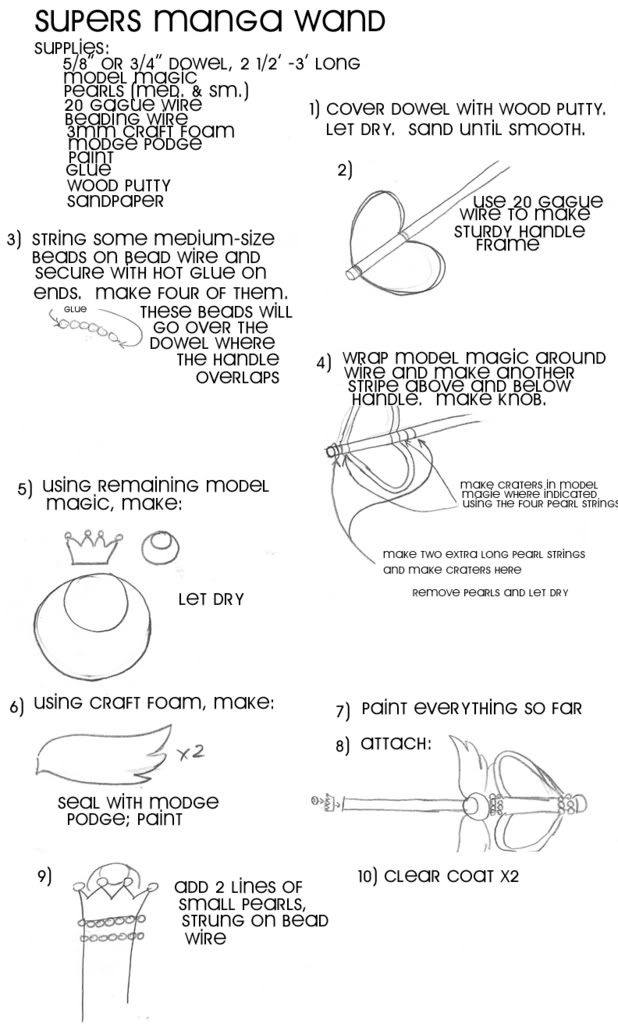
::EDIT:: Use 4mm craft foam for the wings! If you can't find 4mm, use 3mm and stiffen it by pasting on some organza as seen in the Neo Queen Serenity anime crown or Tuxedo Kamen mask tutorial.
::EDIT2::
This should say 3/4" or 1" dowel, rather than 3/4" or 5/8" dowel. 5/8" is WAAAAAAAAY too thin!
Finished Product
Model: windofthestars
Progress Pictures: 1, 2, 3, 4, 5, 6, 7
Note: The wings on this wand were made of model magic, but I suggest foam in the tutorial because now that I know better, I think that's actually EASIER!! ;_______;
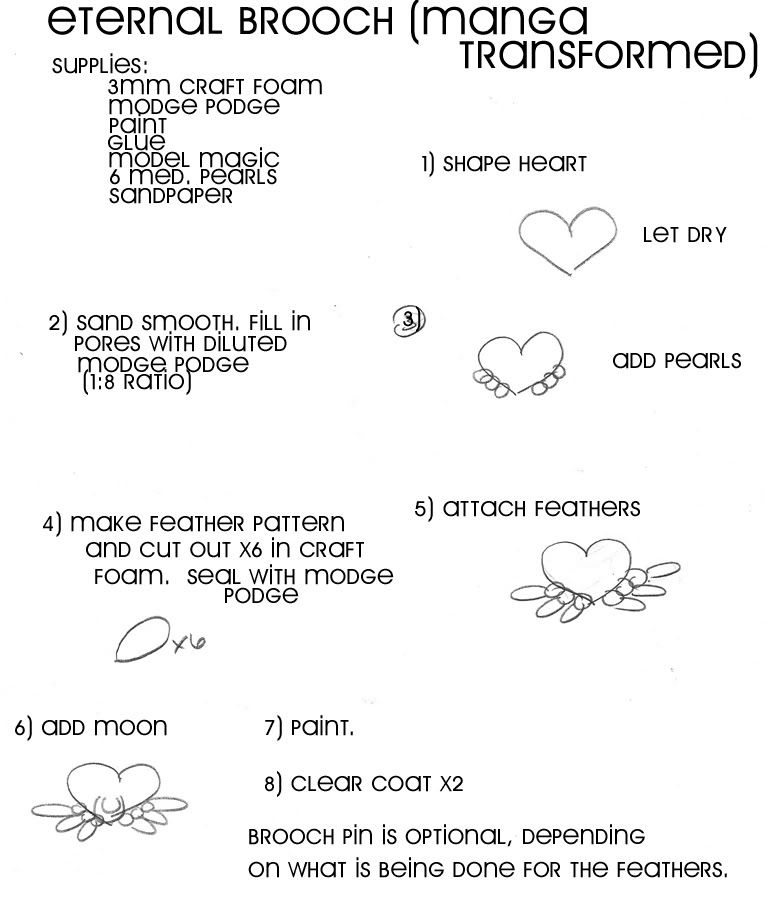
Moon's 5th season brooch
Disclaimer: I've never made this prop myself. This tutorial is solely based on previous experience and speculation.
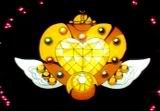
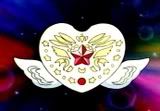
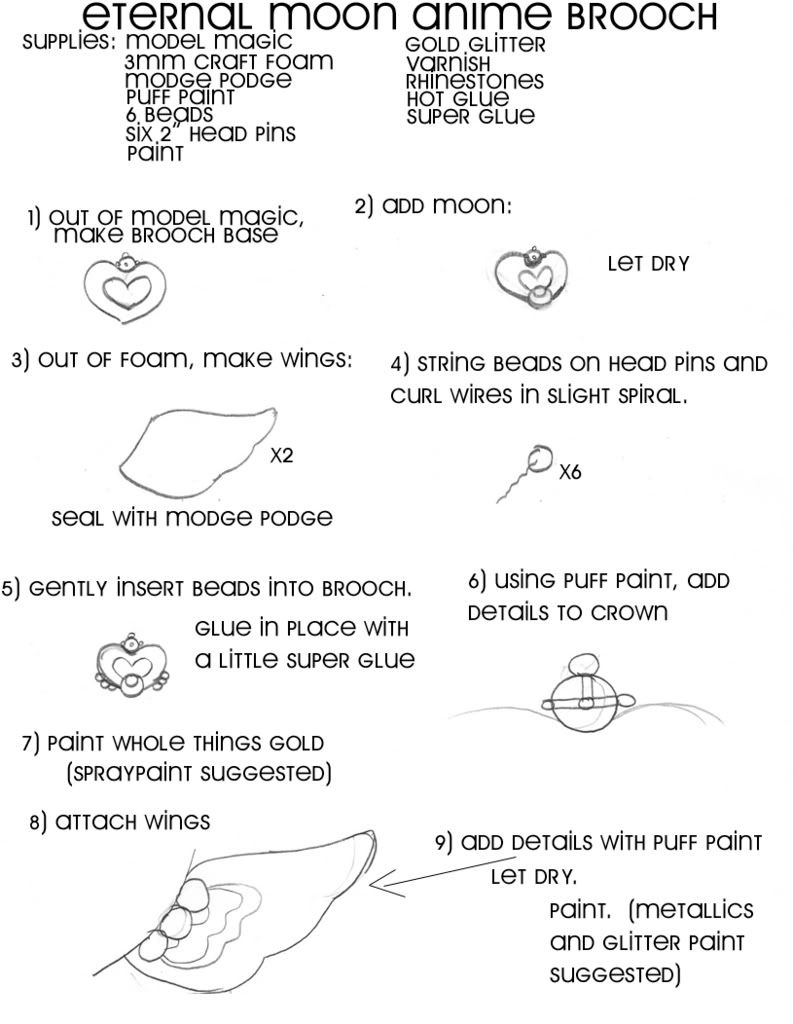
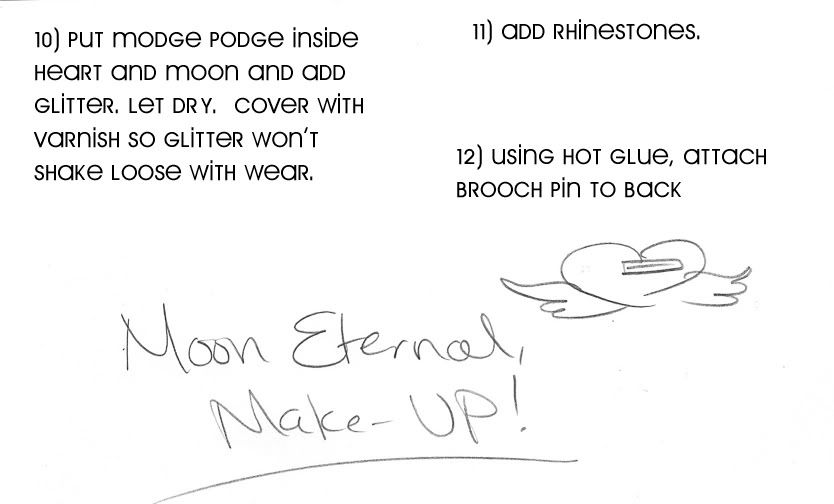

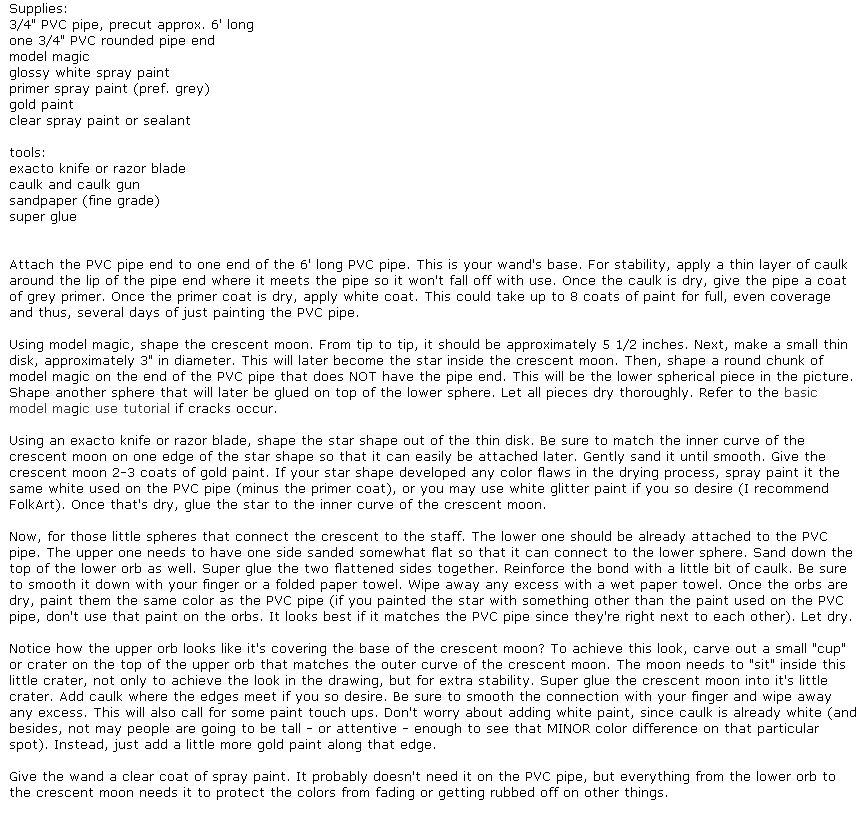
Moon's tall crescent wand from the artbooks
Difficulty: **
Reference picture:
Finished product
(Note: I added pearls to my staff between the orbs as a personal touch. You can barely see them in that picture, but that's just in case you were wondering what that was. ^_^)
Neo Queen Serenity's crown
Manga:
Difficulty: ****
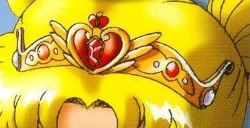
1)
2)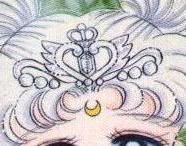
(Note: Version one is the one most commonly seen throughout the manga. Version two only appears in this picture and maybe one or two others in the artbooks.)
Supplies:
Sculpey
20 gague wire
reference picture that is printed out to-scale
glossy white paint
clear spray paint or sealant
white pearls of different sizes
2 hair combs (from the bridal section of your local craft store)
Tools:
wire cutters
clay working tools
caulk and caulk gun
baking sheet
super glue
What makes this prop so difficult to make is the initial clay work and shaping involved. It's very time consuming, so a lot of patience is needed. For purposes of this tutorial, I will be providing pictures as if version two were being made.
First, print out your reference picture. The picture of the crown should be about 4 1/2 - 5" wide, just to give you a general idea.
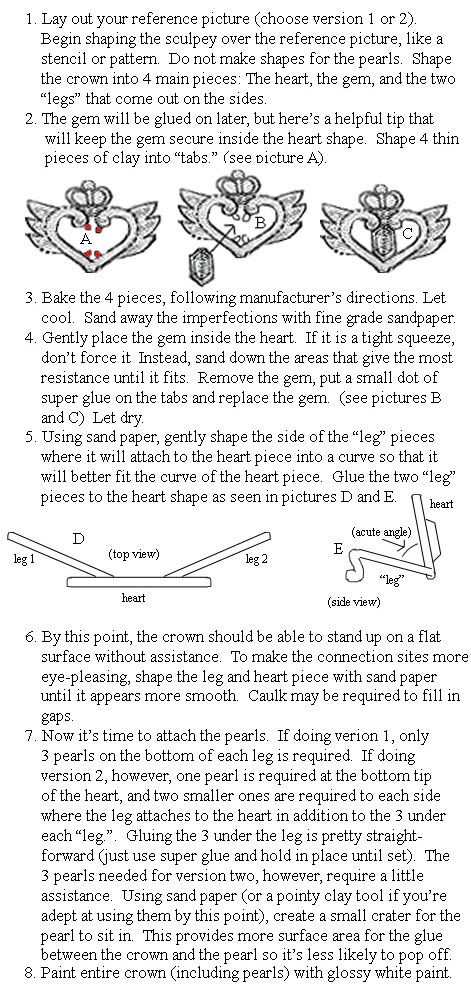
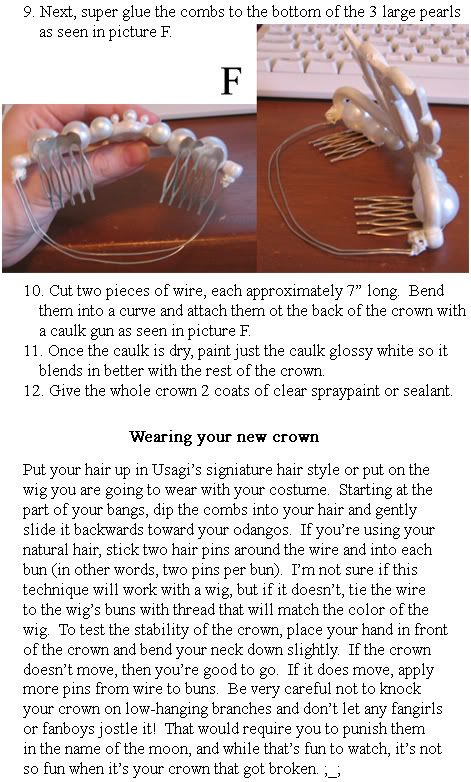
Important notice! When I made this tutorial, I forgot to add a teeny tiny minor detail! ^_^;; On the back of the crown where the tabs are attached, it's probably a good idea to reinforce those with a little bit of caulk over them. That way you've got some guaranteed stability. Sorry for the confusion!
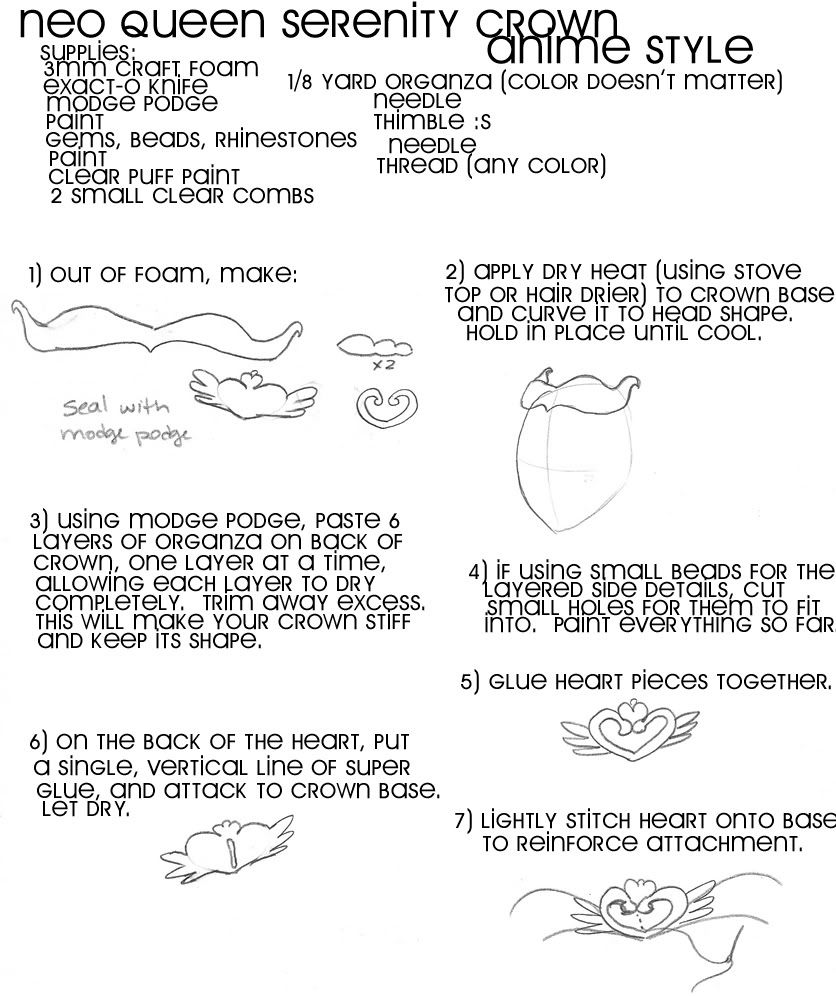
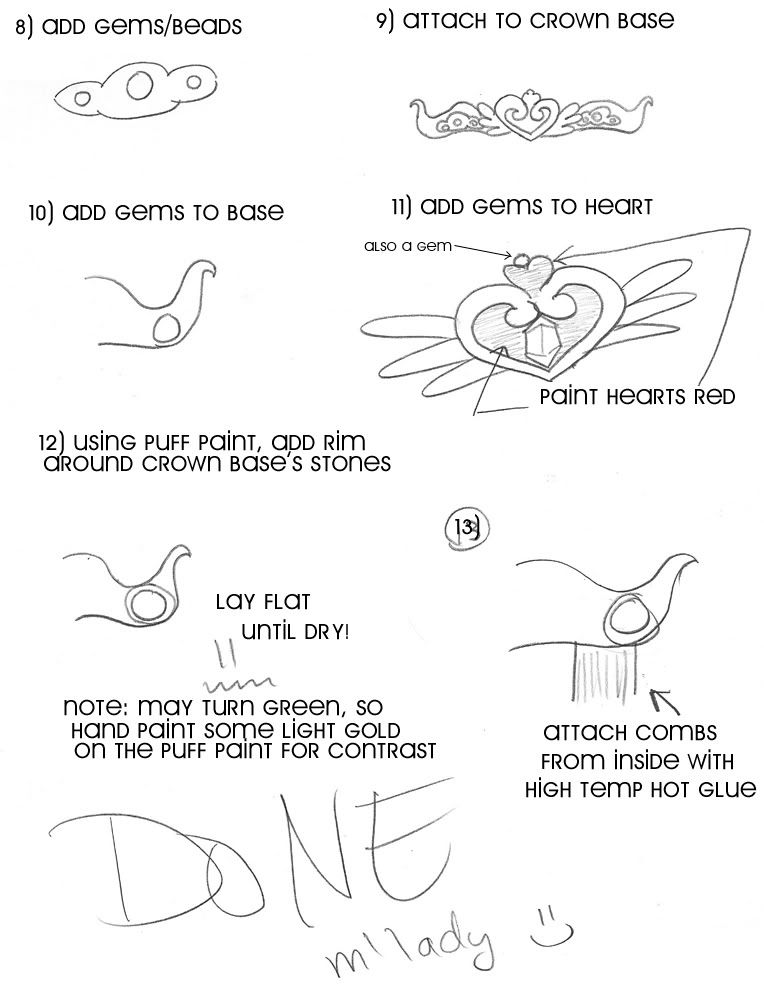
Anime:
Difficulty: ***
Finished Product
King Endymion's medals
Difficulty: *
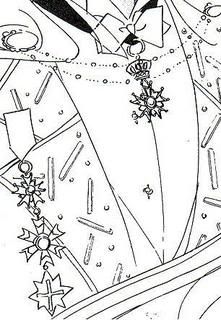
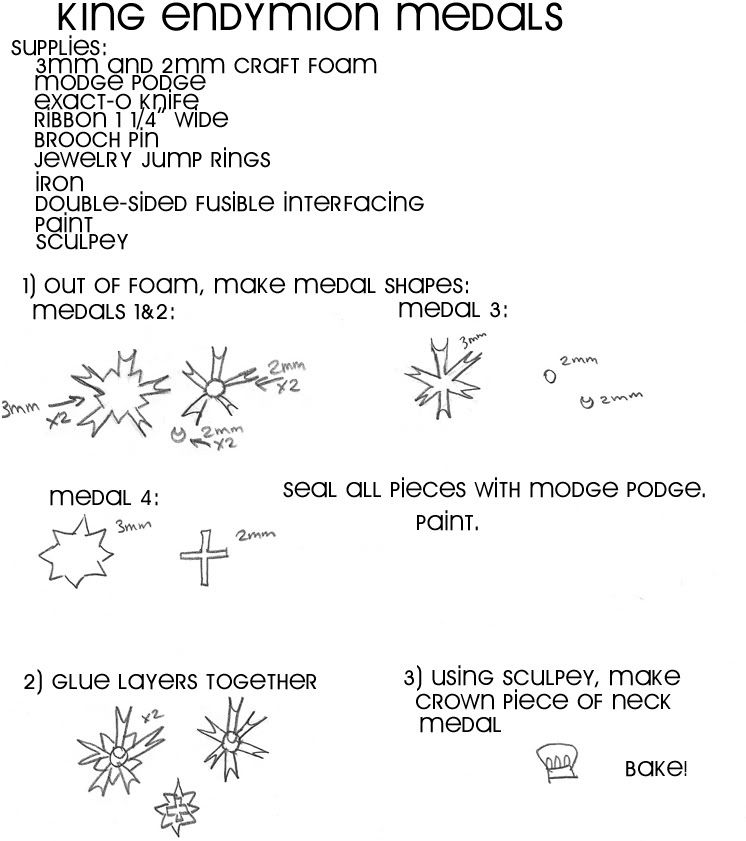
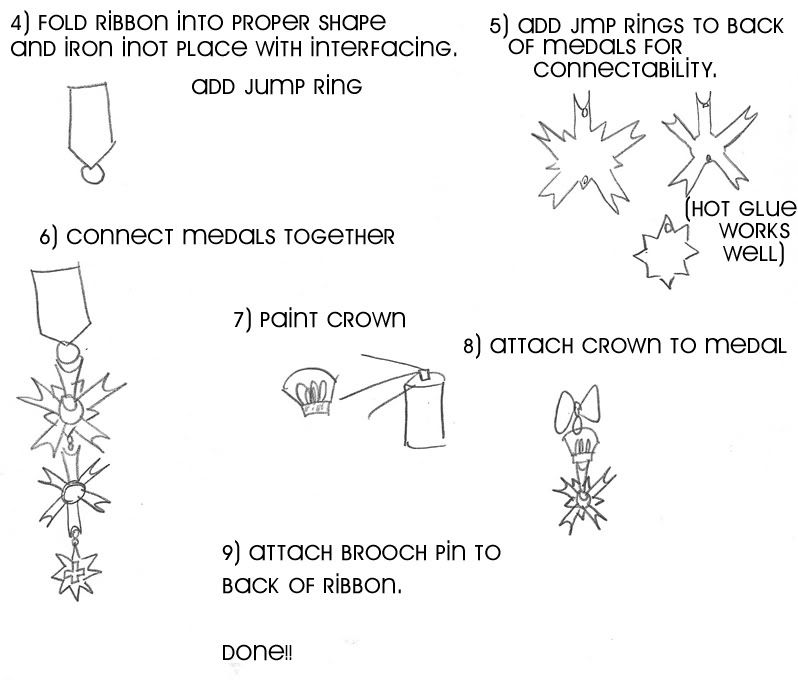
King Endymion's staff
Difficulty: ****

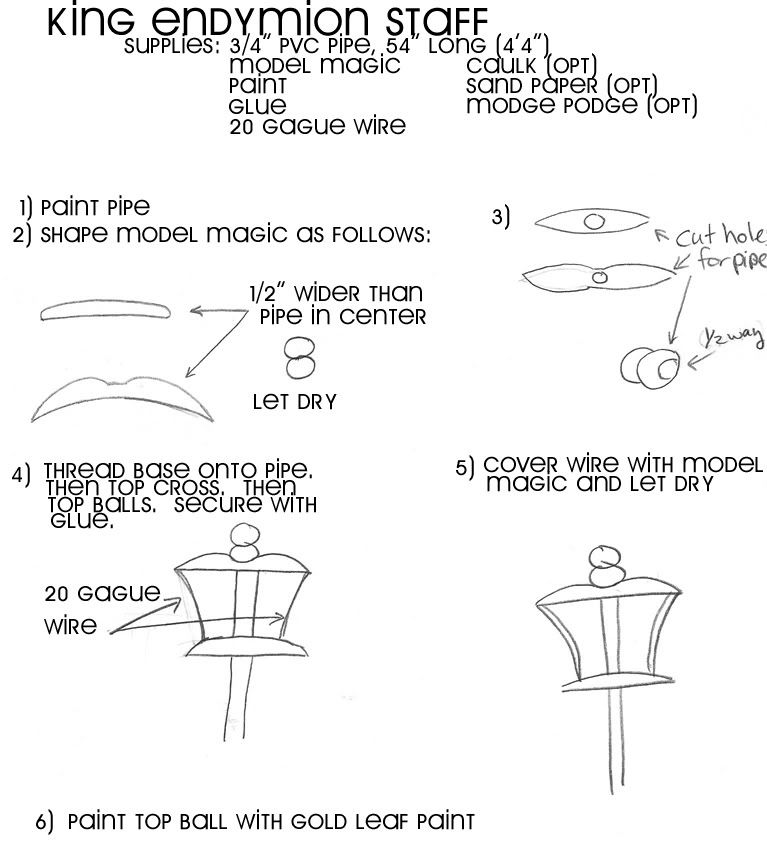
Note: the length of the PVC pipe is sized for my husband who is 6'2". Adjustments may be needed for men of different heights.
Finished Product
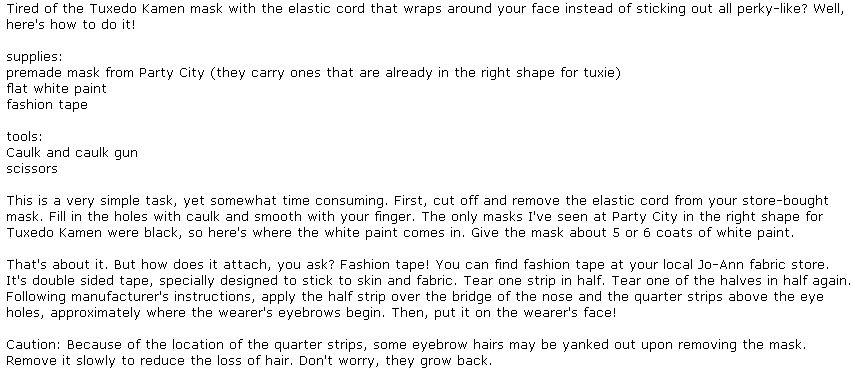
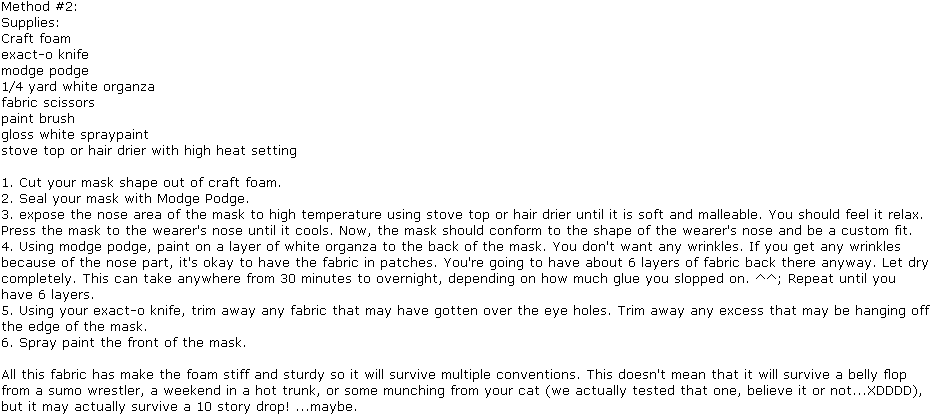
Tuxedo Kamen's mask
Difficulty: *

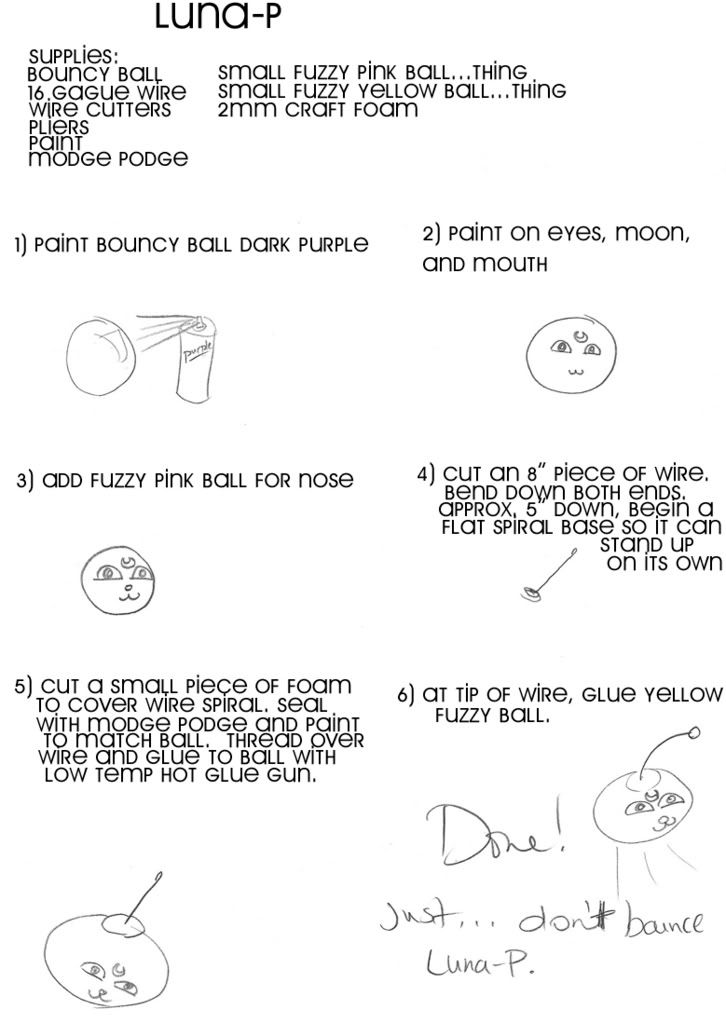
Luna-P
Disclaimer: I've never made this prop myself. This tutorial is solely based on previous experience and speculation.

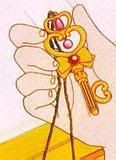
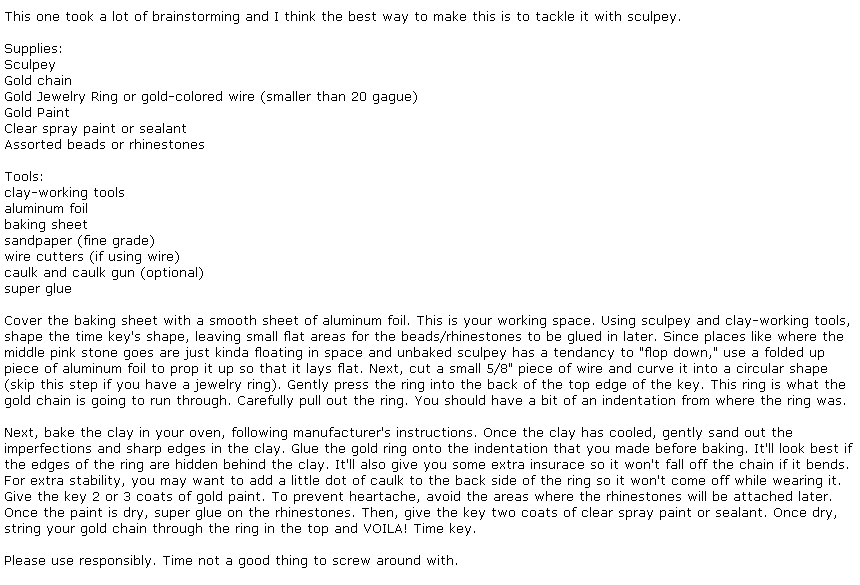
Chibi-Usa's Time Key
Disclaimer: I've never made this prop myself. This tutorial is solely based on previous experience and speculation.
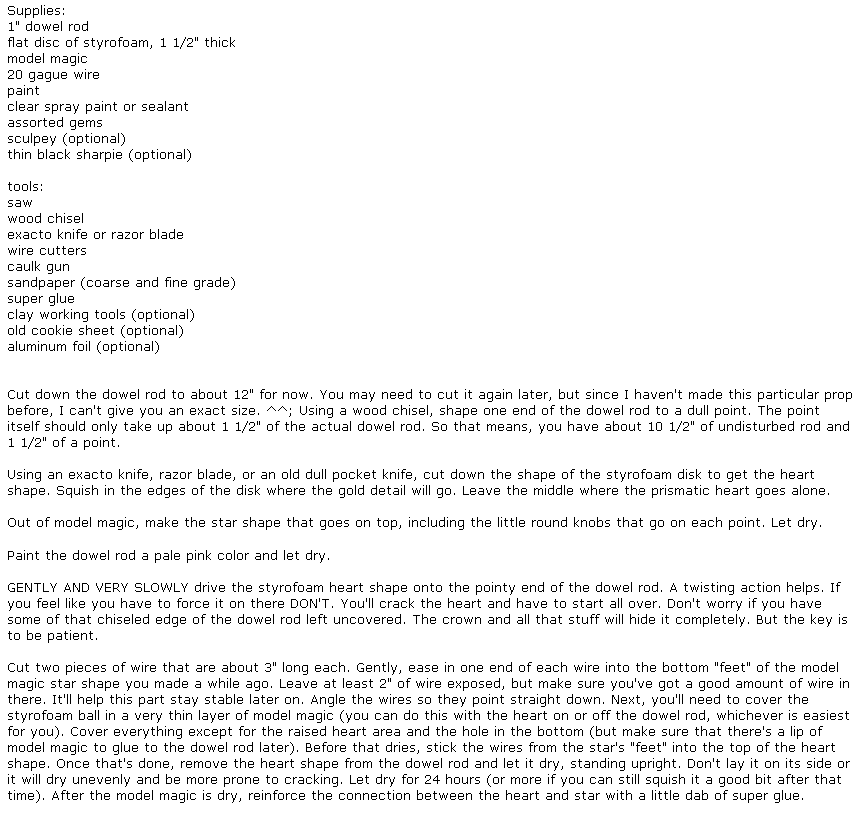
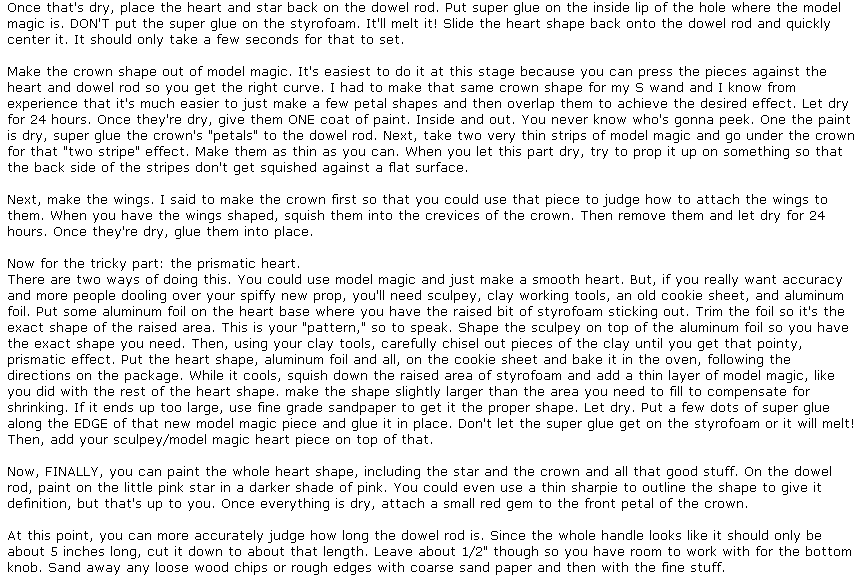
Chibi Moon's 3rd Season Wand
Disclaimer: I've never made this prop myself. This tutorial is solely based on previous experience and speculation.
reference picture:
There aren't many decent full pictures of this wand out there, but the bottom knob looks exactly like Moon's wand in the S season. Make the bottom knob out of model magic (see my 1st season wand). Then, add two clear coats of spray paint to the whole wand!
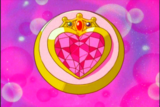
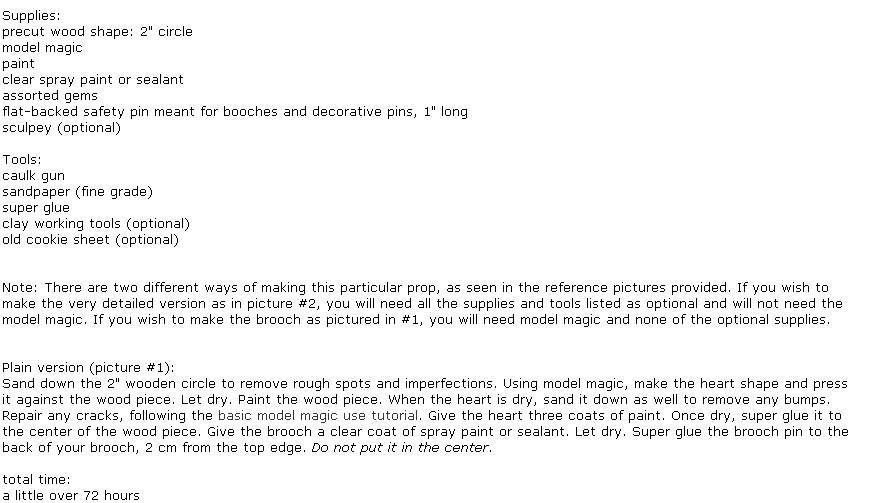
Chibi-Moon's 3rd season brooch
Disclaimer: I've never made this prop myself. This tutorial is solely based on previous experience and speculation.
reference pictures:
1.
2.

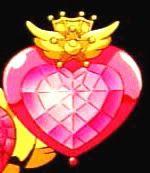
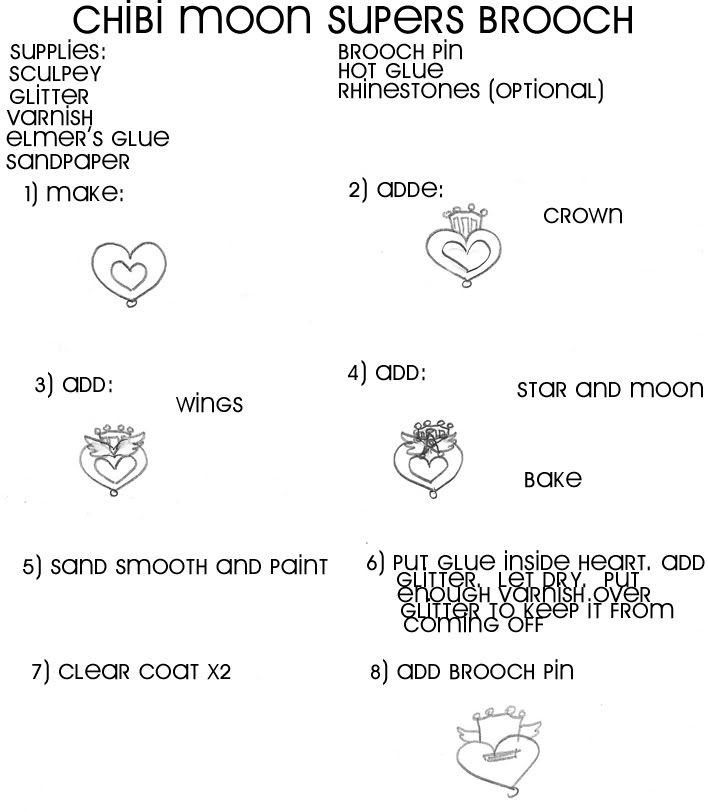
Chibi-Moon's 4th season brooch
Disclaimer: I've never made this prop myself. This tutorial is solely based on previous experience and speculation.

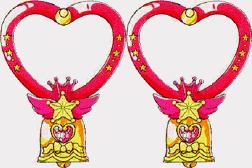
Chibi-Moon's Twinkle Bell: anime
(coming soon)
Disclaimer: I've never made this prop myself. This tutorial is solely based on previous experience and speculation.
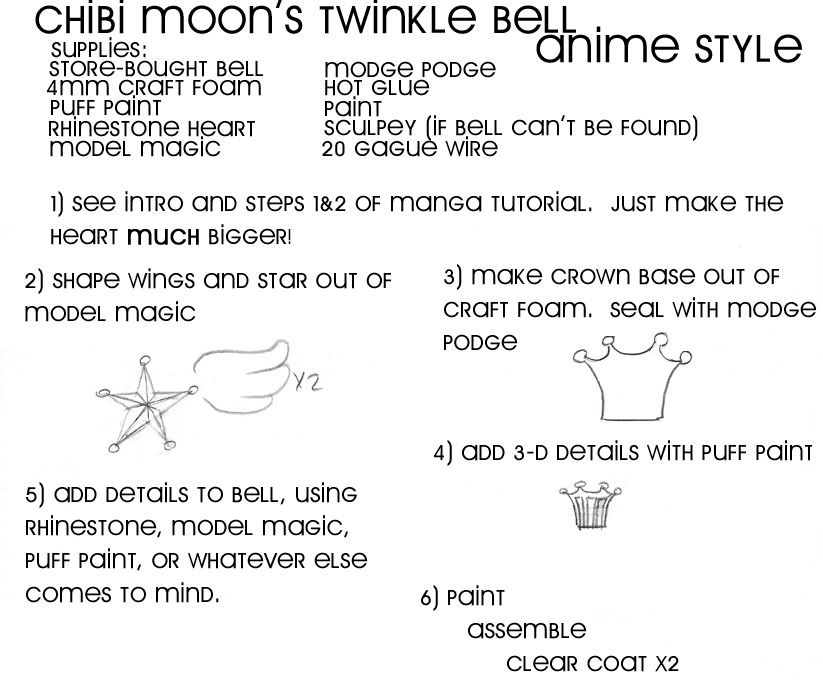
Chibi-Moon's Twinkle Bell: manga
(coming soon)
Disclaimer: I've never made this prop myself. This tutorial is solely based on previous experience and speculation.
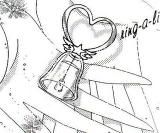

Generic inner senshi 1st henshin pen
Disclaimer: I've never made this prop myself. This tutorial is solely based on previous experience and speculation.
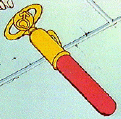
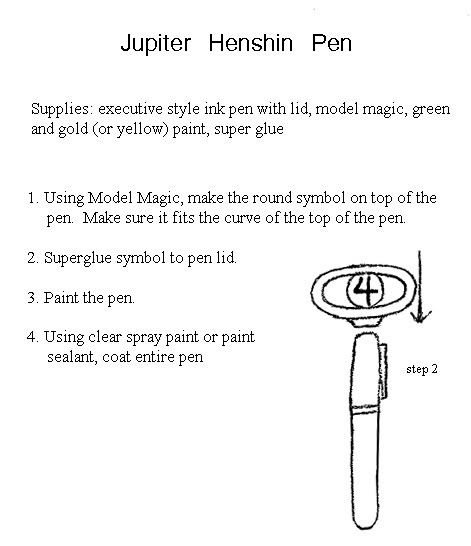
This tutorial was made for a friend of mine a few years ago. Replace "green" with whatever senshi's color that you're making. The same goes for the symbol.
Venus' manga henshin pen
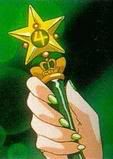
Disclaimer: I've never made this prop myself. This tutorial is solely based on previous experience and speculation. Since I have found no colored pictures of this prop, use your own color interpretation.
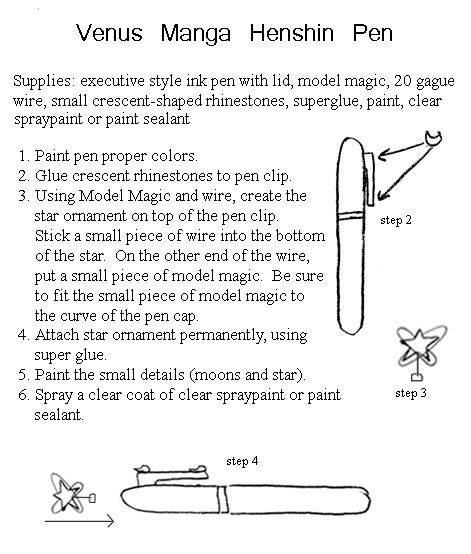
This tutorial was made for a friend of mine a few years ago. That's why it's laid out the way it is.
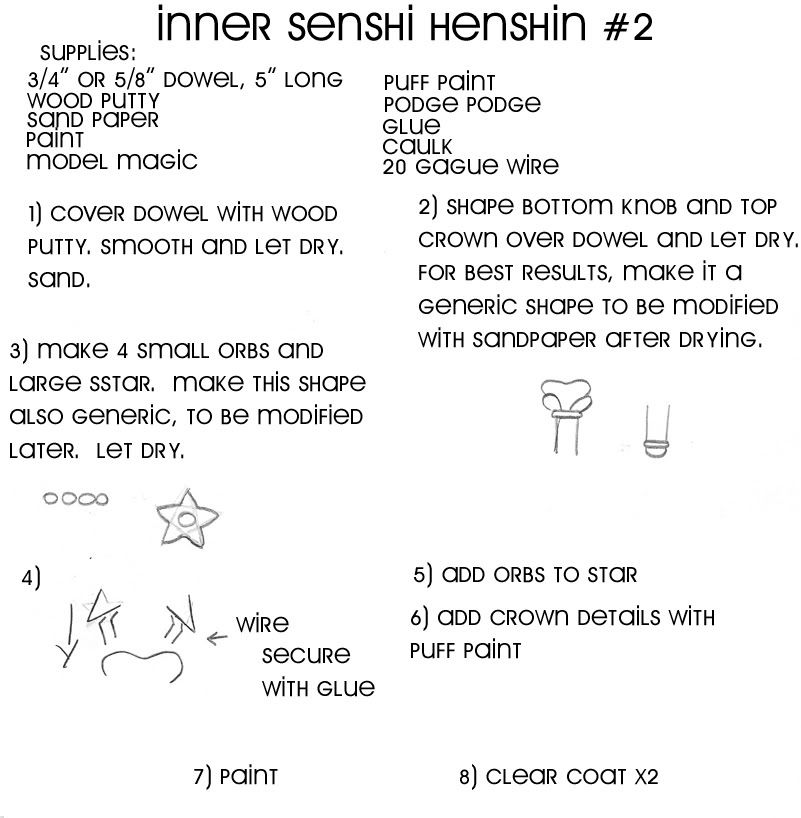
Generic inner senshi 2nd henshin wand
Difficulty: **
::EDIT NOTES:
This should say 3/4" or 1" dowel, rather than 3/4" or 5/8" dowel. 5/8" is WAAAAAAAAY too thin!
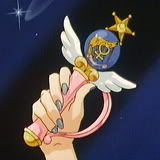
Unfortunately, I don't have a "finished product" picture to share. I made a Mars henshin wand as a gift for a friend a long time ago and I don't have a picture of it. ;______________;
Generic inner senshi 3nd henshin wand
Difficulty: ****
::EDIT NOTES:
This should say 3/4" or 1" dowel, rather than 3/4" or 5/8" dowel. 5/8" is WAAAAAAAAY too thin!
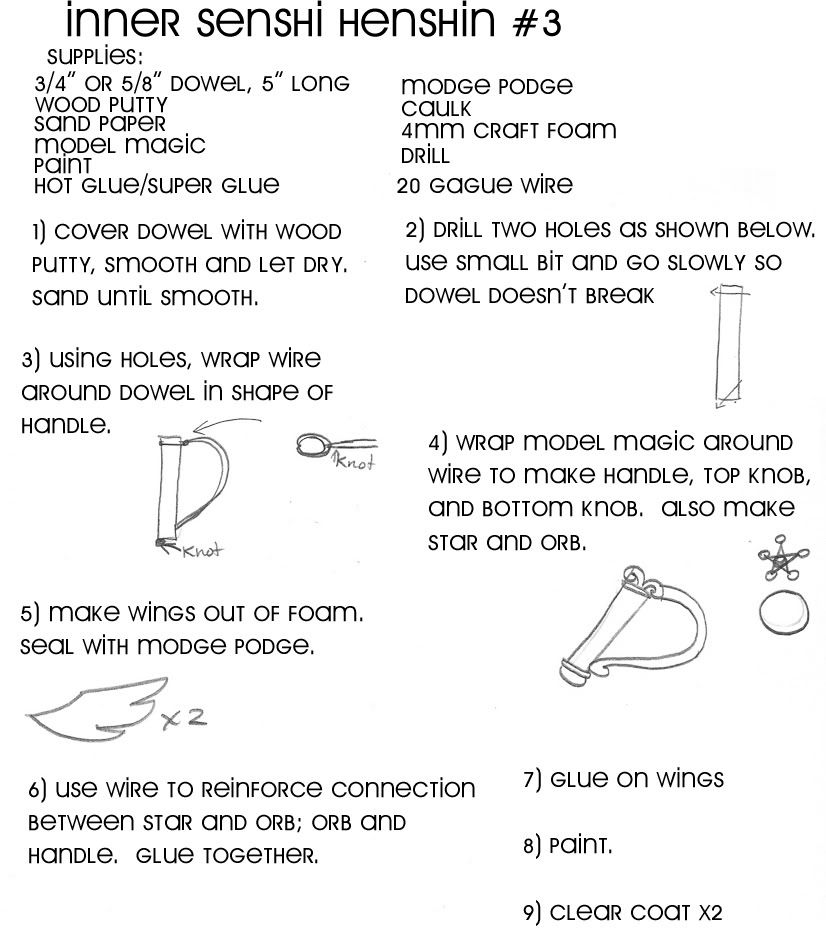
Finished Product (I made a resin ball of death with some sheet metal in the middle and used a PVC pipe handle, but the concept is similar.)
Generic round senshi brooch
Difficulty: *

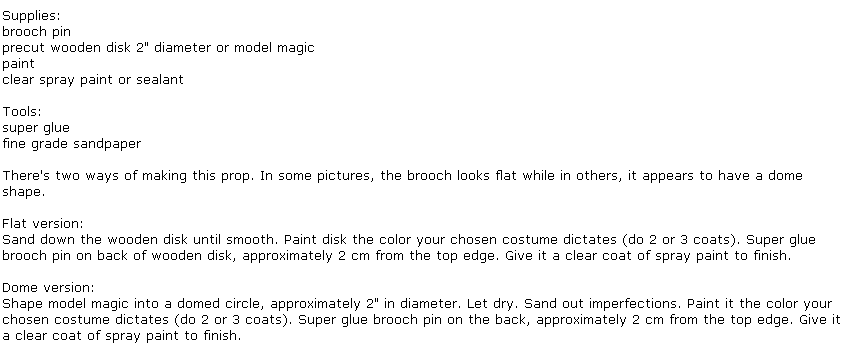
Generic heart-shaped senshi brooch
Difficulty: *


Outer senshi henshin wand
Uranus: *** Neptune: *** Pluto: **
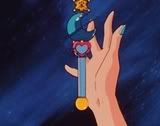

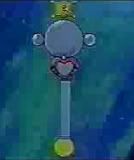
::EDIT NOTES:
1" dowel can also be used.
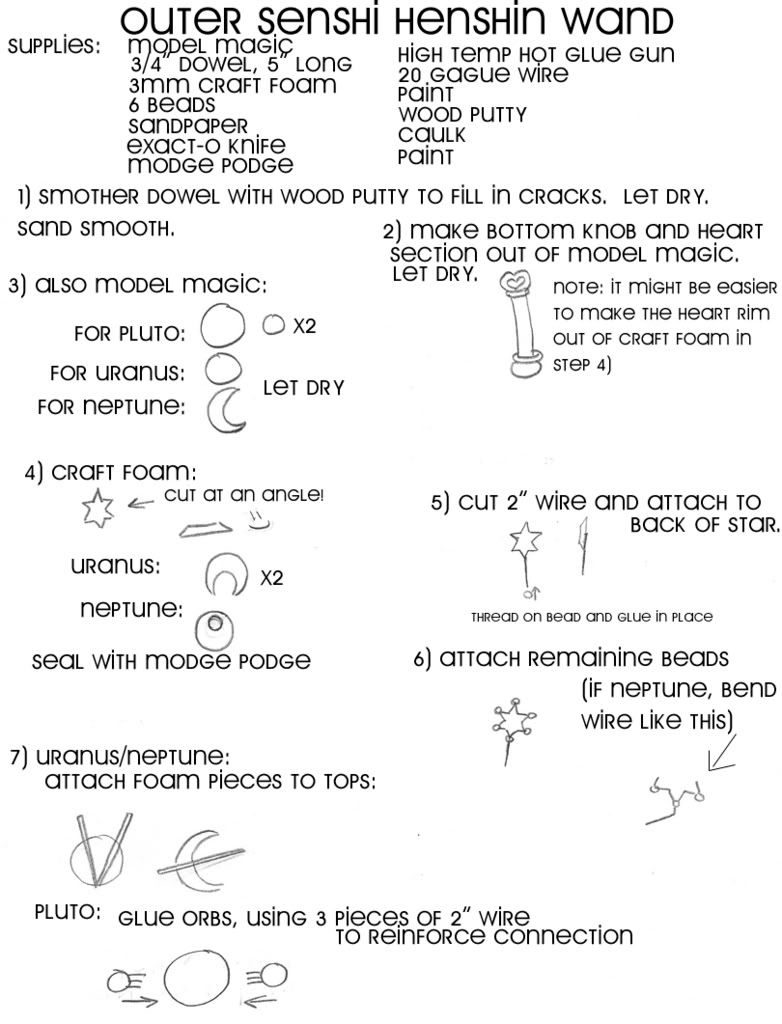
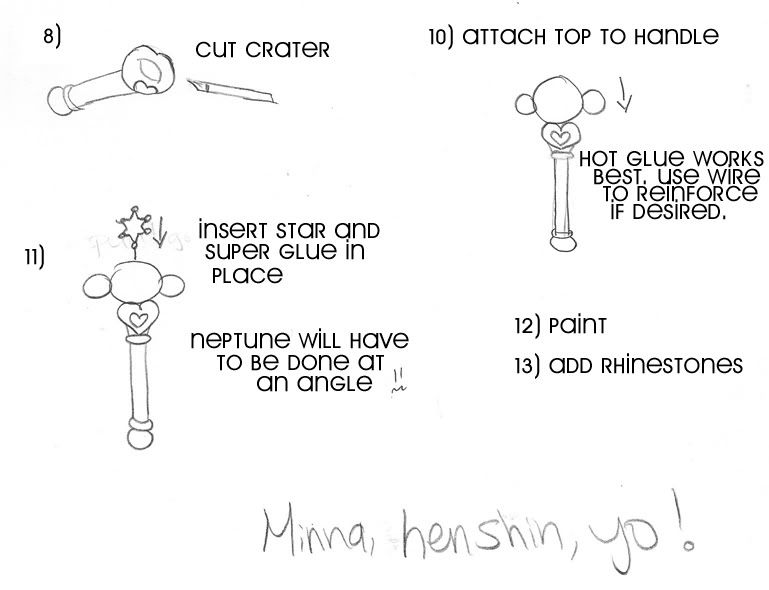
::EDIT:: In step 3, for Uranus and Pluto, make those balls with a styrofoam ball core and cover it in model magic.
Finished Product: Uranus
Finished Product: Neptune
Finished Product: Pluto
Since Saturn's wand is never really shown, you can most likely whip up your own design and make it based on the techniques in this tutorial. If you have any questions, feel free to ask. :)
Neptune's Deep Aqua Mirror
Difficulty: *****
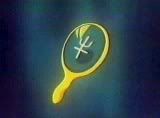

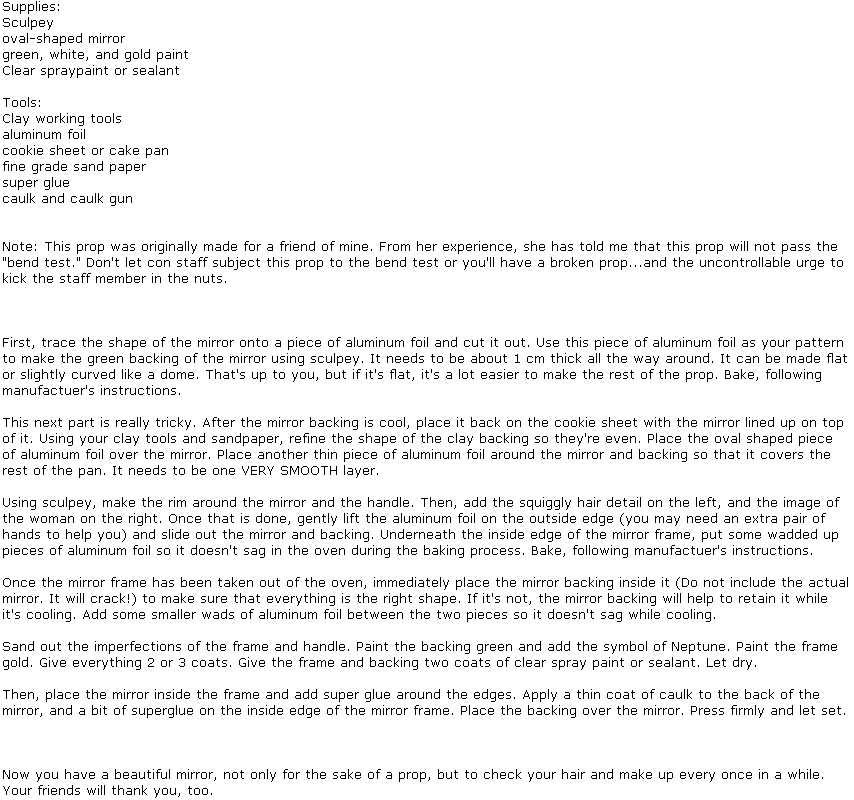
Finished Product
Black Crystal Earrings
Difficulty: *


ETA: The A.C. Moore where I bought these gems no longer carries them. I have a sneaking suspicion that A.C. Moore as a whole may have quit offering these.
Finished product
EDIT: I've discovered a new way of making these but, yet again, Michael's has clearanced all the supplies I used for them. :( I used charms and hot glued the wires onto the back, then attached the gem and earring clips.
Finished Product
Princess Kakyuu's Crown
Difficulty: *** (this was a commission)

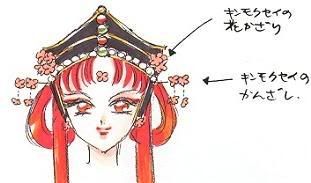

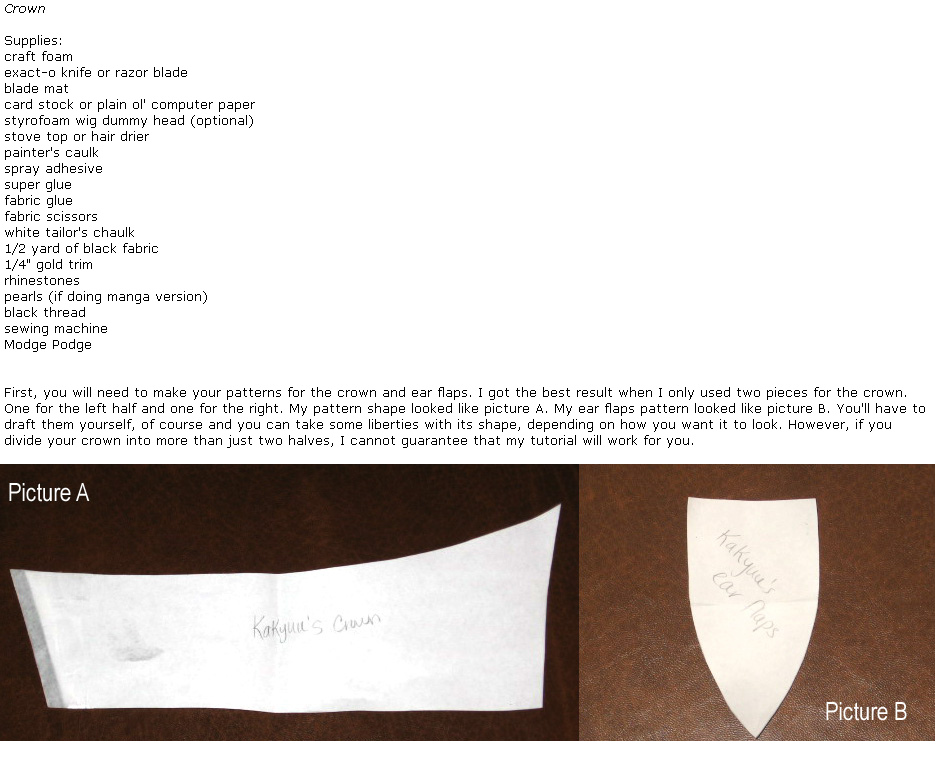
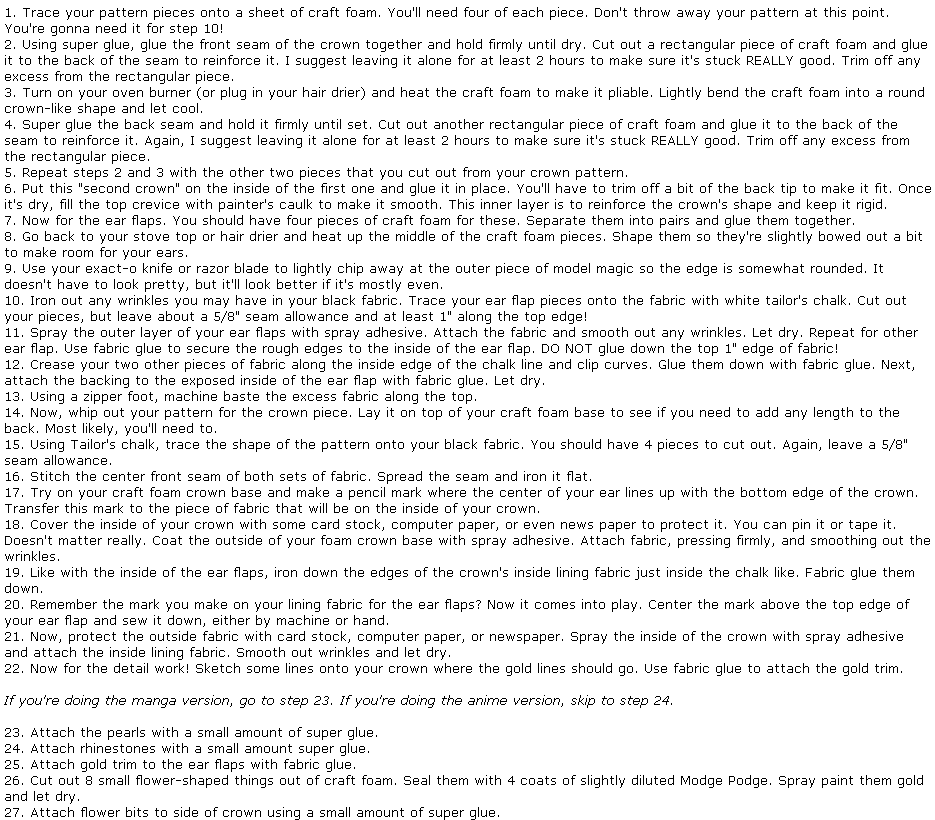
Finished Product
Sakura's Staff of Sealing
Disclaimer: I've never made this prop myself. This tutorial is solely based on previous experience and speculation.

::EDIT NOTES:
1" dowel can also be used.
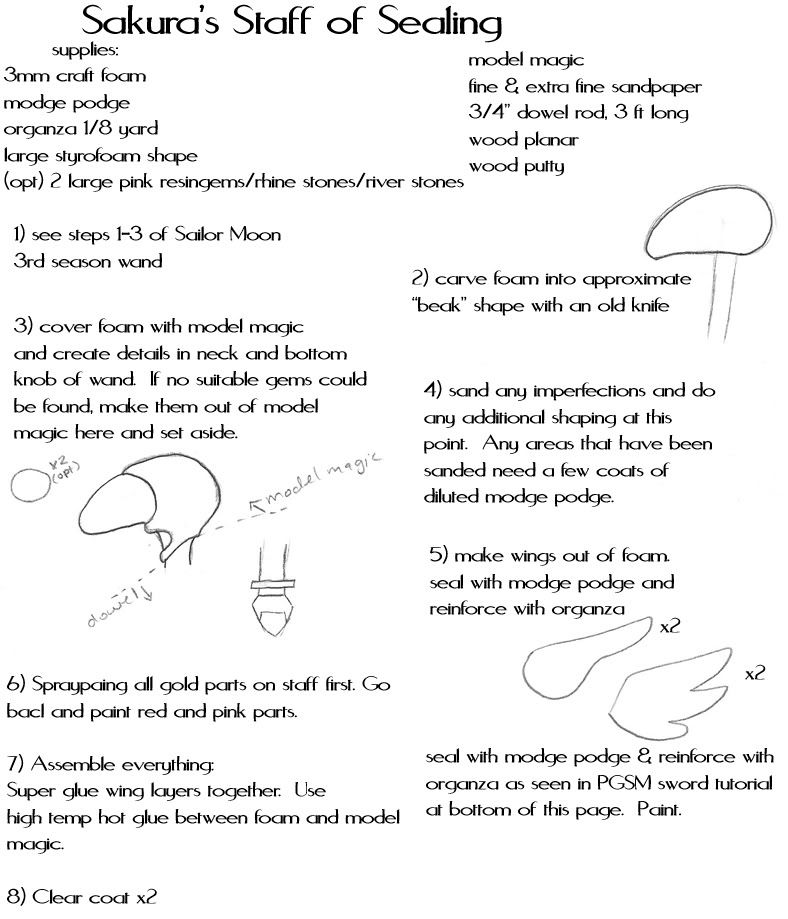
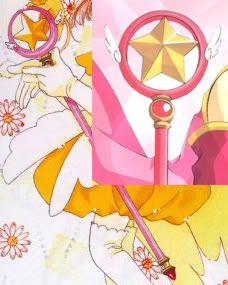
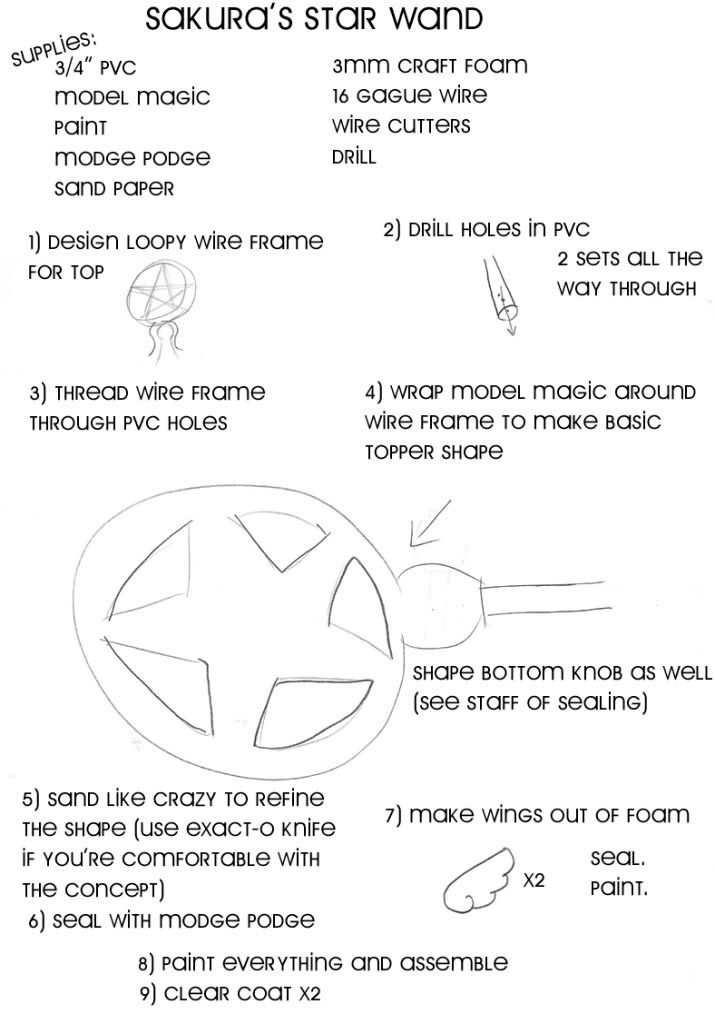
Sakura's Star Wand
Disclaimer: I've never made this prop myself. This tutorial is solely based on previous experience and speculation.

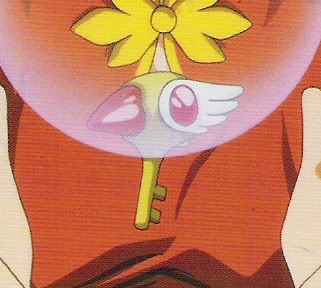
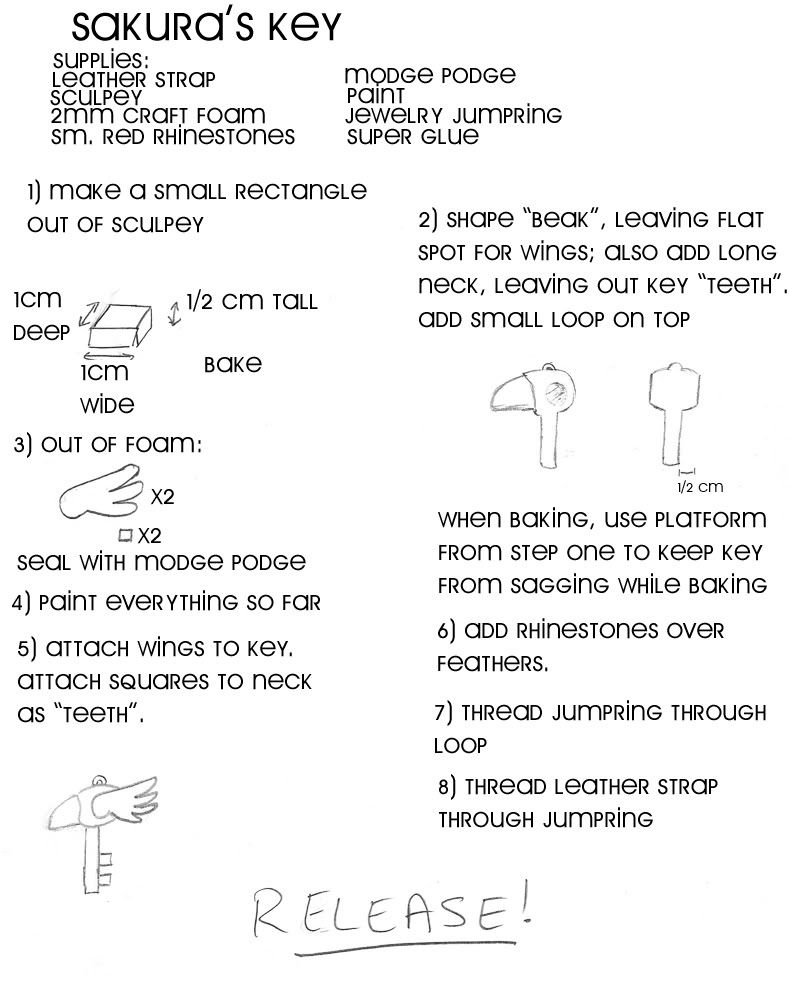
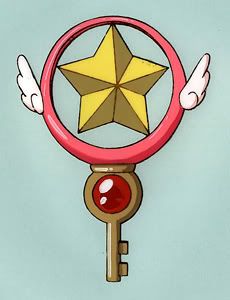
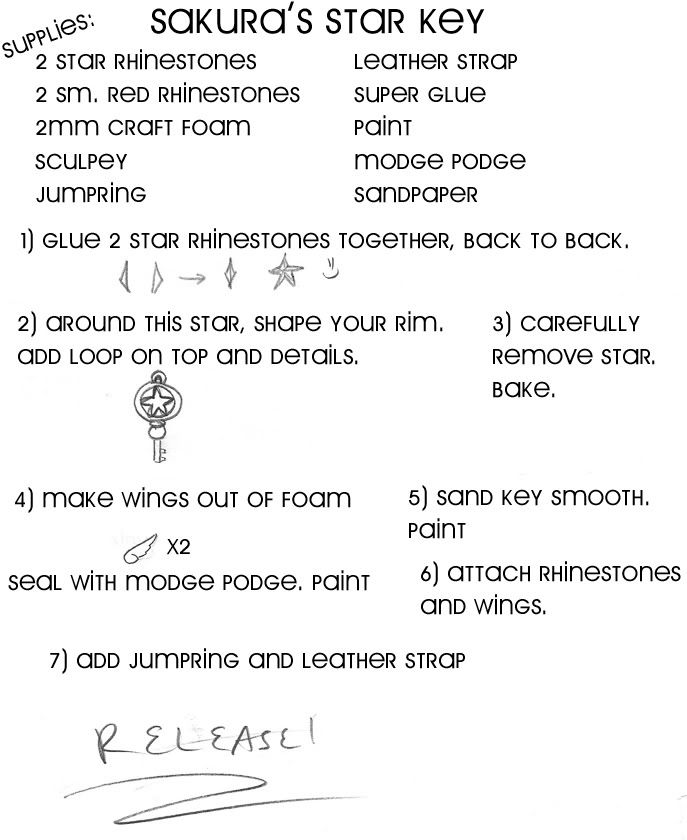
Sakura's keys
Disclaimer: I've never made these props myself. This tutorial is solely based on previous experience and speculation.
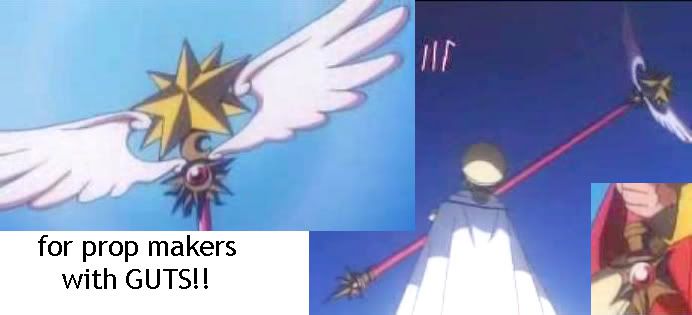
Sakura's really tall staff (episode 69)
Disclaimer: I've never made this prop myself. This tutorial is solely based on previous experience and speculation.
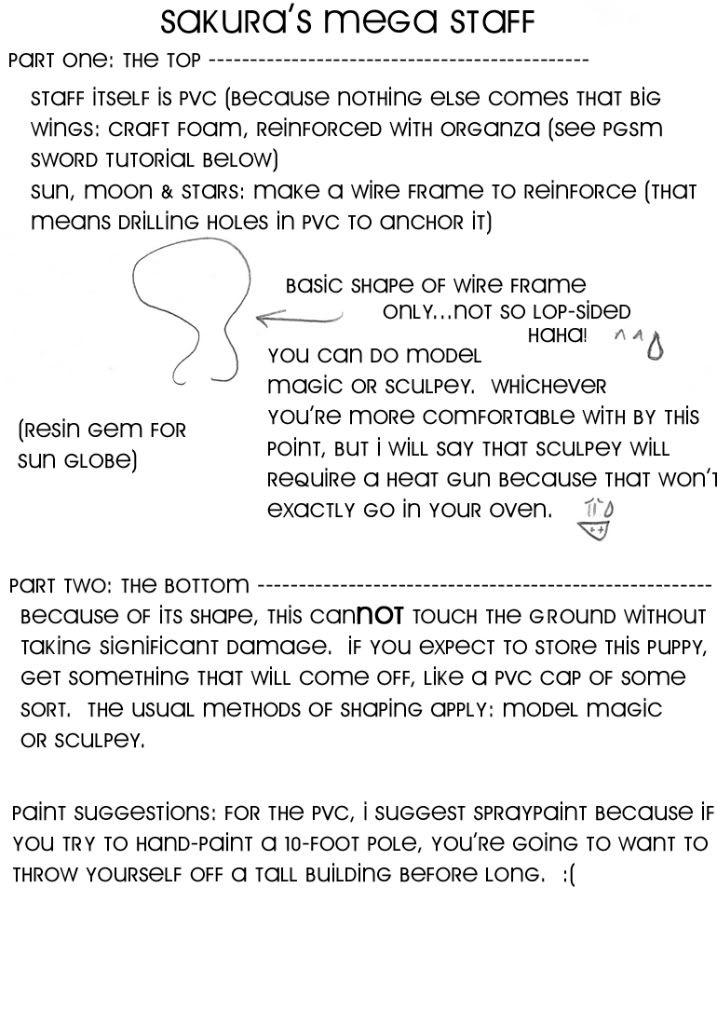
Note: I wrote this with the assumption that those attempting this prop would just need a hint, nudge, or an opinion, rather than needing to be led by the hand like a novice or beginner. This is a guide for the advanced audience out there and shouldn't be attempted unless you really know what you're doing and truly understand the mechanics behind making something of this size.
Have a prop from Sailor Moon, Card Captor Sakura, or some other anime to suggest? Leave a comment with some good, detailed pictures and I'll see if I can wrap my brain around it! :P
This is the place where suggestions have been given and then filled in my spare time!
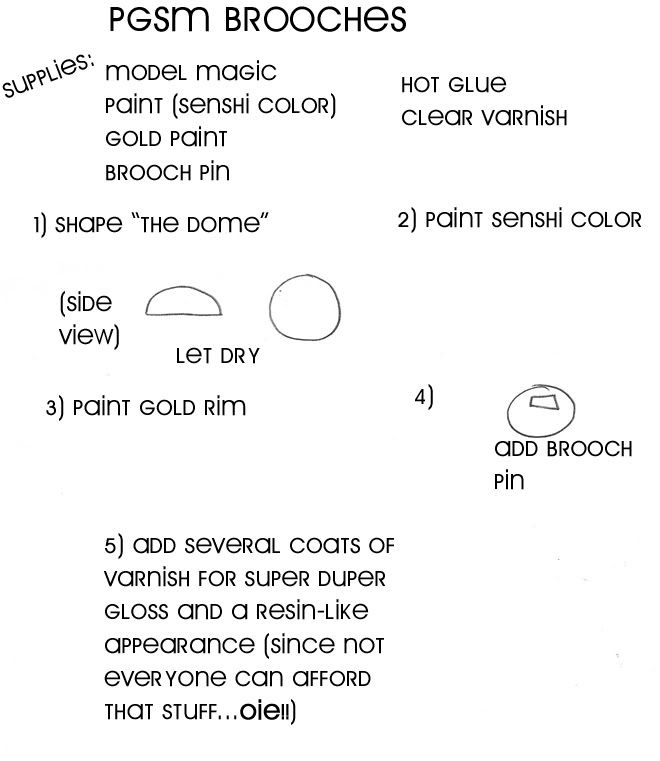
Generic brooches from the Live Action Sailor Moon Series
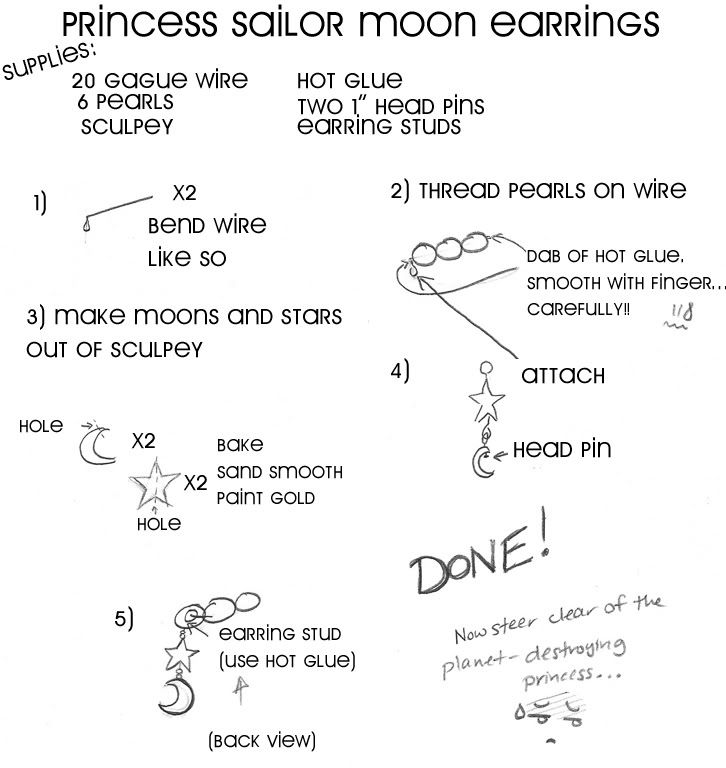
Princess Sailor Moon's Earrings from the Live Action Sailor Moon Series
Sailor Moon's earrings from the anime series
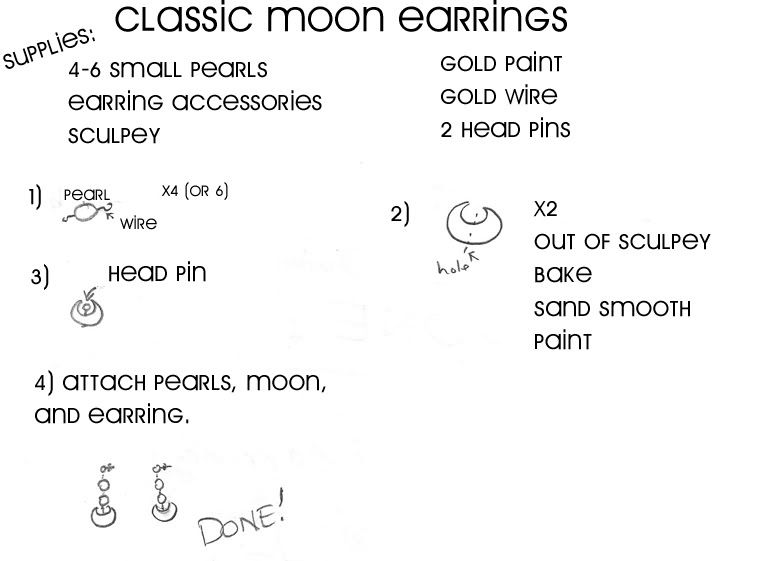
(a little modification can transform these into the manga style. Just throw in a sculpey star and you're good to go.)
Finished product
Super Sailor Moon's earrings from Bishoujo Senshi Sailor Moon
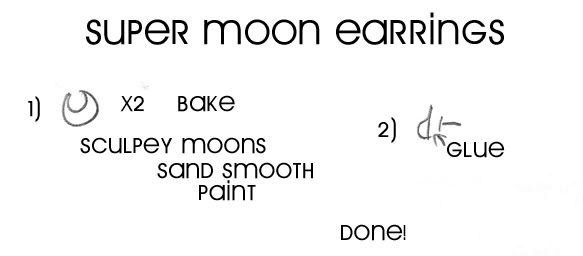
Finished product
Eternal Sailor Moon's earrings from Bishoujo Senshi Sailor Moon
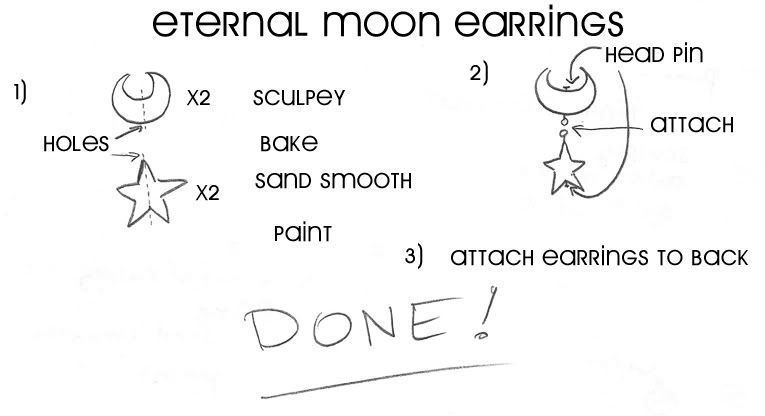
Finished Product
Eternal Senshi earrings from the Sailor Moon manga
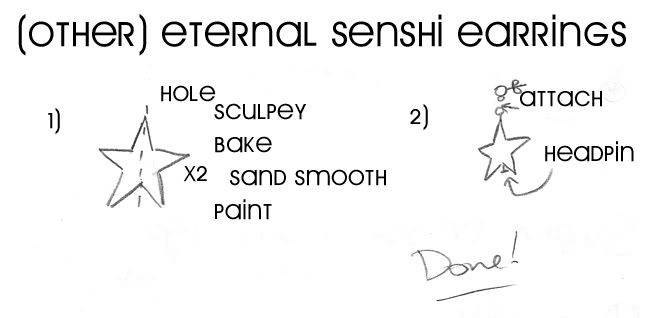
Finished Product
Sailor Jupiter earrings from Sailor Moon (pick a genre)
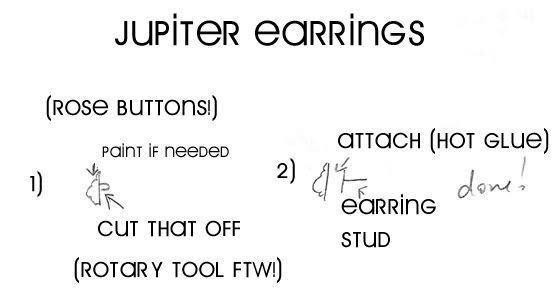
Finished product
Sailor Moon's ornate choker from the Sailor Moon manga and the Live Action series
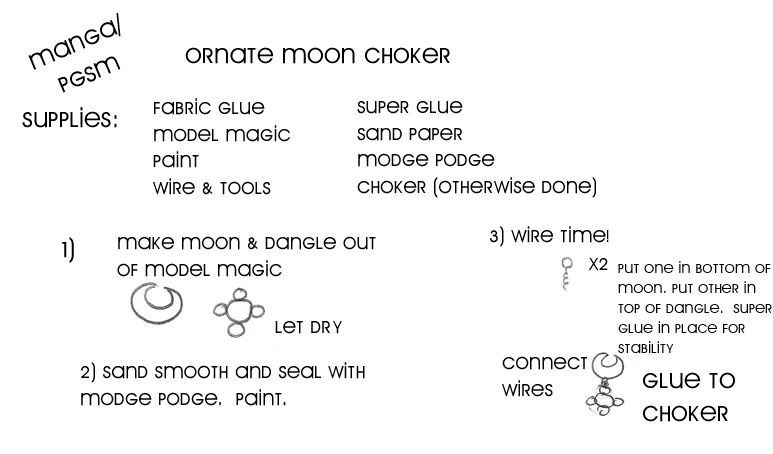
Sailor Venus's Love-Me Chain Belt from the Sailor Moon manga and Live Action series
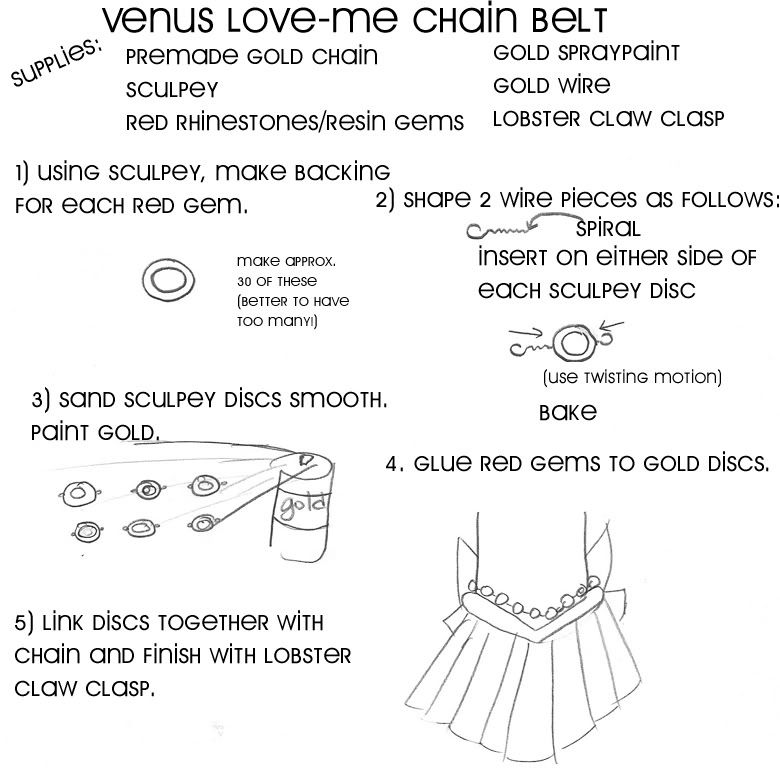
*Note* 3mm (or 4mm if you wish) craft foam can be substituted for sculpey. Be sure to seal the foam with modge podge before painting. Wire can be hot-glued to the back of the discs.
Finished Product
Addendum
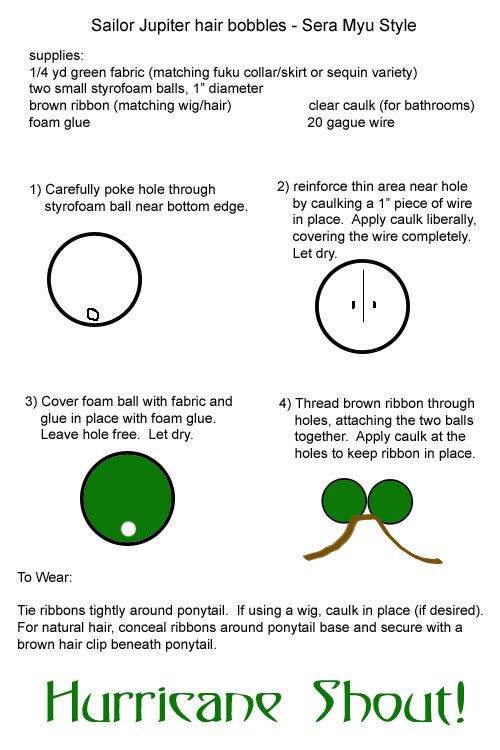
Lelouch's black staff from Code Geass
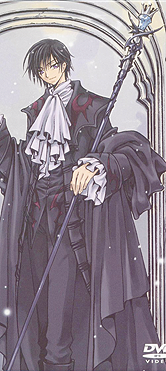
(click to enlarge)
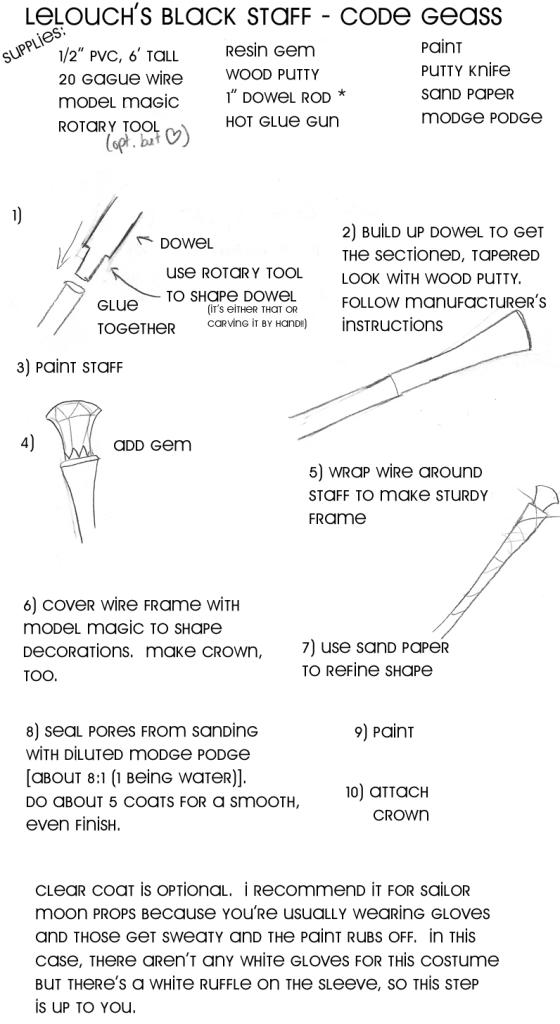
Notes: I was taking a stab in the dark on the dowel rod thickness, though I think the PVC should be around 1/2" thick. On PVC pipe, it's the interior hole that's 1/2", rather than the exterior, so what you need to do is find a dowel rod that's as thick as the PVC pipe's exterior thickness. I'm guessing that a 1" dowel is around the same ballpark. So you're going to have to eyeball it while you're at the store.
Here's a make-shift "tutorial" of sorts a PGSM Princess Sailor Moon sword! Actually, it's more like the behind the scenes of a commission. Would you like to see how I did it with really cheap materials?
step 1: blue print
step 2: PVC and wire
step 3: IT'S A SAI!
step 4: stiffening craft foam 101
step 5: comical faces
step 6: hilt core
step 7: now in technicolor!
step 8: blade core
step 9: don't cry
step 10: blade sammich
step 11: stiffening the blade
step 12a: blade issues
step 12b: I pity the fool!
step 13a: Puberty strikes!
step 13b: 24 hours later
step 14: asthmatics beware
step 15: let's get caulkin'!
step 16: wingin' it
step 17: continuity
step 18: crown part 1
step 19: crown part 2
step 20: it's the small details
step 21: and the even smaller details...
(not a step): word to the wise...
step 22: at last...
step 23:THE GRAND FINALE!
***note to builders! This is a prototype! Please read the whole thing through before you start building yourself! Major boo-boos are reported as soon as I found them! x___x***
Sewing Tutorials (Sailor Moon-based)
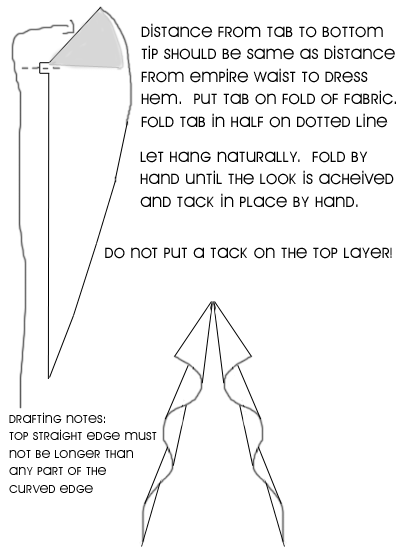
Finished Products: 1, 2, 3
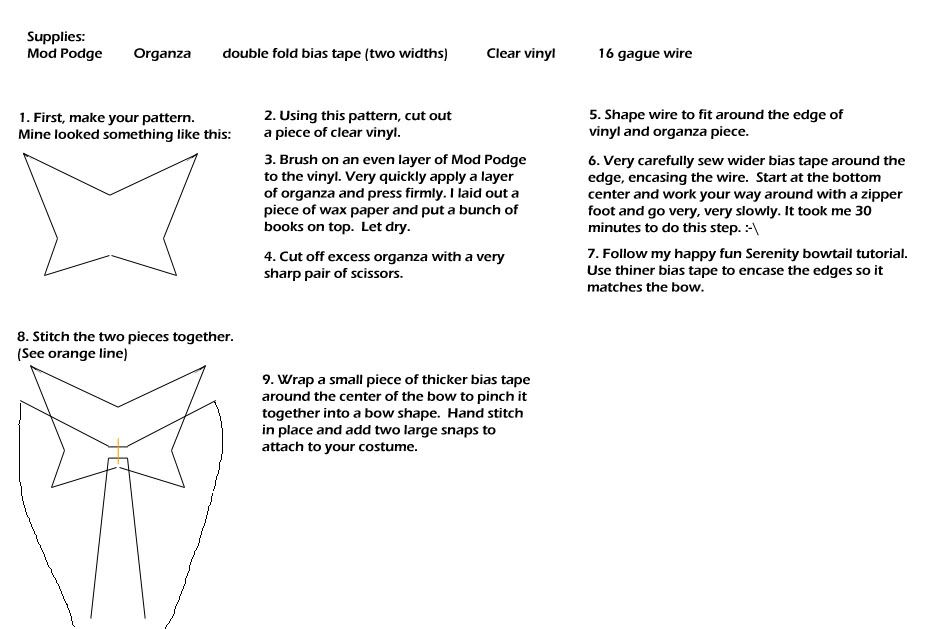
Finished Product
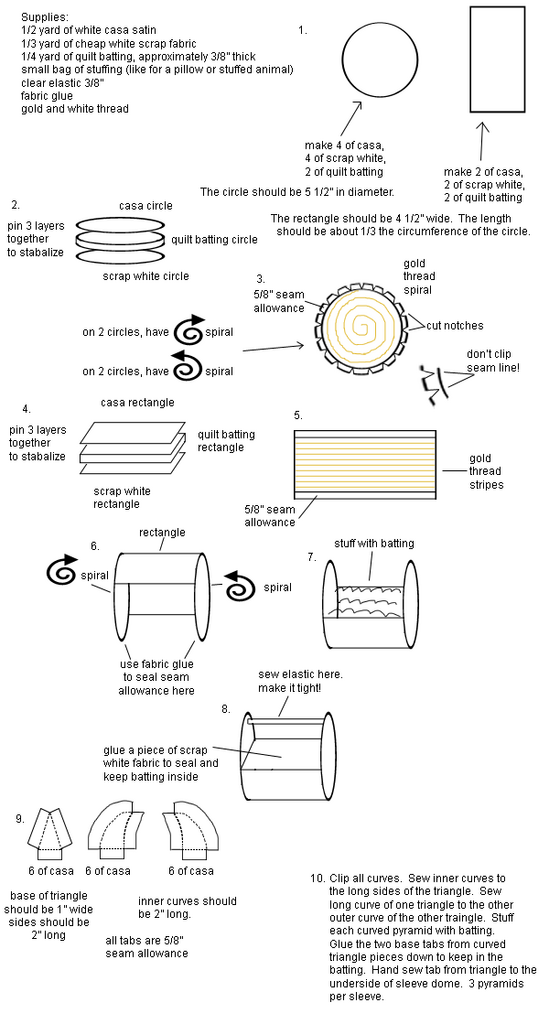
Finished Product
Note: I messed up on step 3 but since I whipped this up forever ago and I am too lazy to edit, I'll just put this here instead. Cut notches AFTER you stitch the 3 pieces together. :)

Finished Products: 1, 2,
After so many people asking for prop help on cosplay.com and elsewhere, I've decided to make a guide, here on my LJ. :) In this post, I'll put tutorials, and people can come to ask questions. If you wish to ask how to make a certain prop, please put the name of the prop in the subject to make it easier for other users to find it. Also, include reference pictures. As time goes on, I'm sure that people will start to ask for help on the same prop over and over, so I ask that you please read through the comments first to see if your question has already been answered. Also, if you happen to find any bugs in the links, please let me know! ^.^v
This link has also been shared here on cosplay.com. So check there to see if a question you have may have already been answered.
I'm no longer taking commissions, but feel free to browse my cosplay prop store at tsuki_sales!
If you'd like to leave a comment or question about a specific prop, please put the name of the item in the subject for easy finding for both me and others. That way, if someone has a question about the same prop, they'll be able to see if their question has already been answered within a few moments of searching and then I won't have to repeat myself several dozen times. ^^; Also, please don't delete your comments. There's no such thing as dumb questions. I should know. :)
Supplies most commonly used:
Model Magic
Sculpey
Painter's Caulk (white)
Sand Paper
Super glue
Dowel Rods (3/4" or 1" thick, usually)
Pre-cut wooden shapes (predominantly circles and hearts)
Rhinestones and assorted beads and gems
20 gague wire
Styrofoam balls and disks
PVC pipe (3/4" thick, usually) and misc. PVC pipe parts
Hot glue gun (High temp ONLY!! Low temp is for things things that run the risk of melting. Nothing here qualifies as such. Here, you'll need the strength of high temp!!)
E-6000 epoxy glue (Recently discovered! For extra strength and flexibility, consider using this in place of hot glue if you don't need a quick set time. STRONGER THAN HOT GLUE!!)
Brooch pins (they look like safety pins, but one side has a flat base)
Craft Foam
Modge Podge (see above link)
Sailor Moon Prop Tutorials:
Note: If I have not made the specific prop before, there will be a disclaimer. If I have, there will be a difficulty rating on a scale of 1 to 5 (1 being easy, and 5 being very difficult).
Moon's hair pearls
Moon's 1st season wand
Moon's 1st season brooch
Moon's 2nd season wand
Moon's 2nd season brooch
Moon's 3rd season wand
Moon's 3rd season brooch
Moon's 4th season brooch
Moon's 4th season wand: anime
Moon and Chibi Moon's 4th season wand: manga
Moon's 5th season brooch
Moon's tall crescent wand from the artbooks
Neo Queen Serenity's crown
King Endymion's medals
King Endymion's staff
Tuxedo Kamen's mask
Luna-P
Chibi-Usa's Time Key
Chibi-Moon's 3rd season wand
Chibi-Moon's 3rd season brooch
Chibi-Moon's 4th season brooch
Chibi-Moon's Twinkle Bell: anime
Chibi-Moon's Twinkle Bell: manga
Generic inner senshi 1st henshin pen
Venus' manga henshin pen
Generic inner senshi 2nd henshin wand
Generic inner senshi 3nd henshin wand
Generic round senshi brooch
Generic heart-shaped senshi brooch
Outer senshi henshin wand
Neptune's Deep Aqua Mirror
Black Crystal Earrings
Princess Kakyuu's Crown
PGSM Princess Sailor Moon's Sword
Card Captor Sakura Prop Tutorials:
Sakura's Staff of Sealing
Sakura's Star Wand
Sakura's keys
Sakura's really tall staff (episode 69)
The Suggestion Corner - Basically, it would have been a pain to re-write all the code on this entry! >P
Sewing Tutorials (Sailor Moon-based)
Basic Model Magic Use:
Model Magic is a plastic-based polymer, produced by Crayola. It comes in a variety of different colors, but mostly I just use white to make things simpler (plus, it's cheaper that way).
A lot of people have come to me saying "I tried to use model magic for this prop, but it just didn't work for me! How'd you do it?"
There's a simple fact about most clays, and that's that they shrink a bit when they're drying. Model Magic is no exception. Because Model Magic is plastic-based, it cracks when it dries.
Steps you can take to reduce cracking
If you have to make a big shape, like a big heart or sphere, use a Styrofoam shape that closely resembles what needs to be made, and cover it in a thin layer of model magic. If you use a thin layer, it's less likely to crack because it dries faster and more evenly. If the shape you have to make is about an inch thick, turn the piece over periodically while it's drying so that air can access as much of the piece as possible, to promote even drying. Otherwise, the top side will dry much faster than the side touching a table top and then you're left with a crack on the front because it took the bottom longer to dry than the top did. I suggest flipping it every 8 hours or so.
Smooth out all wrinkles in the clay while it's still wet. An easy way of doing this is to pinch the wrinkle between your fingers until you have a raised area. Then, gently rub it down with the pad of your index finger. Repeat until the wrinkle disappears. Any wrinkles that are not smoothed down will deepen into a large crack.
Work with your model magic quickly. Your hands absorb moisture and if the model magic starts to take on a rough, scaly appearance while you're working with it, it's only going to get worse while drying. If you need to make a detailed, intricate shape, made a general blob and do the difficult stuff later (see below).
Troubleshooting: Help!! I've got cracks everywhere!!
If you have small, rough imperfections, use fine grade sandpaper to smooth them out. DO NOT use a mechanical sanding machine of any type. Don't push down too hard, or you'll end up with scaly spots that won't go away with sanding. It takes time, so don't rush it. Any time you use sandpaper, though, go back with some diluted mod podge (1 part water : 8 parts mod podge) and give it a few coats. This will fill in all the pores and give a smooth finish once you paint your project.
If you've got a large crack reminiscent of the grand canyon, sand the surrounding area how you want it, then fill in the crack with white painter's caulk. You can find caulk and caulk guns at your local home improvement store (ACE hardware, Home Depot, Lowe's, etc.). Scrape away the excess with a clay tool of the proper curve or use a flat one, depending on the area you're filling. If it's still not quite smooth, let the caulk dry and do it again. Keep doing this until you get the desired result. Be sure you make the surface completely smooth. Caulk isn't sandable. Be sure to keep your clay tools clean by wiping the excess away with a paper towel and scrubbing them under warm water every 30 minutes.
Basic Construction tips:
If you have a shape that looks like it's a bunch of shapes put together, make the pieces separately and glue them together later. If you put them together while they're wet, they won't stick as well and will cause more of a headache later down the road. Attach them with super glue, high temp hot glue, epoxy (E-6000 is my preferred type), or whatever other kind of glue you would like to use. For extra stability and smoothness, you can go around the connection site with caulk and smooth it with your finger or clay tool of a suitable shape.
If you have to make a very detailed shape like a small crown or a multi-pointed star, make a generic blob and shape it later, using an exacto knife and fine grade sandpaper.
If you have any specific questions, please do not hesitate to ask, as I'm sure I haven't thought of everything. Please include pictures of your project, if applicable.
Moon's hair pearls
Difficulty: *


Assistance with this tutorial was provided by windofthestars
Version 2
Difficulty: *

Moon's 1st season wand
Difficulty: **

::EDIT NOTES:
This should say 3/4" or 1" dowel, rather than 5/8" dowel. 5/8" is WAAAAAAAAY too thin!


Finished Product
Moon's 1st season brooch
Difficulty: * (anime) ** (manga)


Finished Product

Moon's 2nd season wand
Difficulty: **

::EDIT NOTES:
This should say 3/4" or 1" dowel, rather than 5/8" or 3/4" dowel. 5/8" is WAAAAAAAAY too thin!


Finished Product
Moon's 2nd season brooch
Difficulty: * (non-openable), **** (openable)


Finished product

Finished product
Moon's 3rd season wand
Difficulty: ****

::EDIT NOTES:
This should say 3/4" or 1" dowel, rather than 3/4" or 5/8" dowel. 5/8" is WAAAAAAAAY too thin!

::EDIT::
I forgot to draw the "petal crown" part between the bow and heart. I knew something looked weird, but that's what happens when you're drawing up a tutorial from memory and you don't have any pictures to look at! :P Basically, you want to make 6 U-shaped petals with a thumb imprint so they curve outward and have dimension. Let them dry separately. Then glue them together to the wand in the space between the bow and heart. If the pieces are too big to go around the stick, use sandpaper to grind them down to size. If they're too small, fill in one of the gaps with caulk either in the back or on one of the sides where the bow will cover it.
Finished Product
Moon's 3rd season brooch
Difficulty: **


Finished Product
Moon's 4th season brooch: anime
Disclaimer: I've never made this prop myself. This tutorial is solely based on previous experience and speculation.


Note: Pink seed beads can used instead of glitter, to add more dimension. I suggest using high-temp hotglue to attach them. (Practice is good! ^_^)
Moon's 4th season wand: anime
Disclaimer: I've never made this version of this prop myself. This tutorial is solely based on previous experience and speculation.

::EDIT NOTES::
This should say 3/4" or 1" dowel, rather than 3/4" or 5/8" dowel. 5/8" is WAAAAAAAAY too thin!


Moon and Chibi Moon's 4th season wand: manga
Difficulty: ****

::EDIT:: Use 4mm craft foam for the wings! If you can't find 4mm, use 3mm and stiffen it by pasting on some organza as seen in the Neo Queen Serenity anime crown or Tuxedo Kamen mask tutorial.
::EDIT2::
This should say 3/4" or 1" dowel, rather than 3/4" or 5/8" dowel. 5/8" is WAAAAAAAAY too thin!

Finished Product
Model: windofthestars
Progress Pictures: 1, 2, 3, 4, 5, 6, 7
Note: The wings on this wand were made of model magic, but I suggest foam in the tutorial because now that I know better, I think that's actually EASIER!! ;_______;
Moon's 5th season brooch
Disclaimer: I've never made this prop myself. This tutorial is solely based on previous experience and speculation.


Moon's tall crescent wand from the artbooks
Difficulty: **
Reference picture:


Finished product
(Note: I added pearls to my staff between the orbs as a personal touch. You can barely see them in that picture, but that's just in case you were wondering what that was. ^_^)
Neo Queen Serenity's crown
Manga:
Difficulty: ****
1)

2)

(Note: Version one is the one most commonly seen throughout the manga. Version two only appears in this picture and maybe one or two others in the artbooks.)
Supplies:
Sculpey
20 gague wire
reference picture that is printed out to-scale
glossy white paint
clear spray paint or sealant
white pearls of different sizes
2 hair combs (from the bridal section of your local craft store)
Tools:
wire cutters
clay working tools
caulk and caulk gun
baking sheet
super glue
What makes this prop so difficult to make is the initial clay work and shaping involved. It's very time consuming, so a lot of patience is needed. For purposes of this tutorial, I will be providing pictures as if version two were being made.
First, print out your reference picture. The picture of the crown should be about 4 1/2 - 5" wide, just to give you a general idea.


Important notice! When I made this tutorial, I forgot to add a teeny tiny minor detail! ^_^;; On the back of the crown where the tabs are attached, it's probably a good idea to reinforce those with a little bit of caulk over them. That way you've got some guaranteed stability. Sorry for the confusion!
Anime:
Difficulty: ***


Finished Product
King Endymion's medals
Difficulty: *


King Endymion's staff
Difficulty: ****


Note: the length of the PVC pipe is sized for my husband who is 6'2". Adjustments may be needed for men of different heights.
Finished Product
Tuxedo Kamen's mask
Difficulty: *


Luna-P
Disclaimer: I've never made this prop myself. This tutorial is solely based on previous experience and speculation.


Chibi-Usa's Time Key
Disclaimer: I've never made this prop myself. This tutorial is solely based on previous experience and speculation.


Chibi Moon's 3rd Season Wand
Disclaimer: I've never made this prop myself. This tutorial is solely based on previous experience and speculation.
reference picture:


There aren't many decent full pictures of this wand out there, but the bottom knob looks exactly like Moon's wand in the S season. Make the bottom knob out of model magic (see my 1st season wand). Then, add two clear coats of spray paint to the whole wand!
Chibi-Moon's 3rd season brooch
Disclaimer: I've never made this prop myself. This tutorial is solely based on previous experience and speculation.
reference pictures:
1.

2.


Chibi-Moon's 4th season brooch
Disclaimer: I've never made this prop myself. This tutorial is solely based on previous experience and speculation.


Chibi-Moon's Twinkle Bell: anime
(coming soon)
Disclaimer: I've never made this prop myself. This tutorial is solely based on previous experience and speculation.


Chibi-Moon's Twinkle Bell: manga
(coming soon)
Disclaimer: I've never made this prop myself. This tutorial is solely based on previous experience and speculation.


Generic inner senshi 1st henshin pen
Disclaimer: I've never made this prop myself. This tutorial is solely based on previous experience and speculation.


This tutorial was made for a friend of mine a few years ago. Replace "green" with whatever senshi's color that you're making. The same goes for the symbol.
Venus' manga henshin pen
Disclaimer: I've never made this prop myself. This tutorial is solely based on previous experience and speculation. Since I have found no colored pictures of this prop, use your own color interpretation.

This tutorial was made for a friend of mine a few years ago. That's why it's laid out the way it is.
Generic inner senshi 2nd henshin wand
Difficulty: **

::EDIT NOTES:
This should say 3/4" or 1" dowel, rather than 3/4" or 5/8" dowel. 5/8" is WAAAAAAAAY too thin!

Unfortunately, I don't have a "finished product" picture to share. I made a Mars henshin wand as a gift for a friend a long time ago and I don't have a picture of it. ;______________;
Generic inner senshi 3nd henshin wand
Difficulty: ****

::EDIT NOTES:
This should say 3/4" or 1" dowel, rather than 3/4" or 5/8" dowel. 5/8" is WAAAAAAAAY too thin!

Finished Product (I made a resin ball of death with some sheet metal in the middle and used a PVC pipe handle, but the concept is similar.)
Generic round senshi brooch
Difficulty: *


Generic heart-shaped senshi brooch
Difficulty: *


Outer senshi henshin wand
Uranus: *** Neptune: *** Pluto: **


::EDIT NOTES:
1" dowel can also be used.


::EDIT:: In step 3, for Uranus and Pluto, make those balls with a styrofoam ball core and cover it in model magic.
Finished Product: Uranus
Finished Product: Neptune
Finished Product: Pluto
Since Saturn's wand is never really shown, you can most likely whip up your own design and make it based on the techniques in this tutorial. If you have any questions, feel free to ask. :)
Neptune's Deep Aqua Mirror
Difficulty: *****


Finished Product
Black Crystal Earrings
Difficulty: *


ETA: The A.C. Moore where I bought these gems no longer carries them. I have a sneaking suspicion that A.C. Moore as a whole may have quit offering these.
Finished product
EDIT: I've discovered a new way of making these but, yet again, Michael's has clearanced all the supplies I used for them. :( I used charms and hot glued the wires onto the back, then attached the gem and earring clips.
Finished Product
Princess Kakyuu's Crown
Difficulty: *** (this was a commission)


Finished Product
Sakura's Staff of Sealing
Disclaimer: I've never made this prop myself. This tutorial is solely based on previous experience and speculation.

::EDIT NOTES:
1" dowel can also be used.

Sakura's Star Wand
Disclaimer: I've never made this prop myself. This tutorial is solely based on previous experience and speculation.


Sakura's keys
Disclaimer: I've never made these props myself. This tutorial is solely based on previous experience and speculation.


Sakura's really tall staff (episode 69)
Disclaimer: I've never made this prop myself. This tutorial is solely based on previous experience and speculation.


Note: I wrote this with the assumption that those attempting this prop would just need a hint, nudge, or an opinion, rather than needing to be led by the hand like a novice or beginner. This is a guide for the advanced audience out there and shouldn't be attempted unless you really know what you're doing and truly understand the mechanics behind making something of this size.
Have a prop from Sailor Moon, Card Captor Sakura, or some other anime to suggest? Leave a comment with some good, detailed pictures and I'll see if I can wrap my brain around it! :P
This is the place where suggestions have been given and then filled in my spare time!
Generic brooches from the Live Action Sailor Moon Series

Princess Sailor Moon's Earrings from the Live Action Sailor Moon Series

Sailor Moon's earrings from the anime series

(a little modification can transform these into the manga style. Just throw in a sculpey star and you're good to go.)
Finished product
Super Sailor Moon's earrings from Bishoujo Senshi Sailor Moon

Finished product
Eternal Sailor Moon's earrings from Bishoujo Senshi Sailor Moon

Finished Product
Eternal Senshi earrings from the Sailor Moon manga

Finished Product
Sailor Jupiter earrings from Sailor Moon (pick a genre)

Finished product
Sailor Moon's ornate choker from the Sailor Moon manga and the Live Action series

Sailor Venus's Love-Me Chain Belt from the Sailor Moon manga and Live Action series

*Note* 3mm (or 4mm if you wish) craft foam can be substituted for sculpey. Be sure to seal the foam with modge podge before painting. Wire can be hot-glued to the back of the discs.
Finished Product
Addendum

Lelouch's black staff from Code Geass

(click to enlarge)

Notes: I was taking a stab in the dark on the dowel rod thickness, though I think the PVC should be around 1/2" thick. On PVC pipe, it's the interior hole that's 1/2", rather than the exterior, so what you need to do is find a dowel rod that's as thick as the PVC pipe's exterior thickness. I'm guessing that a 1" dowel is around the same ballpark. So you're going to have to eyeball it while you're at the store.
Here's a make-shift "tutorial" of sorts a PGSM Princess Sailor Moon sword! Actually, it's more like the behind the scenes of a commission. Would you like to see how I did it with really cheap materials?
step 1: blue print
step 2: PVC and wire
step 3: IT'S A SAI!
step 4: stiffening craft foam 101
step 5: comical faces
step 6: hilt core
step 7: now in technicolor!
step 8: blade core
step 9: don't cry
step 10: blade sammich
step 11: stiffening the blade
step 12a: blade issues
step 12b: I pity the fool!
step 13a: Puberty strikes!
step 13b: 24 hours later
step 14: asthmatics beware
step 15: let's get caulkin'!
step 16: wingin' it
step 17: continuity
step 18: crown part 1
step 19: crown part 2
step 20: it's the small details
step 21: and the even smaller details...
(not a step): word to the wise...
step 22: at last...
step 23:THE GRAND FINALE!
***note to builders! This is a prototype! Please read the whole thing through before you start building yourself! Major boo-boos are reported as soon as I found them! x___x***
Sewing Tutorials (Sailor Moon-based)

Finished Products: 1, 2, 3

Finished Product

Finished Product
Note: I messed up on step 3 but since I whipped this up forever ago and I am too lazy to edit, I'll just put this here instead. Cut notches AFTER you stitch the 3 pieces together. :)

Finished Products: 1, 2,