Artisan Bread in Five Minutes a Day (ABi5): Basic Boule
I love fresh bread. Many years ago, my then boyfriend gave me a bread machine for Christmas. I was still in college at the time and after dinner, my roommates and I would throw ingredients into the bread machine and turn it on. Then a few hours later, we'd have fresh hot bread for our study break. It was magic! I tended to make this Cranberry Bread, which was my favorite bread machine recipe. Over a decade later and I still have that bread machine.
As I finally accepted cooking as a hobby instead of a chore, I decided I wanted to bake bread from scratch, but was intimidated by the process. Then mellybrelly posted step-by-step instructions and made it seem doable. I loved the resulting white bread and the sense of accomplishment that that bread had been made in my kitchen.
However -- it was tiring and I didn't attempt to bake bread again for 2 years after that. I'm glad I returned to making bread but it was still a time-consuming process. I wanted bread every day but I couldn't really work that into my schedule. Enter the book Artisan Bread in Five Minutes a Day by Jeff Hertzberg and Zoë François. The title's a little misleading in that it sounds like you can have fresh bread in just 5 minutes (yay!) but they're only counting the time spent actively working on making the bread. Still, even though it's closer to 10 minutes of active work a day for me, that's an acceptable investment of time to have fresh bread on a regular basis.
It tastes better than any of the plain white breads in the sliced bread aisle of the grocery store. It's as good as, or better, than the similar types of bread in my grocery store's fresh bakery section too. Granted, I didn't think the basic boule bread tasted amazing, but it certainly tasted good enough given how little effort it required. Certainly much less expensive. And for so little input, we enjoyed the gift of fresh, warm bread on a near daily basis.
Once I got comfortable with the basic recipe, I started playing with the dough and turning out variations that kept tasting better and better. First it was just adding some herbs to the dough, then sprinkling some cheese on top. We made pizzas and flat breads. My current favorite variation is cheddar cheese bread. But I'm getting ahead of myself. I'll start with the Basic Boule recipe and save the variations for future posts.
I know...if the variations taste better, why not start with those? Well I figure it's easier to work out the kinks with a basic recipe first. That makes it a little easier to figure out where you might have gone wrong. And then once you're comfortable with the master recipe, we can add more steps and variations.
So go ahead and try this. If it works, then great! You have bread made from your own two hands. If it doesn't work, then the ingredients weren't too expensive and you didn't have to waste too much effort in trying it.

Boule (Artisan Free-Form Loaf)
Makes four 1-pound loaves. The recipe is easily doubled or halved.
3 cups lukewarm water (about 100F, slightly warmer than body temperature)
1-1/2 tablespoons granulated yeast (1-1/2 packets)
1-1/2 tablespoons kosher or other coarse salt
6-1/2 cups unsifted, unbleached, all-purpose white flour,
measured with the scoop-and-sweep method
Cornmeal for pizza peel
PREP DAY
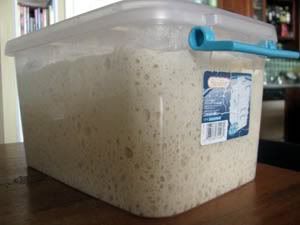
Once I knew I was going to keep making this bread, I got a plastic container with a lid for making and storing dough.
BAKING DAY
Ta-da! Your own freeform loaf of bread
Here's how it looks inside
Not all of the loaves looked as nice. The loaf on the left probably had a dough that was too wet and spread too much. Or maybe my yeast started dying so it didn't rise enough? The center loaf had nowhere to rise since I forgot to slash the top so when it expanded in the oven, it burst out of the bottom. And the one on the right had a slashed top but a big bulge out the top. Not sure what I messed up there.
If you would like to see more detailed instructions, go here:
http://www.motherearthnews.com/Real-Food/Artisan-Bread-In-Five-Minutes-A-Day.aspx
http://www.globalgourmet.com/food/cookbook/2009/artisan-bread/boule.html
or get the book for this basic recipe and many many variations.
Follow-Up Post with more Variations:
http://fitfool.livejournal.com/261756.html
Thread in cooking: http://community.livejournal.com/cooking/8750554.html
Thread in bakebakebake: http://community.livejournal.com/bakebakebake/3060074.html

As I finally accepted cooking as a hobby instead of a chore, I decided I wanted to bake bread from scratch, but was intimidated by the process. Then mellybrelly posted step-by-step instructions and made it seem doable. I loved the resulting white bread and the sense of accomplishment that that bread had been made in my kitchen.
However -- it was tiring and I didn't attempt to bake bread again for 2 years after that. I'm glad I returned to making bread but it was still a time-consuming process. I wanted bread every day but I couldn't really work that into my schedule. Enter the book Artisan Bread in Five Minutes a Day by Jeff Hertzberg and Zoë François. The title's a little misleading in that it sounds like you can have fresh bread in just 5 minutes (yay!) but they're only counting the time spent actively working on making the bread. Still, even though it's closer to 10 minutes of active work a day for me, that's an acceptable investment of time to have fresh bread on a regular basis.
It tastes better than any of the plain white breads in the sliced bread aisle of the grocery store. It's as good as, or better, than the similar types of bread in my grocery store's fresh bakery section too. Granted, I didn't think the basic boule bread tasted amazing, but it certainly tasted good enough given how little effort it required. Certainly much less expensive. And for so little input, we enjoyed the gift of fresh, warm bread on a near daily basis.
Once I got comfortable with the basic recipe, I started playing with the dough and turning out variations that kept tasting better and better. First it was just adding some herbs to the dough, then sprinkling some cheese on top. We made pizzas and flat breads. My current favorite variation is cheddar cheese bread. But I'm getting ahead of myself. I'll start with the Basic Boule recipe and save the variations for future posts.
I know...if the variations taste better, why not start with those? Well I figure it's easier to work out the kinks with a basic recipe first. That makes it a little easier to figure out where you might have gone wrong. And then once you're comfortable with the master recipe, we can add more steps and variations.
So go ahead and try this. If it works, then great! You have bread made from your own two hands. If it doesn't work, then the ingredients weren't too expensive and you didn't have to waste too much effort in trying it.
Boule (Artisan Free-Form Loaf)
Makes four 1-pound loaves. The recipe is easily doubled or halved.
3 cups lukewarm water (about 100F, slightly warmer than body temperature)
1-1/2 tablespoons granulated yeast (1-1/2 packets)
1-1/2 tablespoons kosher or other coarse salt
6-1/2 cups unsifted, unbleached, all-purpose white flour,
measured with the scoop-and-sweep method
Cornmeal for pizza peel
PREP DAY
- In a big 5-quart bowl or plastic container, mix water, yeast, and salt. Stir it around. You don't need to wait for the yeast to dissolve. If the water's too hot, then you risk killing your yeast. If it's too cold, it'll still work but it'll take longer for it to rise.
- Dump in all the flour and mix with a wooden spoon until all of the flour is moistened. You don't need to knead the dough.
- Cover loosely with a lid or plastic wrap over the opening of the container and wait for the dough to rise. If the water's just right, it'll take about 2 hours for your dough to rise enough the first time. If it's cold water, it might take more like 3-4 hours to rise.
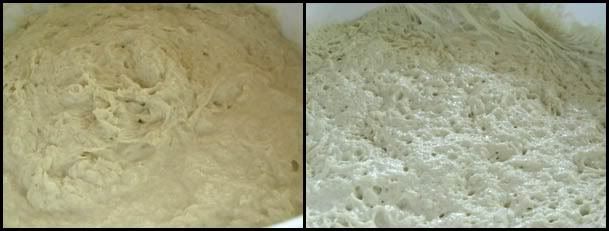
On the left, the dough has been mixed. On the right, the dough has risen. You can see how it's sticking to the sides where it had risen and started falling back down.
Once I knew I was going to keep making this bread, I got a plastic container with a lid for making and storing dough.
BAKING DAY
- Sprinkle some flour on your kitchen counter (or wherever you're going to let your dough rise).
- Sprinkle some flour on the surface of your refrigerated dough and over your hands too. Pull up and cut off a 1-pound piece of dough (about the size of a grapefruit, or one fourth of the total amount of dough). Roll that hunk of dough lightly through the flour on the counter to try to prevent it from sticking.
Form it into a ball by gently stretching the top of the dough around to the bottom of the dough, rotate a quarter turn, stretch again, and so on until you've got yourself a ball of dough. The bottom might look like a bunch of bunched ends but they'll flatten out. The surface should look smooth (mine generally look smooth-ish).
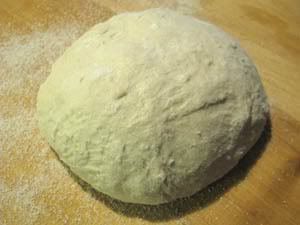
Not perfectly smooth, but formed into a ball
- Allow the ball of dough to rest for about 40 minutes on your floured counter. The original instructions say to rest it on your pizza peel but mine was always too wet for that and ended up sticking to the peel.
- Twenty minutes before baking, preheat oven to 450F, with a baking stone placed on the middle rack. (or just use a baking sheet) On a separate shelf below the baking stone, place an empty broiler pan.
- Just before baking, dust the top of your ball of dough with flour and use a serrated knife to slash a big X about 1/4-inch deep across the top. Sprinkle your pizza peel with cornmeal (so the dough will slide off into the oven more easily), place the dough onto the peel, and then slide the dough on top of the preheated baking stone. Quickly (but carefully) pour 1 cup of hot tap water into that broiler pan and then close the oven door to trap in that steam.
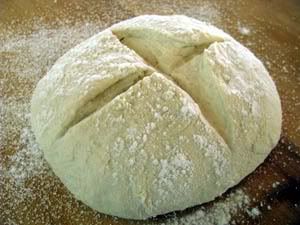
Ready to go into the oven
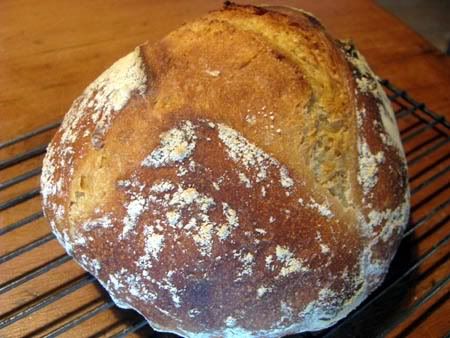
- Bake for about 30 minutes until the crust is browned and firm to the touch. Remove to a wire cooling rack and let cool completely.
Ta-da! Your own freeform loaf of bread
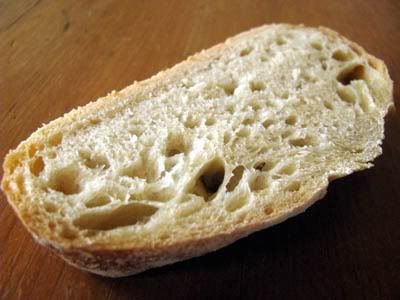
Here's how it looks inside
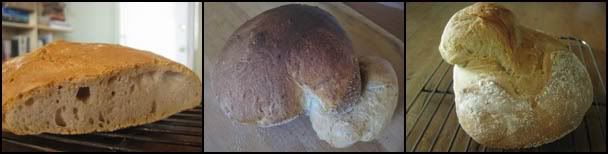
Not all of the loaves looked as nice. The loaf on the left probably had a dough that was too wet and spread too much. Or maybe my yeast started dying so it didn't rise enough? The center loaf had nowhere to rise since I forgot to slash the top so when it expanded in the oven, it burst out of the bottom. And the one on the right had a slashed top but a big bulge out the top. Not sure what I messed up there.
If you would like to see more detailed instructions, go here:
http://www.motherearthnews.com/Real-Food/Artisan-Bread-In-Five-Minutes-A-Day.aspx
http://www.globalgourmet.com/food/cookbook/2009/artisan-bread/boule.html
or get the book for this basic recipe and many many variations.
Follow-Up Post with more Variations:
http://fitfool.livejournal.com/261756.html
Thread in cooking: http://community.livejournal.com/cooking/8750554.html
Thread in bakebakebake: http://community.livejournal.com/bakebakebake/3060074.html