ABi5: Basic Boule with Variations (Herb Bread, Cheddar Cheese Bread, Cranberry Pecan Bread)
So have you been practicing baking bread since my last post about using the Artisan Bread in Five Minutes a Day method? I hope a few of you tried it. I had promised to come back with variations and then got busy with other things. (No wait, I mean...I wanted to give you a chance to practice the basic version first.)
One of the things I love most about this ABi5 method is that it really made me feel free to play with the recipe. The ingredients are relatively inexpensive (compared to paying $3-$6 per loaf at our favorite bakery) and the effort is also low so I don't feel too badly if a batch comes out badly. I can shrug it off and try tweaking the next batch. After getting the hang of the Basic Boule recipe, I started playing a little with it. You can too! They've made it so easy with this method.
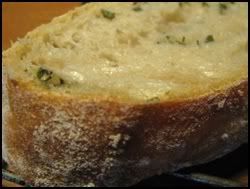
I put the rest behind an LJ-cut because it's long but PLEASE do click through because there are some beautiful loaves at the end and it hurts me to think that you might not see them. Partly because I want to show off. Partly because I think you'll then be inspired to try making this yourself since the steps really aren't difficult! OK...one more sneak peek photo to lure you on to the rest of this post:

Mix In Other Flavors
First I tried mixing in 1 tsp of herbs and then 1 Tbsp of herbs per loaf. I tried fresh rosemary and dried dill. What other herbs would you try? I also sprinkled shredded cheddar cheese on top of the loaf for the last 10 minutes of baking and that melted nicely.
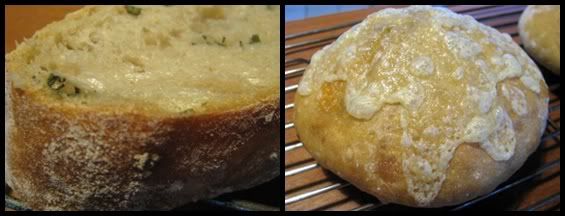
Herb Bread on the left and Boule topped with Cheddar Cheese on the right
Whole Wheat and Light Whole Wheat
I felt a wee bit guilty about eating so much bread that I tried making the Whole Wheat version which turned out into a rather flat loaf. (If you want to use their method for whole wheat bread, get the recipe from their SECOND book, NOT the first!) So I scaled back and just substituted one cup of whole wheat flour for one of the cups of all-purpose flour. Later when I was flipping through their book, I realized I had stumbled upon their recipe for Light Whole Wheat Bread with that 1 cup of whole wheat flour.
Using Less Yeast and Building More Flavor
But I was still also trying recipes for making bread in other ways and felt that those loaves tasted better -- although they also required more time and effort. I stumbled across this post talking about using less yeast and tried that. It takes longer but that extra time is spent just waiting, not actively working with the dough, so it's not too big a deal. Using less yeast means the dough rises more slowly. This slow rise seemed to build better flavor. The less yeast you used, the more time you had to let it rise before you put the dough away in the fridge. You also needed to let the formed loaf sit longer on the counter for its second rise before going into the oven. I tried the original amount of yeast (1 1/2 Tbsp), half as much yeast (3/4 Tbsp), and once with just 1/2 tsp yeast. Decided the middle amount of yeast yielded the best bang for my buck. The really low yeast version meant I had to remember to take the dough out of the fridge at least 2.5 hours before I wanted to eat it! Also note that if the water you use is cold or the room is chillier, you'll also want to let your dough rise longer.
Yeast First Rise Second Rise
Original 1 1/2 Tbsp ~2 hours ~40 minutes
Low Yeast 3/4 Tbsp ~4-5 hours 1 hour
Lowest Yeast 1/2 tsp ~6-12 hours 2 hours
Rolling In Other Ingredients
Originally, for mixing in other flavors, I had just kneaded in the added herbs or sprinkled stuff on top. But then I saw a reference to how to roll in other ingredients to get them more evenly distributed throughout the dough. And I thought, if cheese tastes good on top of the loaf, I bet it tastes even better when it's in every bite! So I stretched and patted the dough out into a sheet, sprinkled some shredded cheese on top, then rolled it up jelly-roll style. Then pulled that into a little ball shape and set it aside to rest. So good! Plus the extra fat from the cheese seemed to help the bread stay fresh a little longer. The cheddar cheese loaves didn't go stale nearly as quickly as the plain boules did. I repeated this technique with other loaves mixing in raisins as well as chopped and toasted nuts. They have a video on their website that shows how to roll in other ingredients.
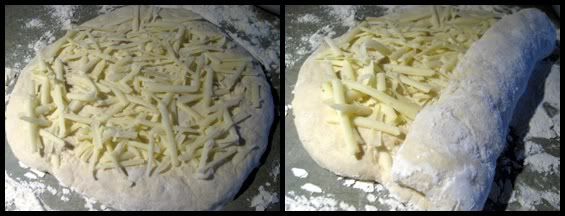
How to roll more ingredients into your loaf
Cheddar Cheese Bread is the current household favorite. Plenty of flavor for not much effort.
Baking In a Covered Pot (or How to Get a Fabulous Crust)
Another point of dissatisfaction had been that the crust was ok but nothing special. The ABi5 forums have lots of great information in them and this post yielded the piece of advice that let me turn out loaves that looked gorgeous. Remember when Bittman wrote in the NY Times about Jim Lahey's No-Knead Bread? Seemed like everyone was baking that bread! I bought my enameled cast-iron Dutch oven just so I could bake that bread (though I didn't actually get around to trying it because I stumbled across ABi5 first). Using this method means you also don't need the baking stone and pizza peel they suggest you use in the original recipe. But the biggest advantage is that placing this relatively high-moisture dough into a covered post means all that moisture stays close to your bread, creating this nice steamy chamber. The result was a beautifully crisp crust. I use a big 6-quart pot because it's the size that I have but the bigger size is also nice since I don't have to worry about my hands touching the hot sides of the pot when I put the dough in. The other change is that the formed dough has its second rise on a piece of parchment paper so you can just pick up the whole thing and drop it into the pot. Picking it up by the parchment paper has the added bonus of the loaf not sticking to the counter such that I deflate a lot of the air bubbles trying to pick it up. And while the parchment paper browns, it doesn't burn. Bake 15 minutes at 500F with the lid on. Then lower the temp to 450F and bake uncovered for another 10-15 minutes while the crust browns. Total time depends on the size of your loaf. Bigger loaves will need more time.
Boule with Variations
This mixes up enough dough for about 4 loaves of bread. (also, you might want to refer to my last post for more details about this method)
Dough:
3 cups lukewarm water
3/4 Tablespoons granulated yeast (1-1/2 packets)(2 1/4 tsp) (used less yeast)
1-1/2 tablespoons kosher or other coarse salt
5-1/2 cups unsifted, unbleached, all-purpose white flour
1 cup whole wheat flour (If I've run out of WW flour then I just use a total of 6.5 cups all-purpose flour)
Optional Variations Ingredients:
1 tsp to 1 Tbsp fresh or dried herbs
1/4 cup shredded cheddar cheese (if just sprinkling on top)
1 cup shredded cheddar cheese (if including it inside the bread)
1/2 cup to 1 cup raisins and/or toasted+chopped nuts (pecans are my favorite)
Other Equipment:
enameled cast-iron covered pot (Dutch Oven) [might need to replace knob on lid if it's plastic]
parchment paper
Instructions:
Prep work:
Mix all the ingredients for the dough together in a big 5-quart plastic bowl or a container. Cover loosely with plastic wrap or with a lid and then let rise for 4 to 5 hours. Mine has generally been done by 4 hours. You'll know it's ready when you see that the level of the dough in the container has reached a peak and is now oozing back down. After this first rise, put your dough in its loosely-covered container into the fridge. I find the dough much easier to work with after it has chilled for a day but you could continue right on to the next step if you really wanted.
Baking Day:
See how versatile this basic recipe is? See how beautiful this bread is?
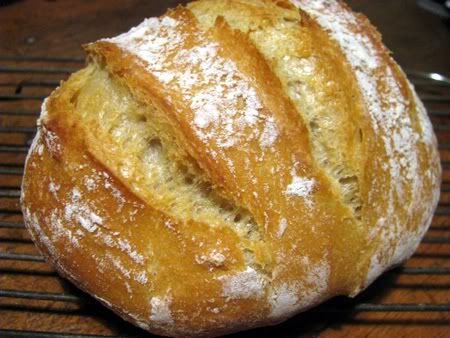
Basic Boule Baked in a Covered Pot
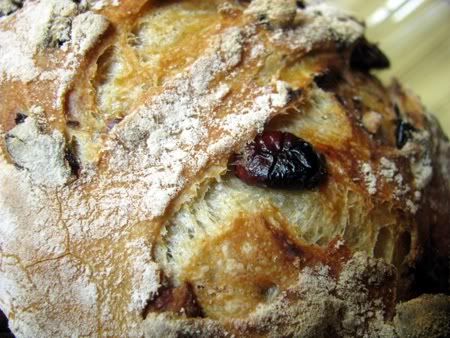
Cranberry Pecan Bread Baked in a Covered Pot
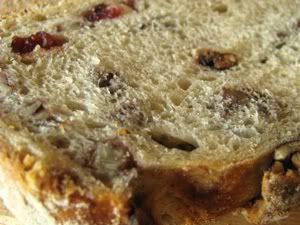
a slice of cranberry pecan bread so you can see inside
Thread in cooking: http://community.livejournal.com/cooking/8936871.html
Thread in food_porn: http://community.livejournal.com/food_porn/6116736.html
Worked for zoethe!: http://zoethe.livejournal.com/793185.html
One of the things I love most about this ABi5 method is that it really made me feel free to play with the recipe. The ingredients are relatively inexpensive (compared to paying $3-$6 per loaf at our favorite bakery) and the effort is also low so I don't feel too badly if a batch comes out badly. I can shrug it off and try tweaking the next batch. After getting the hang of the Basic Boule recipe, I started playing a little with it. You can too! They've made it so easy with this method.

I put the rest behind an LJ-cut because it's long but PLEASE do click through because there are some beautiful loaves at the end and it hurts me to think that you might not see them. Partly because I want to show off. Partly because I think you'll then be inspired to try making this yourself since the steps really aren't difficult! OK...one more sneak peek photo to lure you on to the rest of this post:
Mix In Other Flavors
First I tried mixing in 1 tsp of herbs and then 1 Tbsp of herbs per loaf. I tried fresh rosemary and dried dill. What other herbs would you try? I also sprinkled shredded cheddar cheese on top of the loaf for the last 10 minutes of baking and that melted nicely.

Herb Bread on the left and Boule topped with Cheddar Cheese on the right
Whole Wheat and Light Whole Wheat
I felt a wee bit guilty about eating so much bread that I tried making the Whole Wheat version which turned out into a rather flat loaf. (If you want to use their method for whole wheat bread, get the recipe from their SECOND book, NOT the first!) So I scaled back and just substituted one cup of whole wheat flour for one of the cups of all-purpose flour. Later when I was flipping through their book, I realized I had stumbled upon their recipe for Light Whole Wheat Bread with that 1 cup of whole wheat flour.
Using Less Yeast and Building More Flavor
But I was still also trying recipes for making bread in other ways and felt that those loaves tasted better -- although they also required more time and effort. I stumbled across this post talking about using less yeast and tried that. It takes longer but that extra time is spent just waiting, not actively working with the dough, so it's not too big a deal. Using less yeast means the dough rises more slowly. This slow rise seemed to build better flavor. The less yeast you used, the more time you had to let it rise before you put the dough away in the fridge. You also needed to let the formed loaf sit longer on the counter for its second rise before going into the oven. I tried the original amount of yeast (1 1/2 Tbsp), half as much yeast (3/4 Tbsp), and once with just 1/2 tsp yeast. Decided the middle amount of yeast yielded the best bang for my buck. The really low yeast version meant I had to remember to take the dough out of the fridge at least 2.5 hours before I wanted to eat it! Also note that if the water you use is cold or the room is chillier, you'll also want to let your dough rise longer.
Yeast First Rise Second Rise
Original 1 1/2 Tbsp ~2 hours ~40 minutes
Low Yeast 3/4 Tbsp ~4-5 hours 1 hour
Lowest Yeast 1/2 tsp ~6-12 hours 2 hours
Rolling In Other Ingredients
Originally, for mixing in other flavors, I had just kneaded in the added herbs or sprinkled stuff on top. But then I saw a reference to how to roll in other ingredients to get them more evenly distributed throughout the dough. And I thought, if cheese tastes good on top of the loaf, I bet it tastes even better when it's in every bite! So I stretched and patted the dough out into a sheet, sprinkled some shredded cheese on top, then rolled it up jelly-roll style. Then pulled that into a little ball shape and set it aside to rest. So good! Plus the extra fat from the cheese seemed to help the bread stay fresh a little longer. The cheddar cheese loaves didn't go stale nearly as quickly as the plain boules did. I repeated this technique with other loaves mixing in raisins as well as chopped and toasted nuts. They have a video on their website that shows how to roll in other ingredients.

How to roll more ingredients into your loaf
Cheddar Cheese Bread is the current household favorite. Plenty of flavor for not much effort.
Baking In a Covered Pot (or How to Get a Fabulous Crust)
Another point of dissatisfaction had been that the crust was ok but nothing special. The ABi5 forums have lots of great information in them and this post yielded the piece of advice that let me turn out loaves that looked gorgeous. Remember when Bittman wrote in the NY Times about Jim Lahey's No-Knead Bread? Seemed like everyone was baking that bread! I bought my enameled cast-iron Dutch oven just so I could bake that bread (though I didn't actually get around to trying it because I stumbled across ABi5 first). Using this method means you also don't need the baking stone and pizza peel they suggest you use in the original recipe. But the biggest advantage is that placing this relatively high-moisture dough into a covered post means all that moisture stays close to your bread, creating this nice steamy chamber. The result was a beautifully crisp crust. I use a big 6-quart pot because it's the size that I have but the bigger size is also nice since I don't have to worry about my hands touching the hot sides of the pot when I put the dough in. The other change is that the formed dough has its second rise on a piece of parchment paper so you can just pick up the whole thing and drop it into the pot. Picking it up by the parchment paper has the added bonus of the loaf not sticking to the counter such that I deflate a lot of the air bubbles trying to pick it up. And while the parchment paper browns, it doesn't burn. Bake 15 minutes at 500F with the lid on. Then lower the temp to 450F and bake uncovered for another 10-15 minutes while the crust browns. Total time depends on the size of your loaf. Bigger loaves will need more time.
Boule with Variations
This mixes up enough dough for about 4 loaves of bread. (also, you might want to refer to my last post for more details about this method)
Dough:
3 cups lukewarm water
3/4 Tablespoons granulated yeast (1-1/2 packets)(2 1/4 tsp) (used less yeast)
1-1/2 tablespoons kosher or other coarse salt
5-1/2 cups unsifted, unbleached, all-purpose white flour
1 cup whole wheat flour (If I've run out of WW flour then I just use a total of 6.5 cups all-purpose flour)
Optional Variations Ingredients:
1 tsp to 1 Tbsp fresh or dried herbs
1/4 cup shredded cheddar cheese (if just sprinkling on top)
1 cup shredded cheddar cheese (if including it inside the bread)
1/2 cup to 1 cup raisins and/or toasted+chopped nuts (pecans are my favorite)
Other Equipment:
enameled cast-iron covered pot (Dutch Oven) [might need to replace knob on lid if it's plastic]
parchment paper
Instructions:
Prep work:
Mix all the ingredients for the dough together in a big 5-quart plastic bowl or a container. Cover loosely with plastic wrap or with a lid and then let rise for 4 to 5 hours. Mine has generally been done by 4 hours. You'll know it's ready when you see that the level of the dough in the container has reached a peak and is now oozing back down. After this first rise, put your dough in its loosely-covered container into the fridge. I find the dough much easier to work with after it has chilled for a day but you could continue right on to the next step if you really wanted.
Baking Day:
- Dust your hands and the surface of the dough with flour. Grab a hunk of dough big enough to form a ball about the size of a grapefruit (roughly one-fourth of the original batch). Put the rest of the dough back in the fridge for the next time you want to make bread.
- Pick a flavor variation and prep the dough accordingly. Don't forget to sprinkle flour on your work surface too if you're planning to work the dough much. The dough is a bit sticky. So mix in some herbs if you wanted to make herb bread. Stretch it out into a sheet and sprinkle in cheese, raisins, and/or nuts and roll it up jelly-roll style if you want Cheddar Cheese Bread or Raisin Pecan Bread.
- Form your dough into a ball and then place it on a piece of parchment paper to rest about an hour.
- About half an hour before you bake, turn your oven on to pre-heat to 500F. Put your cast-iron pot in there too.
- Just before baking, sprinkle flour on top of shaped dough, slash the dough about 1/4-inch deep with a serrated knife, and then carefully lift the parchment paper and dough to put it into the pot.
- Bake covered at 500F for 15 minutes.
- Remove lid, bake at 450F and bake another 15-20 minutes. (I've been doing 10-15 minutes since we tend to make slightly smaller loaves for just 2 people) This is also when I sprinkle some more cheddar cheese on top if I wanted to melt some on top.
- Once done, remove bread from parchment paper and let cool on a wire rack.
- Congratulate yourself on bringing homemade bread into your life.
See how versatile this basic recipe is? See how beautiful this bread is?

Basic Boule Baked in a Covered Pot

Cranberry Pecan Bread Baked in a Covered Pot

a slice of cranberry pecan bread so you can see inside
Thread in cooking: http://community.livejournal.com/cooking/8936871.html
Thread in food_porn: http://community.livejournal.com/food_porn/6116736.html
Worked for zoethe!: http://zoethe.livejournal.com/793185.html