124 English Gentry; Peter Som Inspired Lace Frill
16 September 2008- One of the Unwearables (definition: a piece of garment that your parents or other half would never allow you to wear out of the house) in my wardrobe is a soft, dainty, nude blouse from Mango prettily trimmed with the sweetest pink lace, all on account of the glaring nose-dive that is its neckline. Despite my mother's marked disapproval over the plunging V neck, I was determined that this lovely blouse of mine should never be surrendered to the desolate pile of the Unwanted and Unworn. So, racking my brains, I did the only sensible thing I could have done - layer the blouse. Deciding that an English gentry look would be perfect to go with the romantic mood of my lacy top, I chose a sleeveless, collared, pleated shirt as the inner piece. Then, inspired by Peter Som's f/w 2005 collection, I randomly concocted a lace frill to dress up my collar.


white sleeveless collared pleated blouse last worn here (inner) - made by mum
nude plunging v neck top trimmed with lace (outer) - Mango
brown skirt with little notch in the middle last worn here - made by mum
bag in a gorgeous crimson red last carried here - online
i always felt nude and dark red went together.
camellia brooch last worn here - mum's
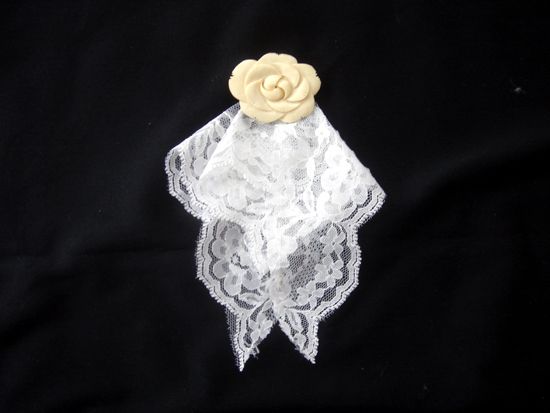
lace frill at collar - really a strip of lace randomly folded to resemble
what i saw on a Peter Som blouse
portrait of a girl ring - Ocean Launa
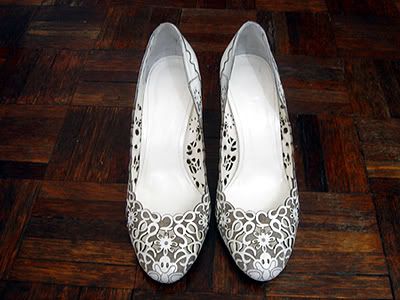
white shoes with scallop edges and cutouts last worn here - August Ryan

Closeup of the DIY lace frill at the collar. Steps on how I folded the lace frill may be viewed in the second half of this entry.

This camellia brooch from my mum's collection is a real gem. It's rare to find flower brooches nowadays that are neither made out of fabric, nor molded from ugly glossy plastic a la Anna Sui. And I dare say, when compared with Chanel's signature camellia, this heirloom is prettier by far.

Said Edmund to me, "doesn't the girl on this ring look like you?"
"Really dear? I think not." - but I bought her anyway.
With her purple dress and gold locks, this girl could very well be Goldilocks. I like how the designer has chosen her side view to frame in a ring; it is more eye-catching than say, a full frontal view: all lips, eyes and nose. She appears to be musing about something. Well, being Goldilocks she must be thinking about the bears' porridge...
To wear lace on my feet - what a luxury indeed.
(Of course, if one factors in the pain it's a different story. I can hardly call painful feet a luxury.)
More pictures of shoes here.
--------------------------------------------------------------------------------------------------------------------
A step-by-step guide on how I folded the lace:


To dress up my plain, pleated blouse, I tried my hand at origami folding on an impulse, taking inspiration from Peter Som's f/w 2005 collection. The result was an ad-hoc lace frill composed out of the following materials: a strip of lace I found in my mum's stash of old cloth, a safety-pin, and a beautifully sculpted camellia brooch. Unlike Peter Som's creation, my interpretation of the lace frill is softer and more romantic.

The folds I made to create my lace frill were entirely random at first, as I was rushing for time to get dressed. I subsequently devised a proper method after experimenting with the strip of lace a few more times and documented the steps as shown below.

1. Fold the left end under the strip of lace,
2. and the right end over.
This is to ensure that the scalloped sides of each end face outwards.

3. Visually picture a diagonal line (represented by the blue dashed line above) in the middle thereabouts of your left fold, and bring the right end of your strip over to the left against this axis.
4. Now fold that overhanging end down again against the topmost point of your left fold.
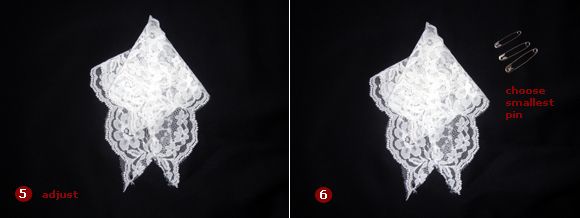
5. Adjust the folds to your satisfaction. This is your lace frill, unsecured and undecorated.
6. Pick a small safety pin, ideally one that measures about 2.8cm.
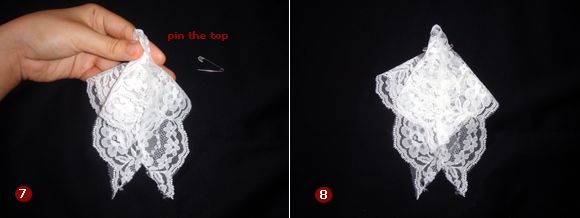
7. Pinch the uppermost top of your lace frill and push the pin through. Make sure the pin goes through all your folds as this will, albeit roughly, secure their shape.
8. This is how it looks after securing the pin. Never mind the fact that the pin can be seen or that the shape of your frill toward the top is slightly ruined, as this will be covered by your brooch.
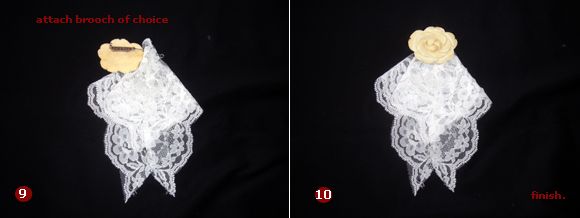
9. Attach the brooch of your choice to the top of your lace frill.
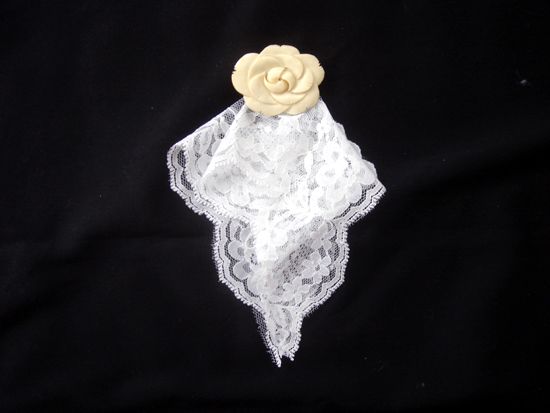
10. End result :)
Lace frill, version 1.

If you are unsatisfied with the stray ends at the bottom of your lace frill and wish to eliminate the gaping hole between them,
11. pull the two ends together. You need not re-pin anything.
12. End result as shown.
Lace frill, version 2.
white sleeveless collared pleated blouse last worn here (inner) - made by mum
nude plunging v neck top trimmed with lace (outer) - Mango
brown skirt with little notch in the middle last worn here - made by mum
bag in a gorgeous crimson red last carried here - online
i always felt nude and dark red went together.
camellia brooch last worn here - mum's
lace frill at collar - really a strip of lace randomly folded to resemble
what i saw on a Peter Som blouse
portrait of a girl ring - Ocean Launa
white shoes with scallop edges and cutouts last worn here - August Ryan
Closeup of the DIY lace frill at the collar. Steps on how I folded the lace frill may be viewed in the second half of this entry.
This camellia brooch from my mum's collection is a real gem. It's rare to find flower brooches nowadays that are neither made out of fabric, nor molded from ugly glossy plastic a la Anna Sui. And I dare say, when compared with Chanel's signature camellia, this heirloom is prettier by far.
Said Edmund to me, "doesn't the girl on this ring look like you?"
"Really dear? I think not." - but I bought her anyway.
With her purple dress and gold locks, this girl could very well be Goldilocks. I like how the designer has chosen her side view to frame in a ring; it is more eye-catching than say, a full frontal view: all lips, eyes and nose. She appears to be musing about something. Well, being Goldilocks she must be thinking about the bears' porridge...
To wear lace on my feet - what a luxury indeed.
(Of course, if one factors in the pain it's a different story. I can hardly call painful feet a luxury.)
More pictures of shoes here.
--------------------------------------------------------------------------------------------------------------------
A step-by-step guide on how I folded the lace:
To dress up my plain, pleated blouse, I tried my hand at origami folding on an impulse, taking inspiration from Peter Som's f/w 2005 collection. The result was an ad-hoc lace frill composed out of the following materials: a strip of lace I found in my mum's stash of old cloth, a safety-pin, and a beautifully sculpted camellia brooch. Unlike Peter Som's creation, my interpretation of the lace frill is softer and more romantic.
The folds I made to create my lace frill were entirely random at first, as I was rushing for time to get dressed. I subsequently devised a proper method after experimenting with the strip of lace a few more times and documented the steps as shown below.
1. Fold the left end under the strip of lace,
2. and the right end over.
This is to ensure that the scalloped sides of each end face outwards.
3. Visually picture a diagonal line (represented by the blue dashed line above) in the middle thereabouts of your left fold, and bring the right end of your strip over to the left against this axis.
4. Now fold that overhanging end down again against the topmost point of your left fold.
5. Adjust the folds to your satisfaction. This is your lace frill, unsecured and undecorated.
6. Pick a small safety pin, ideally one that measures about 2.8cm.
7. Pinch the uppermost top of your lace frill and push the pin through. Make sure the pin goes through all your folds as this will, albeit roughly, secure their shape.
8. This is how it looks after securing the pin. Never mind the fact that the pin can be seen or that the shape of your frill toward the top is slightly ruined, as this will be covered by your brooch.
9. Attach the brooch of your choice to the top of your lace frill.
10. End result :)
Lace frill, version 1.
If you are unsatisfied with the stray ends at the bottom of your lace frill and wish to eliminate the gaping hole between them,
11. pull the two ends together. You need not re-pin anything.
12. End result as shown.
Lace frill, version 2.