[paid accounts] Connected Comments
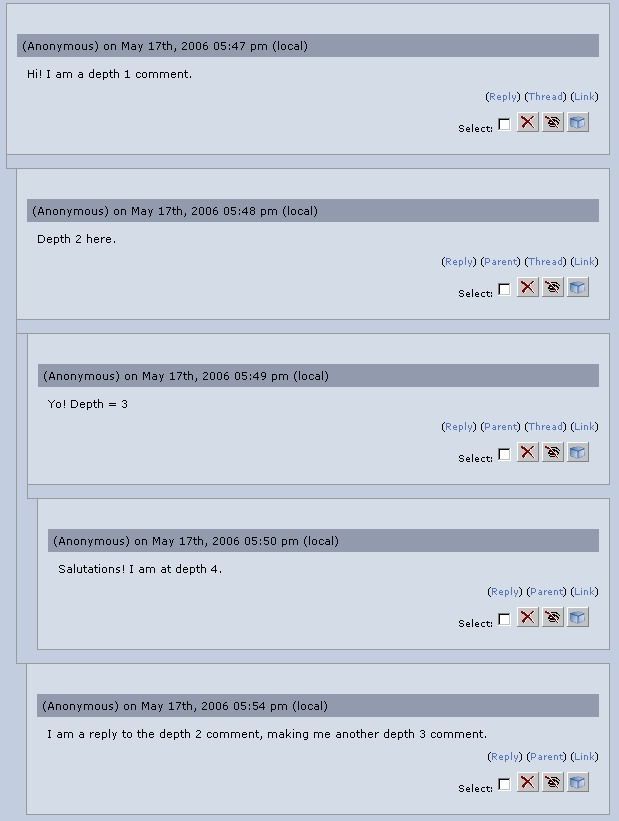
This tutorial (for paid accounts only) adds linking lines between comments, so that your eye has an easier time following branched threads. The code can also be customized to reduce the amount of indentation used to indicate comment depth, so that your long comment threads don't span so much horizontal space, or get squished. See preview image:

Note that with this code, your comments will only ever indent from the left -- the indentation will no longer be determined by the side on which user pics are shown.
Instructions
1. Make sure you have created a theme layer.
2. Do you already have the EntryPage::print_comments function in your theme layer? If yes, skip down to Part B. Otherwise, if that function is not already in your theme layer, follow the instructions in Part A.
function Page::print_custom_head() {
"""
""";
}
4. Add this code to your Page::print_custom_head function, just before the line:
""";
# Specify how much indentation to use on comments to indicate thread depth
var int indent = 10;
"""
/* Comments with connecting lines */
.commenttrace_x {
border-top: 1px solid $*border_color;
}
.commenttrace_y {
border-left: 1px solid $*border_color;
}
.commentforceindent {
border-style: none;
margin-left: ${indent}px;
}
.commentbox, .commentboxpartial {
margin: 0 0 0 ${indent}px;
border-top: 0px none $*border_color;
border-right: 1px solid $*border_color;
border-bottom: 1px solid $*border_color;
border-left: 1px solid $*border_color;
}
5. You can provide a custom value for $indent to change the amount of space used to indent comments horizontally.
6. Compile your layer and check your journal to see if your comments are connected together by helpful linking lines.
Additional Tweaks
If you have really long comment threads, you may want to make a slightly radical change and eliminate comment indentation almost completely. With this scheme, the reader must rely entirely upon the connecting lines to figure out if a comment is a same-depth sibling to the one above it, or if it is a reply to that preceding comment. A comment will still indent if it is one of several same-depth replies to its parent comment, just so that the connecting lines have space to display, but otherwise there will be no indentation past a comment depth level of your choosing.
To implement this change, look at the top of your EntryPage::print_comments function for this line (shown in blue in both Step 2 and Step 3):
var int no_indent_depth = 1000000;
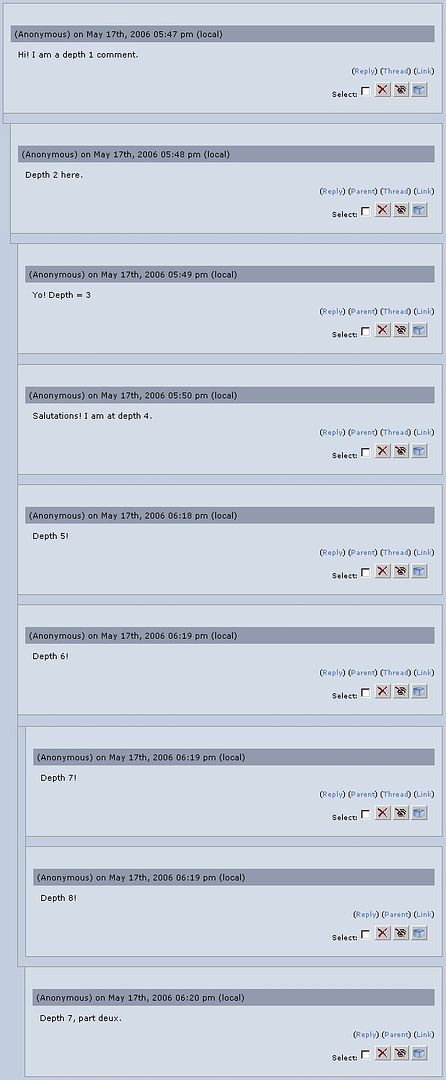
By default the $no_indent_depth variable is set to a huge number, so that comments at all depths use normal indentation. You can reduce this number to halt indentation at a certain comment depth. If you change this variable to 4, for example, then comments at depth 4 and deeper will all display with the same amount of indentation as depth 3 comments. For comments at depth 4, 5, 6, etc. any further indentation will be triggered only when a comment has multiple same-depth replies, forcing the thread to branch. See preview image:

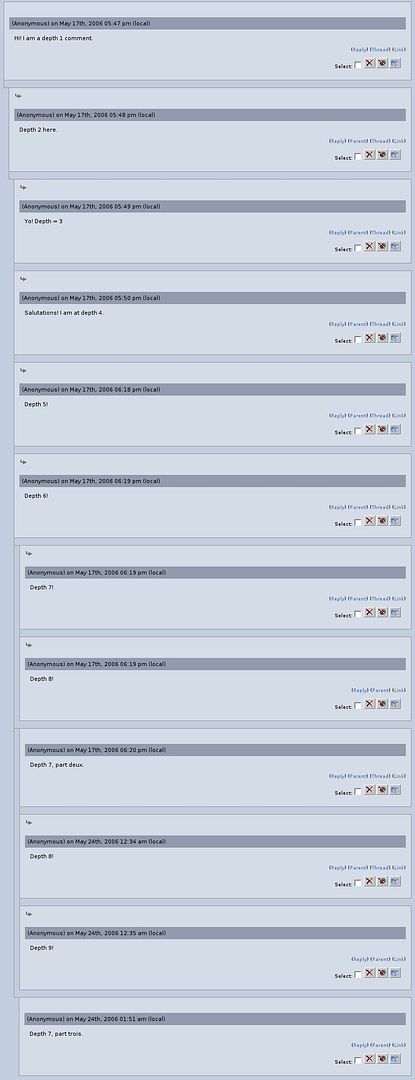
Since people may become confused by the lack of indentation, you may want to consider adding a small arrow image to any comment that is in reply to the comment immediately above. When a comment is shown that is *not* a reply to the comment above it, but is in fact in reply to a comment further up on the page, that comment will lack an arrow image, which will hopefully be a clue to readers to follow the linking line up to the parent comment. See preview image:

You can do this by finding an image you like, uploading it to some hosting space, and then adding the blue code below to your EntryPage::print_comments function:
"""
""";
"""""";
"""
\n""";
if (($count == 0) and ($c.depth >= 2)) {
"""

YOUR_IMAGE_URL" alt="In reply to above" title="In reply to above" />""";
}
if ( $c.full ) {
$this->print_comment( $c );
}
else {
$this->print_comment_partial( $c );
}
"";
Replace YOUR_IMAGE_URL with the URL of your own image.
If you would like your image to change colour automatically when you change your journal colours, make sure you create a grayscale PNG or GIF image and upload it to Scrapbook (you must host it on Scrapbook and not on an external image hosting service, otherwise the colour matching won't work). Then add this code just above the blue code you added in the last step:
var string img_color = $*border_color.as_string;
$img_color = $img_color->substr(1, $img_color->length());
Make sure you modify YOUR_IMAGE_URL to point to the Scrapbook image URL, and then append the blue code below to that URL:
"""
YOUR_SCRAPBOOK_URL/pt$img_color" alt="In reply to above" title="In reply to above" />""";
Now your image should get tinted with your journal's border colour, whatever it may be.
Note that with this code, your comments will only ever indent from the left -- the indentation will no longer be determined by the side on which user pics are shown.
Instructions
1. Make sure you have created a theme layer.
2. Do you already have the EntryPage::print_comments function in your theme layer? If yes, skip down to Part B. Otherwise, if that function is not already in your theme layer, follow the instructions in Part A.
- Part A: Add this function to your layer and then proceed to Step 3:
function EntryPage::print_comments(Comment[] comments) {
# Specify where you want to halt the indentation -- comments at this
# depth will have the same amount of indent as their parent comment.
# Note that comments with same-depth siblings will still indent.
var int no_indent_depth = 1000000;
if ( size $comments == 0 ) {
return;
}
var int count = 0;
foreach var Comment c ( $comments ) {
var string indent = "";
var string partialcomment = $c.full ? "" : "partial";
var string sideborder = "";
if ((size $comments <= 1) and ($c.depth >= $no_indent_depth)) {
$indent = "margin-left: 0px;";
}
if ($c.depth == 1) {
$indent = "margin-left: 0px;";
$sideborder = "border-left: 0 none black;";
}
# Open the div that provides the left trace
"""
""";
# This is the last comment at this level, so close the vertical trace div right away
if ($count == (size $comments - 1)) {
"";
}
"""
""";
"""""";
"""
\n""";
if ( $c.full ) {
$this->print_comment( $c );
}
else {
$this->print_comment_partial( $c );
}
"";
"""
""";
$this->print_comments($c.replies);
"";
# This was not the last comment at this level, so only close the vertical trace
# div now, so it spans all replies
if ($count != (size $comments - 1)) {
"";
}
$count = $count + 1;
}
} - Part B: If you already have the EntryPage::print_comments function in your theme layer, you will need to try to integrate your existing version with the code below. To help you with this task, the code that was changed/added to the Flexible Squares system layer version of EntryPage::print_comments is shown in blue (with helpful comments in green). Code that was removed from the system function is in red. If you have trouble merging your code, please make your layer viewable and comment to this post with the link to your layer. Someone will be along to take a look at your code and help you out. Once the functions have been merged, proceed to Step 3.
function EntryPage::print_comments(Comment[] comments) {
# Specify where you want to halt the indentation -- comments at this
# depth will have the same amount of indent as their parent comment.
# Note that comments with same-depth siblings will still indent.
var int no_indent_depth = 1000000;
if ( size $comments == 0 ) {
return;
}
var int count = 0;
foreach var Comment c ( $comments ) {
var string indent = "";
var string partialcomment = $c.full ? "" : "partial";
var string margin = "";
if ($*userpic_position == "left")
{
$margin = "right";
}
else
{
$margin = "left";
}
var string sideborder = "";
if ((size $comments <= 1) and ($c.depth >= $no_indent_depth)) {
$indent = "margin-left: 0px;";
}
if ($c.depth == 1) {
$indent = "margin-left: 0px;";
$sideborder = "border-left: 0 none black;";
}
# Open the div that provides the left trace
"""
""";
# This is the last comment at this level, so close the vertical trace div right away
if ($count == (size $comments - 1)) {
"";
}
"""
""";
"""""";
"""
$indent">\n""";
if ( $c.full ) {
$this->print_comment( $c );
}
else {
$this->print_comment_partial( $c );
}
"";
"""
""";
$this->print_comments($c.replies);
"";
# This was not the last comment at this level, so only close the vertical trace
# div now, so it spans all replies
if ($count != (size $comments - 1)) {
"";
}
$count = $count + 1;
}
}
function Page::print_custom_head() {
"""
""";
}
4. Add this code to your Page::print_custom_head function, just before the line:
""";
# Specify how much indentation to use on comments to indicate thread depth
var int indent = 10;
"""
/* Comments with connecting lines */
.commenttrace_x {
border-top: 1px solid $*border_color;
}
.commenttrace_y {
border-left: 1px solid $*border_color;
}
.commentforceindent {
border-style: none;
margin-left: ${indent}px;
}
.commentbox, .commentboxpartial {
margin: 0 0 0 ${indent}px;
border-top: 0px none $*border_color;
border-right: 1px solid $*border_color;
border-bottom: 1px solid $*border_color;
border-left: 1px solid $*border_color;
}
5. You can provide a custom value for $indent to change the amount of space used to indent comments horizontally.
6. Compile your layer and check your journal to see if your comments are connected together by helpful linking lines.
Additional Tweaks
If you have really long comment threads, you may want to make a slightly radical change and eliminate comment indentation almost completely. With this scheme, the reader must rely entirely upon the connecting lines to figure out if a comment is a same-depth sibling to the one above it, or if it is a reply to that preceding comment. A comment will still indent if it is one of several same-depth replies to its parent comment, just so that the connecting lines have space to display, but otherwise there will be no indentation past a comment depth level of your choosing.
To implement this change, look at the top of your EntryPage::print_comments function for this line (shown in blue in both Step 2 and Step 3):
var int no_indent_depth = 1000000;
By default the $no_indent_depth variable is set to a huge number, so that comments at all depths use normal indentation. You can reduce this number to halt indentation at a certain comment depth. If you change this variable to 4, for example, then comments at depth 4 and deeper will all display with the same amount of indentation as depth 3 comments. For comments at depth 4, 5, 6, etc. any further indentation will be triggered only when a comment has multiple same-depth replies, forcing the thread to branch. See preview image:
Since people may become confused by the lack of indentation, you may want to consider adding a small arrow image to any comment that is in reply to the comment immediately above. When a comment is shown that is *not* a reply to the comment above it, but is in fact in reply to a comment further up on the page, that comment will lack an arrow image, which will hopefully be a clue to readers to follow the linking line up to the parent comment. See preview image:
You can do this by finding an image you like, uploading it to some hosting space, and then adding the blue code below to your EntryPage::print_comments function:
"""
""";
"""""";
"""
\n""";
if (($count == 0) and ($c.depth >= 2)) {
"""
YOUR_IMAGE_URL" alt="In reply to above" title="In reply to above" />""";
}
if ( $c.full ) {
$this->print_comment( $c );
}
else {
$this->print_comment_partial( $c );
}
"";
Replace YOUR_IMAGE_URL with the URL of your own image.
If you would like your image to change colour automatically when you change your journal colours, make sure you create a grayscale PNG or GIF image and upload it to Scrapbook (you must host it on Scrapbook and not on an external image hosting service, otherwise the colour matching won't work). Then add this code just above the blue code you added in the last step:
var string img_color = $*border_color.as_string;
$img_color = $img_color->substr(1, $img_color->length());
Make sure you modify YOUR_IMAGE_URL to point to the Scrapbook image URL, and then append the blue code below to that URL:
"""
YOUR_SCRAPBOOK_URL/pt$img_color" alt="In reply to above" title="In reply to above" />""";
Now your image should get tinted with your journal's border colour, whatever it may be.