Tutorial #2 - Michelle Trachtenberg (whitewashed)
On this lazy Sunday afternoon we will be going from
this: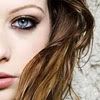
to this: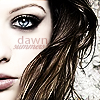
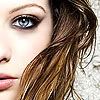
#1. Sharpen once, then use the Sharpen Tool set to apprx. 10% and carefully go over her hair to enhance the texture, then soften the skin of her face by using a combo of the Blur Tool set to apprx. 20% for large areas and the Smudge Tool set to apprx. 10% for small areas. For a bit more detail on how I do this see step #2 of this tutorial. I then used the Smudge Tool (same strength)to add extra smudge to her eyeliner and to 'wing it out' at the outer corner of her eye.
#2. Duplicate the layer. On the top image adjust the brightness/contrast to -23(brightness) and +16(contrast), set to Soft light.
She should look like this: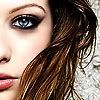
#3. Duplicate the base. Erase everything except the iris (colored part) of her eye, set to Linear Dodge.
Now she looks like this: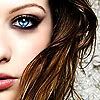
#4. *drumroll* That's right, y'all know what's coming: on a new blank/transparent layer flood fill with #062E50, set to Exclusion 70%.
#5. Duplicate the base layer, drag it to the top and set to Overlay 100%. I then duplicated that layer, desaturated it (Image > Adjustments > Desaturate or Shift+Ctrl+U), fade the desaturation (Edit > Fade or Shift+Ctrl+F) to 45% and set the layer to Color 80%
#6. Then I added a new blank/transparent layer, flood filled with white (#FFFFFF) and set that to Color 18%
We now have this:
Layer Review:

: Color 18%(only has a border so it would show up)
: Color 80%
: Overlay 100%

: Exclusion 70%

: Liner Dodge 100% (on white background and framed only for visual purposes, as layer it should be transparent other than MT's eyeball)
Soft Light 100%
: Normal 100% (Background)
I loathe doing text, so I just used the dropper tool to pick up the color from her lips and added her name (I forgot the fonts, sizes, blending mode and kerning used). If you have any questions, shoot 'em at me.
Finished icon is sharable. Please comment and credit if taking/using.
this:
to this:
#1. Sharpen once, then use the Sharpen Tool set to apprx. 10% and carefully go over her hair to enhance the texture, then soften the skin of her face by using a combo of the Blur Tool set to apprx. 20% for large areas and the Smudge Tool set to apprx. 10% for small areas. For a bit more detail on how I do this see step #2 of this tutorial. I then used the Smudge Tool (same strength)to add extra smudge to her eyeliner and to 'wing it out' at the outer corner of her eye.
#2. Duplicate the layer. On the top image adjust the brightness/contrast to -23(brightness) and +16(contrast), set to Soft light.
She should look like this:
#3. Duplicate the base. Erase everything except the iris (colored part) of her eye, set to Linear Dodge.
Now she looks like this:
#4. *drumroll* That's right, y'all know what's coming: on a new blank/transparent layer flood fill with #062E50, set to Exclusion 70%.
#5. Duplicate the base layer, drag it to the top and set to Overlay 100%. I then duplicated that layer, desaturated it (Image > Adjustments > Desaturate or Shift+Ctrl+U), fade the desaturation (Edit > Fade or Shift+Ctrl+F) to 45% and set the layer to Color 80%
#6. Then I added a new blank/transparent layer, flood filled with white (#FFFFFF) and set that to Color 18%
We now have this:
Layer Review:
: Color 18%(only has a border so it would show up)
: Color 80%
: Overlay 100%
: Exclusion 70%
: Liner Dodge 100% (on white background and framed only for visual purposes, as layer it should be transparent other than MT's eyeball)
Soft Light 100%
: Normal 100% (Background)
I loathe doing text, so I just used the dropper tool to pick up the color from her lips and added her name (I forgot the fonts, sizes, blending mode and kerning used). If you have any questions, shoot 'em at me.
Finished icon is sharable. Please comment and credit if taking/using.