Basic Manga Tutorial
Coloring Manga without those pesky textures and all those complicated adjustment layers.
Skill-builder tutorial for the beginner in manga coloring.
Photoshop 7, Translatable.
Should at least be knowlegeable in changing Layer Type/Blend and selecting colors.
I made this tutorial for a friend, who is not used at coloring manga. Very EASY STUFF. Very Wordy because I like to explain WHY. All tutorials should explain principles ♥
How to make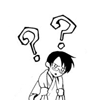
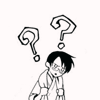
into
This tutorial was made using the Web Hues Swatches Pallette.
1. Take your Base:
and make sure it's set to Normal. This works if you put the coloring layers ABOVE the Base. If you color BELOW the Base, Set the Base to Multiply. For this tutorial, we'll set the Base to Normal and Create Layers Above.
Create a Layer Above the Base and fill with #003333.
Set Layer to Exclusion.
Adjust Opacity to 10%.
Exclusion layers give your final output a richer look and it also prevents a washed out look. Since we'll be doing very basic stuff, an exclusion of 10% is enough to give it a very light pinkish er...color, just to prevent a washed out look and to avoid any further color adjustments.
Note on Exclusion Layer: #003333 as an Exclusion gives a rich pinkish color. You can also use colors such as #003366 which gives off something golden. Experimenting on Exclusion Opacities is highly recommend.
! Because the lines of this base are very bold and clean, we'll just go ahead and use this Magic Wand.
.
2. Coloring. :D We'll create the Coloring layers ABOVE the base. Setting this Coloring Layers to Multiply (or Linear Burn) allows the darker areas (the black lines) of your Manga to seep through the layer. You won't have a headache coloring because you can see the black lines.
2a. SKIN.
Make sure your BASE Layer is selected. Click on the Magic Wand and click on the area on Watanuki's face.
Create a new Layer Above your Base.
Fill that with #ffcc99.
Now Set that New Layer to Multiply. The darker lines wrap around the color so yay.
But it's too dark, so Adjust Opacity to 40%.
Repeat Process for Hands.
Name this Layer: Skin Layer (For Clarity purposes)
2b. QUESTION MARK
**Select the Base Layer Again and Click on the Area inside the Question. If the Wand did not cover all the area you want to paint, just Press SHIFT (you'll see a + sign) and click again.
**Create a new Layer Above your Skin Layer.
Fill with #ffc761.
Instead of setting this to Multiply, we'll set this to Linear Burn to make the color a little more vibrant. (You can experiment to see the difference). The darker lines will still pass through the layer so you won't any problems coloring.
The color is fine as it is. No opacity adjustments needed.
2c. WATANUKI'S TOWEL
By now you should know what you will do to color. **
Fill with the #ffc761.
Set this Layer to Linear Burn.

2d. WATANUKI'S YUKATA
You're already good at this so... after the usual method
Fill with #dfbc9d.
Set to Linear Burn.
Adjust Opacity to 60.
3. Teh PINK.
To quickly color with minimal trouble, go to your base and use your Magic Wand to Click on the Area Inside the Question Marks. Press Shift and Click again if you miss any areas.
Create a new layer.
Set to Multiply.
RIGHT CLICK on the Active Area (the Question Marks Area Created by Your Wand) and Select INVERSE. :D You'll like this technique.
Fill that Layer with #ff545e.
The pink around Watanuki should be easy to erase. Since the base lines are very clean, get a hard round brush for erasing.
The Layers should look like this:

Final Babblings:
The Magic Wand is only reliable when your base lines are as clean as this one...which is very rare.
The colors are fine as it is. The icon is simple to make. While textures add zest, I think it's always awesome to ...respect, I guess, your base. :>
Skill-builder tutorial for the beginner in manga coloring.
Photoshop 7, Translatable.
Should at least be knowlegeable in changing Layer Type/Blend and selecting colors.
I made this tutorial for a friend, who is not used at coloring manga. Very EASY STUFF. Very Wordy because I like to explain WHY. All tutorials should explain principles ♥
How to make
into
This tutorial was made using the Web Hues Swatches Pallette.
1. Take your Base:
and make sure it's set to Normal. This works if you put the coloring layers ABOVE the Base. If you color BELOW the Base, Set the Base to Multiply. For this tutorial, we'll set the Base to Normal and Create Layers Above.
Create a Layer Above the Base and fill with #003333.
Set Layer to Exclusion.
Adjust Opacity to 10%.
Exclusion layers give your final output a richer look and it also prevents a washed out look. Since we'll be doing very basic stuff, an exclusion of 10% is enough to give it a very light pinkish er...color, just to prevent a washed out look and to avoid any further color adjustments.
Note on Exclusion Layer: #003333 as an Exclusion gives a rich pinkish color. You can also use colors such as #003366 which gives off something golden. Experimenting on Exclusion Opacities is highly recommend.
! Because the lines of this base are very bold and clean, we'll just go ahead and use this Magic Wand.
.
2. Coloring. :D We'll create the Coloring layers ABOVE the base. Setting this Coloring Layers to Multiply (or Linear Burn) allows the darker areas (the black lines) of your Manga to seep through the layer. You won't have a headache coloring because you can see the black lines.
2a. SKIN.
Make sure your BASE Layer is selected. Click on the Magic Wand and click on the area on Watanuki's face.
Create a new Layer Above your Base.
Fill that with #ffcc99.
Now Set that New Layer to Multiply. The darker lines wrap around the color so yay.
But it's too dark, so Adjust Opacity to 40%.
Repeat Process for Hands.
Name this Layer: Skin Layer (For Clarity purposes)
2b. QUESTION MARK
**Select the Base Layer Again and Click on the Area inside the Question. If the Wand did not cover all the area you want to paint, just Press SHIFT (you'll see a + sign) and click again.
**Create a new Layer Above your Skin Layer.
Fill with #ffc761.
Instead of setting this to Multiply, we'll set this to Linear Burn to make the color a little more vibrant. (You can experiment to see the difference). The darker lines will still pass through the layer so you won't any problems coloring.
The color is fine as it is. No opacity adjustments needed.
2c. WATANUKI'S TOWEL
By now you should know what you will do to color. **
Fill with the #ffc761.
Set this Layer to Linear Burn.
2d. WATANUKI'S YUKATA
You're already good at this so... after the usual method
Fill with #dfbc9d.
Set to Linear Burn.
Adjust Opacity to 60.
3. Teh PINK.
To quickly color with minimal trouble, go to your base and use your Magic Wand to Click on the Area Inside the Question Marks. Press Shift and Click again if you miss any areas.
Create a new layer.
Set to Multiply.
RIGHT CLICK on the Active Area (the Question Marks Area Created by Your Wand) and Select INVERSE. :D You'll like this technique.
Fill that Layer with #ff545e.
The pink around Watanuki should be easy to erase. Since the base lines are very clean, get a hard round brush for erasing.
The Layers should look like this:
Final Babblings:
The Magic Wand is only reliable when your base lines are as clean as this one...which is very rare.
The colors are fine as it is. The icon is simple to make. While textures add zest, I think it's always awesome to ...respect, I guess, your base. :>