Tutorial | Icon #034
How to make 
For Photoshop CS2. The .psd file can be found here.
I'm using one Gradient Map Layer.
S T E P : O N E - T H E : T E X T U R E
I used
a texture
of mine
I played around with it and I'm giving you the short run :)
Duplicated it, set copy to screen, merged both layers.
Duplicated the new layer twice, set first copy to Pin Light, second to Soft Light, merged all layers.
Flipped the new layer vertically.
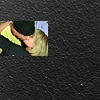
S T E P : T W O - T H E : I M A G E

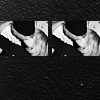
Crop your image down to 48x35.
Sharpen it once and move it to the upper left of the icon.
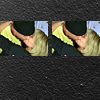
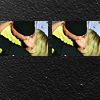
S T E P : T H R E E - T H E : I M A G E : C O P Y

Duplicate the image.
Move it from the left to the right.

S T E P : F O U R - T H E : B A S E
Merge (Ctrl+Shift+E) all layers.
Duplicate your new base.
Set the copy to Soft Light | 10%.
S T E P : F I V E - G R A D I E N T : M A P
Go to Layer >> New Adjustment Layer >> Gradient Map.
Select the black/white gradient.
S T E P : S I X - T E X T

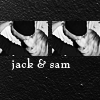
Write your text.
Bernhard Modern Std | Font Style: Roman | Size: 13pt | Tracking: 50
S T E P : S E V E N - T I N Y : T E X T : 0 1
Make a new layer.
Use a tiny text brush by colorfilter in #FFFFFF (white).

S T E P : E I G H T - T I N Y : T E X T : 0 2

Make a new layer.
Use a tiny text brush by fangirls_inc in #FFFFFF (white).

S T E P : N I N E - R E D : B L U R R E D : B R U SH

Make a new layer.
Use a brush by fangirls_inc in #BA0000 (from the put behind set).
Go to Filter >> Blur >> Gaussian Blur and use a radius of 2/3 px.
Set this layer to Screen.
T H E : E N D
For Photoshop CS2. The .psd file can be found here.
I'm using one Gradient Map Layer.
S T E P : O N E - T H E : T E X T U R E
I used
a texture
of mine
I played around with it and I'm giving you the short run :)
Duplicated it, set copy to screen, merged both layers.
Duplicated the new layer twice, set first copy to Pin Light, second to Soft Light, merged all layers.
Flipped the new layer vertically.
S T E P : T W O - T H E : I M A G E
Crop your image down to 48x35.
Sharpen it once and move it to the upper left of the icon.
S T E P : T H R E E - T H E : I M A G E : C O P Y
Duplicate the image.
Move it from the left to the right.
S T E P : F O U R - T H E : B A S E
Merge (Ctrl+Shift+E) all layers.
Duplicate your new base.
Set the copy to Soft Light | 10%.
S T E P : F I V E - G R A D I E N T : M A P
Go to Layer >> New Adjustment Layer >> Gradient Map.
Select the black/white gradient.
S T E P : S I X - T E X T
Write your text.
Bernhard Modern Std | Font Style: Roman | Size: 13pt | Tracking: 50
S T E P : S E V E N - T I N Y : T E X T : 0 1
Make a new layer.
Use a tiny text brush by colorfilter in #FFFFFF (white).
S T E P : E I G H T - T I N Y : T E X T : 0 2
Make a new layer.
Use a tiny text brush by fangirls_inc in #FFFFFF (white).
S T E P : N I N E - R E D : B L U R R E D : B R U SH
Make a new layer.
Use a brush by fangirls_inc in #BA0000 (from the put behind set).
Go to Filter >> Blur >> Gaussian Blur and use a radius of 2/3 px.
Set this layer to Screen.
T H E : E N D