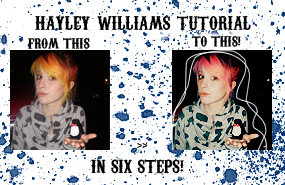
Hayley Williams tutorial.
Hi everyone! Before I left for Disneyland, I wanted to share another tutorial I made up.
Alright.

We’re using the lovely Hayley Williams as our base.
NOTE: This tutorial might not work for all pictures. Try to pick a picture with more colors.
1. Crop your picture and resize it to 100x100.
2. After it’s cropped, duplicate your base image twice. Set one of the layers to screen, and the other to soft light.
3. Make a new color fill layer: #DEC596. Set the layer to multiply at 80%
4. Make a new selective color layer, and I know some people are pretty tired of selective color, so I uploaded it. Let me know when it expires.
Reds: 50/15/100/-25
Yellows: -55/15/-100/20
Whites: 100/-35/-100/-45
Blacks: 35/0/0/10
5. Make a new color balance layer
Shadows: -25/0/15
Highlights: 0/0/-10
6. Now for your optional decoration step: I remember learning this from tutorial but I don’t know where… (http://community.livejournal.com/silencethecity/10639.html)
First, select the smallest brush size.
Then, take your pen tool and change it to freeform pen on the top of you screen. It should be a pen that has a squiggly dotted line on the top.
Draw around your subject or the place where you desire. (If you want cleaner lines, zoom your picture in and draw from that.)
Then right-click and you’ll see “stroke path.” Click that and select the drop-down menu to brush. And after that, press enter and you should see a line that looks like a brush.
And you’re done! I hope this wasn’t hard and I’d love to see your results!
Other results with this tutorial:

Alright.
We’re using the lovely Hayley Williams as our base.
NOTE: This tutorial might not work for all pictures. Try to pick a picture with more colors.
1. Crop your picture and resize it to 100x100.
2. After it’s cropped, duplicate your base image twice. Set one of the layers to screen, and the other to soft light.
3. Make a new color fill layer: #DEC596. Set the layer to multiply at 80%
4. Make a new selective color layer, and I know some people are pretty tired of selective color, so I uploaded it. Let me know when it expires.
Reds: 50/15/100/-25
Yellows: -55/15/-100/20
Whites: 100/-35/-100/-45
Blacks: 35/0/0/10
5. Make a new color balance layer
Shadows: -25/0/15
Highlights: 0/0/-10
6. Now for your optional decoration step: I remember learning this from tutorial but I don’t know where… (http://community.livejournal.com/silencethecity/10639.html)
First, select the smallest brush size.
Then, take your pen tool and change it to freeform pen on the top of you screen. It should be a pen that has a squiggly dotted line on the top.
Draw around your subject or the place where you desire. (If you want cleaner lines, zoom your picture in and draw from that.)
Then right-click and you’ll see “stroke path.” Click that and select the drop-down menu to brush. And after that, press enter and you should see a line that looks like a brush.
And you’re done! I hope this wasn’t hard and I’d love to see your results!
Other results with this tutorial: