Tutorial #8: Brown Hazel
A tutorial requested by m1ch1ru, featuring the adorable Kobato. While making this tutorial I realized it has many possible, and appealing outcomes -- it just depends on where you decide to stop. :) As always, please try not to remake the icon 100%, and experimentation on your part is highly encouraged!
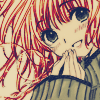
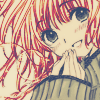
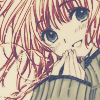
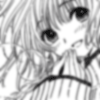
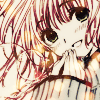
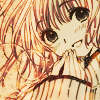
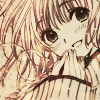
Today we're learning how to turn:
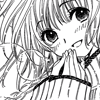
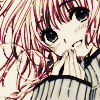
into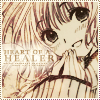
For Photoshop CS2, translatable.
1. First take out your base, and sharpen/brighten/clean it however you'd like. Now duplicate it, and Gaussian Blur (Filter >> Blur >> Gaussian Blur) it to a 1.0 radius. Set it to Linear Burn at around 50% opacity.
>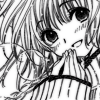
2. Now for the fun part, coloring! (if you're not using a b&w manga base, you may skip this part) Make a new layer (Layer >> New >> Layer), and set that layer to Multiply. Now using whatever means you like (I tend to use a round anti-aliased brush or the Polygonal Lasso Tool) fill in your image with color in anyway you want. Don't forget to include shadows & shines to give your picture a more dimensional effect! For this particular image, I made a new layer just for her hair, duplicated it twice, and set it to Color Burn (just because, haha) -- however it depends on what type of image you have. NOTE: Color her eyes on a separate multiply layer, so you can duplicate it for one of the steps later. :3
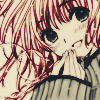
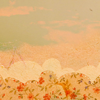
-- When you're done, you should have something like this:
(however, if you plan to follow this tut to the very end, then I wouldn't pay too much attention to the coloring. XD; As you can see from the outcome, it gets a bit "lost in translation")
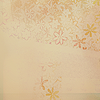
3. Slap on this texture by 77words, and set it to Overlay.
>
4. New layer, fill it with a navy blue (I chose #16254b), and set it to Exclusion.

>
5. New layer, fill it with a pale brown (I chose #d4cbbf), and set it to Soft Light.

>
6. New layer, fill it with a pale pink (I chose #dabfbd), and set it to Saturation at around 50% opacity.

>
7. Remember that gaussion blur'd layer from step 1? Duplicate it, and drag it untop. Now set it to Color Burn at around 60% opacity.
>
8. Duplicate your base, drag it untop, and set it to Soft Light.
>
9. If you made that seperate layer for your character's eyes in step 2, then duplicate that layer, and drag it untop. Now set it to Overlay, or whatever setting best works for your image. (this doesn't do that much, but I guess I did it to make the eyes stand out a bit more in the outcome.)
-- Next, slap on this texture by ewanism, rotate it to accommodate your image, and set it to Screen.
>
10. Slap on this texture by colorfilter, rotate it to accommodate your image, and set it to Screen.

>
11. Slap on this texture by 77words, and again, rotate it to accommodate your image. Set it to Linear Burn.
>
12. Last texture, I promise. XD Again, slap on this texture also by 77words, rotate it to occomidate your image, and set it to Screen at about 60% opacity and 70% fill.
>
13. Duplicate your base, drag it untop, and set it to Soft Light.
>
14. New layer, and again, fill it with a pale pink (I chose #dabfbd), and set it to Saturation at around 50% opacity. You can also save yourself some time by duplicating the layer from step 6.
>
That's it! Add your text, brushes, border -- anything you'd like, and you're finished. :) Feel free to ask questions, and I'd love to see your result if you tried it!
I hope you found this tutorial useful, and if you like what you see, then consider watching my journal for updates on icons, tutorials, resources, and more goodies. :)
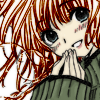
Today we're learning how to turn:
into
For Photoshop CS2, translatable.
1. First take out your base, and sharpen/brighten/clean it however you'd like. Now duplicate it, and Gaussian Blur (Filter >> Blur >> Gaussian Blur) it to a 1.0 radius. Set it to Linear Burn at around 50% opacity.
>
2. Now for the fun part, coloring! (if you're not using a b&w manga base, you may skip this part) Make a new layer (Layer >> New >> Layer), and set that layer to Multiply. Now using whatever means you like (I tend to use a round anti-aliased brush or the Polygonal Lasso Tool) fill in your image with color in anyway you want. Don't forget to include shadows & shines to give your picture a more dimensional effect! For this particular image, I made a new layer just for her hair, duplicated it twice, and set it to Color Burn (just because, haha) -- however it depends on what type of image you have. NOTE: Color her eyes on a separate multiply layer, so you can duplicate it for one of the steps later. :3
-- When you're done, you should have something like this:
(however, if you plan to follow this tut to the very end, then I wouldn't pay too much attention to the coloring. XD; As you can see from the outcome, it gets a bit "lost in translation")
3. Slap on this texture by 77words, and set it to Overlay.
>
4. New layer, fill it with a navy blue (I chose #16254b), and set it to Exclusion.
>
5. New layer, fill it with a pale brown (I chose #d4cbbf), and set it to Soft Light.
>
6. New layer, fill it with a pale pink (I chose #dabfbd), and set it to Saturation at around 50% opacity.
>
7. Remember that gaussion blur'd layer from step 1? Duplicate it, and drag it untop. Now set it to Color Burn at around 60% opacity.
>
8. Duplicate your base, drag it untop, and set it to Soft Light.
>
9. If you made that seperate layer for your character's eyes in step 2, then duplicate that layer, and drag it untop. Now set it to Overlay, or whatever setting best works for your image. (this doesn't do that much, but I guess I did it to make the eyes stand out a bit more in the outcome.)
-- Next, slap on this texture by ewanism, rotate it to accommodate your image, and set it to Screen.
>
10. Slap on this texture by colorfilter, rotate it to accommodate your image, and set it to Screen.
>
11. Slap on this texture by 77words, and again, rotate it to accommodate your image. Set it to Linear Burn.
>
12. Last texture, I promise. XD Again, slap on this texture also by 77words, rotate it to occomidate your image, and set it to Screen at about 60% opacity and 70% fill.
>
13. Duplicate your base, drag it untop, and set it to Soft Light.
>
14. New layer, and again, fill it with a pale pink (I chose #dabfbd), and set it to Saturation at around 50% opacity. You can also save yourself some time by duplicating the layer from step 6.
>
That's it! Add your text, brushes, border -- anything you'd like, and you're finished. :) Feel free to ask questions, and I'd love to see your result if you tried it!
I hope you found this tutorial useful, and if you like what you see, then consider watching my journal for updates on icons, tutorials, resources, and more goodies. :)