Gimp Tutorial
Here is the promised tutorial. If some links don’t work, please let me know.
And if you try it, can you tell me what is not sufficiently explained so I can correct it?
Gimp2 is here: http://www.gimp.org/downloads/
I use version 2.6
We will be creating a wallpaper/banner that in the end will look like that:
End Result
http://i1093.photobucket.com/albums/i427/NickyGabriel2/tutorial/wallfh.jpg
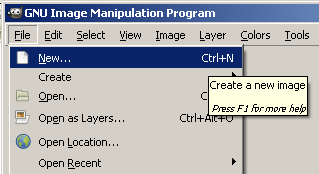
Open the photo editor and create new file.
File ->New
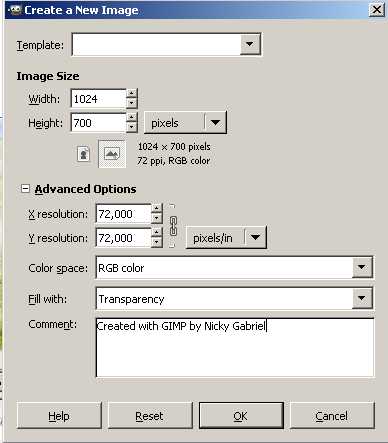
Step 1
http://i1093.photobucket.com/albums/i427/NickyGabriel2/tutorial/step1.png
Width: 1024
Height: 700
Click on the ‘+’ Advanced Options
Fill with: Transparency (this is very important, because we will use transparency on some layers and without Alpha Channel it won’t work)
Don’t change other options there unless you want to print your image (then the resolution should be at least 300).
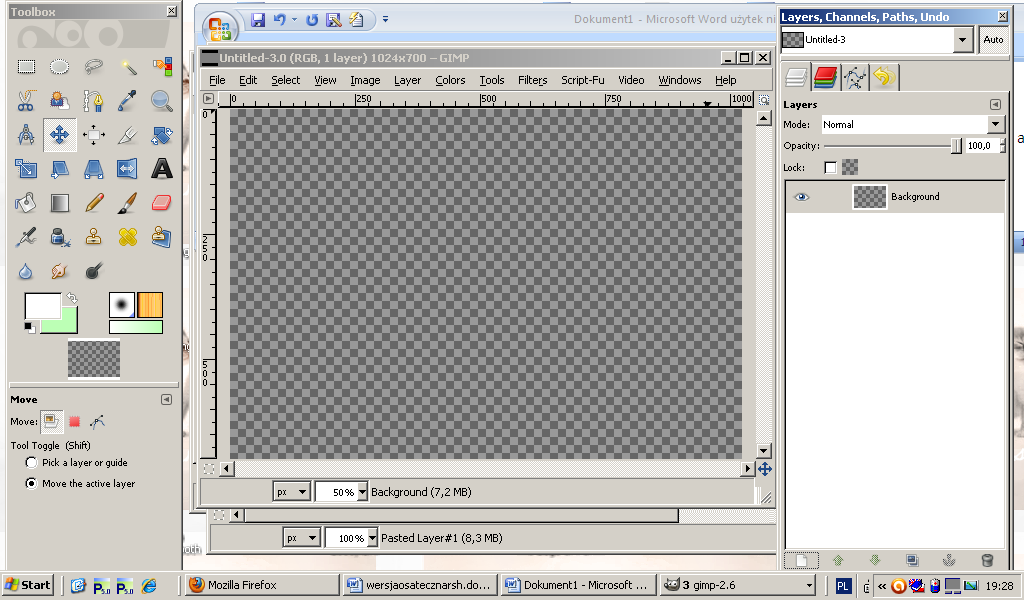
Step 2
http://i1093.photobucket.com/albums/i427/NickyGabriel2/tutorial/step2.png
This is what we have now:
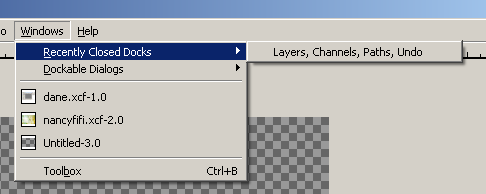
Step 3
http://i1093.photobucket.com/albums/i427/NickyGabriel2/tutorial/step3.png
If you don’t have this window on the right visible, click: Windows -> Recently Closed Docs -> Layers, Channels, Paths, Undo
Step 4
http://i1093.photobucket.com/albums/i427/NickyGabriel2/tutorial/step4.png
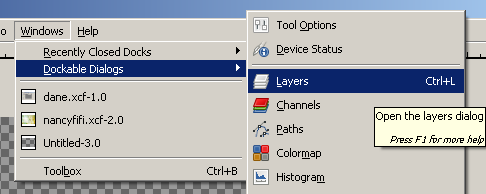
If you don’t have such option, click: Windows -> Dockable Dialogs -> Layers
Step 5
http://i1093.photobucket.com/albums/i427/NickyGabriel2/tutorial/step5.png
This is what we (let’s hope) have now :)
(see) Step 3
http://i1093.photobucket.com/albums/i427/NickyGabriel2/tutorial/step3.png
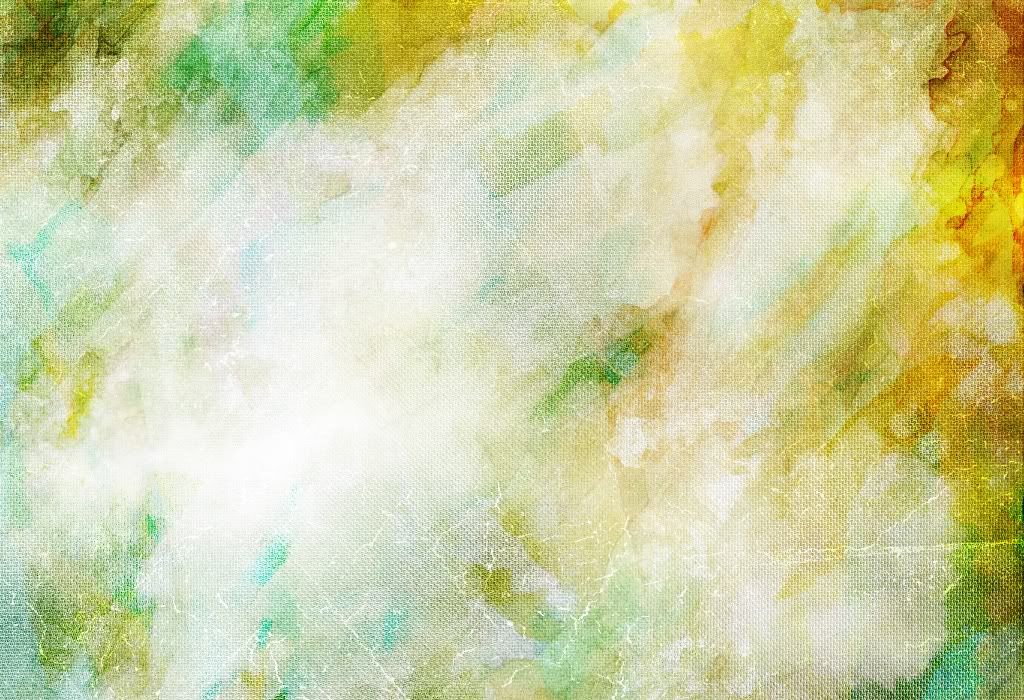
Now we will fill the file with the following texture (by hgx) Texture Here.
Click the link above -> right button click -> copy image (or whatever sounds like that, depending on what browser you are using). Go back to our file, click: Edit -> Paste
This is what you get on the Layer window:
Step 6
http://i1093.photobucket.com/albums/i427/NickyGabriel2/tutorial/step6.png
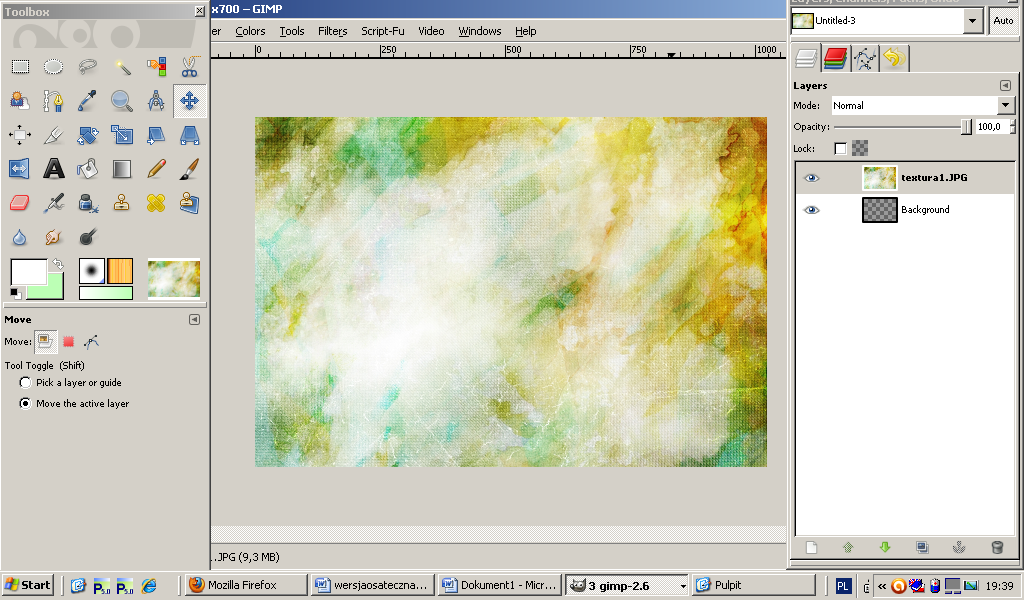
Click at the bottom of the window to add new layer to the texture (red arrow).
This is what we have so far:
Step 7
http://i1093.photobucket.com/albums/i427/NickyGabriel2/tutorial/step7.png
To see full size of the image, press ‘1’ on your keyboard. If you want resize the image to your screen press Ctrl+Shift+e.
If you don’t want to see the control windows: Toolbox (left) and Layers (right), press Tab. To see it again, press Tab once more. It’s very useful if your screen is so small as mine is (1024x600).
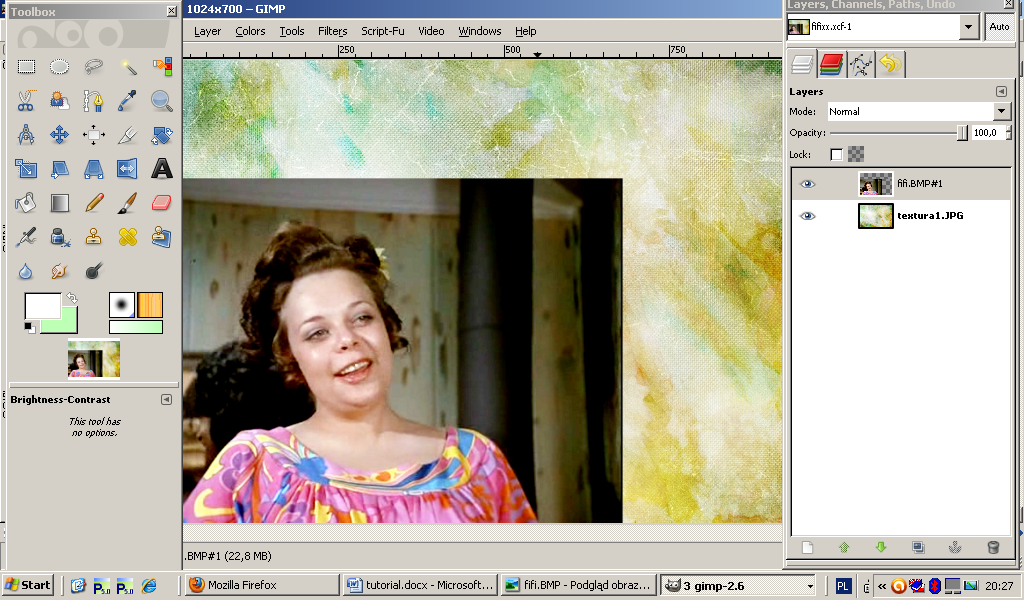
Okay, now we will change the layer because for my wallpaper it will work better mirrored. We have two layers on the Layer window. We don’t need the background one so we will delete it: Select the background one (just click on the layer, it will be highlighted) and then click the trash icon on the bottom of the window.
Step 8
http://i1093.photobucket.com/albums/i427/NickyGabriel2/tutorial/step8.png
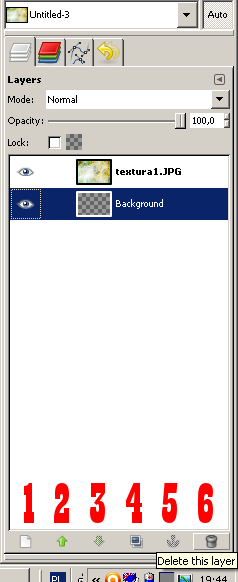
If you have never worked with layers, the icons on the bottom are for:
1 Adding new layers,
2 moving layers up
3 and down,
4 duplicating layers (we will use this one),
5 anchoring (to the active-highlighted layer) and
6 deleting layers.
You can achieve it all as well when you right button click on the selected layer.
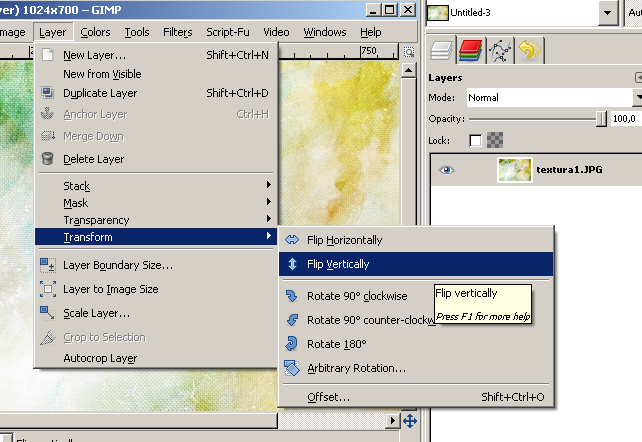
So now we have just one layer and it’s our background. Click: Layer -> Transform -> Flip Vertically
Step 9
http://i1093.photobucket.com/albums/i427/NickyGabriel2/tutorial/step9.png
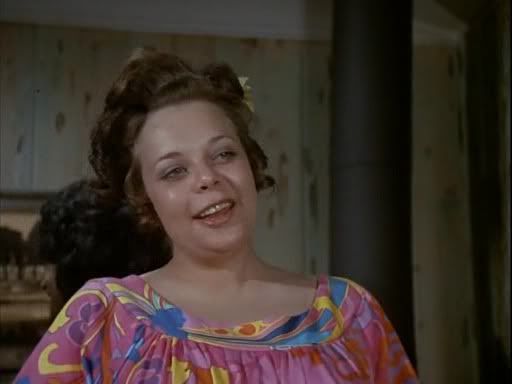
Now we will need Fifi. She’s here: Fifi. Copy and paste the image to our file. You know how, we already did it.
This is what we should have in the end.
Step 10
http://i1093.photobucket.com/albums/i427/NickyGabriel2/tutorial/step10.png
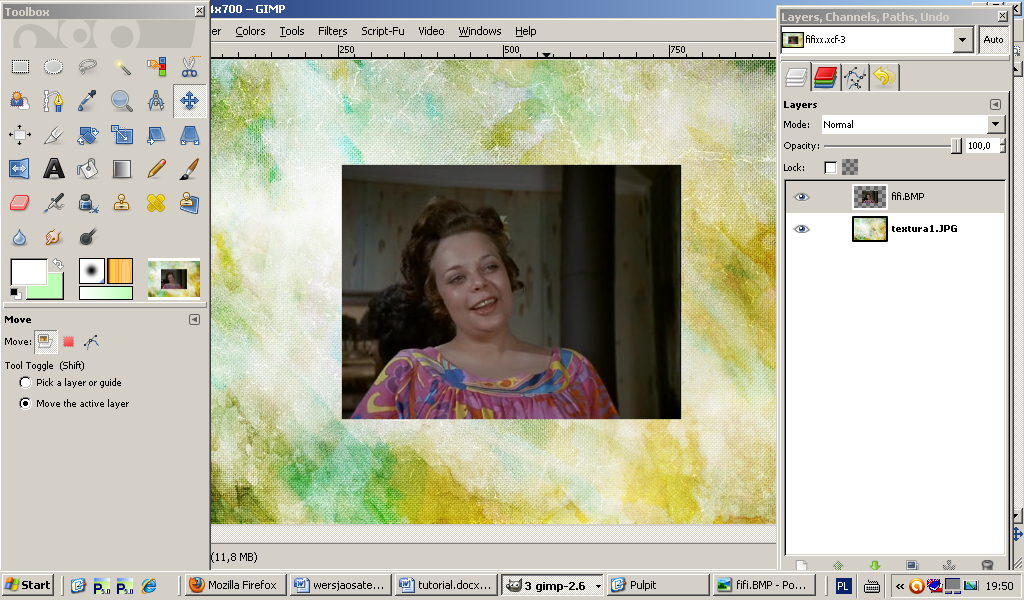
As we can see, the layer is dark, there is no contrast and the coloring doesn’t fit our background. There is one very simple way to make it work.
First we will place her where we want her. Use the marked tool.
Step 10a
http://i1093.photobucket.com/albums/i427/NickyGabriel2/tutorial/step10a.png
Remember that the layer with Fifi must be selected-highlighted. Otherwise you will move the background. If that happens, you can always use Edit -> Undo or Ctrl+z or the Undo tab on the Layers window.
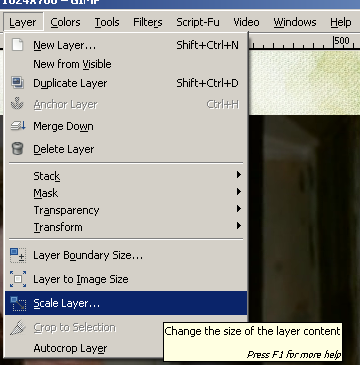
First of all, we need to resize the layer with Fifi, because she is too small :)
Layer -> Scale Layer
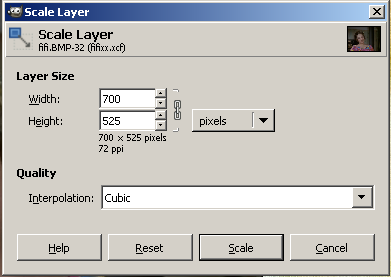
Step 11
http://i1093.photobucket.com/albums/i427/NickyGabriel2/tutorial/step11.png
Width: 700
Step 12
http://i1093.photobucket.com/albums/i427/NickyGabriel2/tutorial/step12.png
Now she is perfect :)
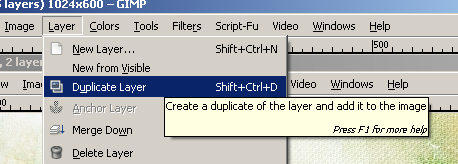
Click Layer -> Duplicate Layer, or use the icon I explained above.
Step 13
http://i1093.photobucket.com/albums/i427/NickyGabriel2/tutorial/step13.png
BEFORE YOU GO ANY FARTHER, PLESE SAVE YOUR FILE BECAUSE THERE ARE SOME BUGS IN CERTAIN VERSIONS OF THE GIMP AND YOU CAN LOOSE ALL YOUR WORK IF YOU USE THE COLOR TOOLS.
FILE -> SAVE AS -> name.xcf
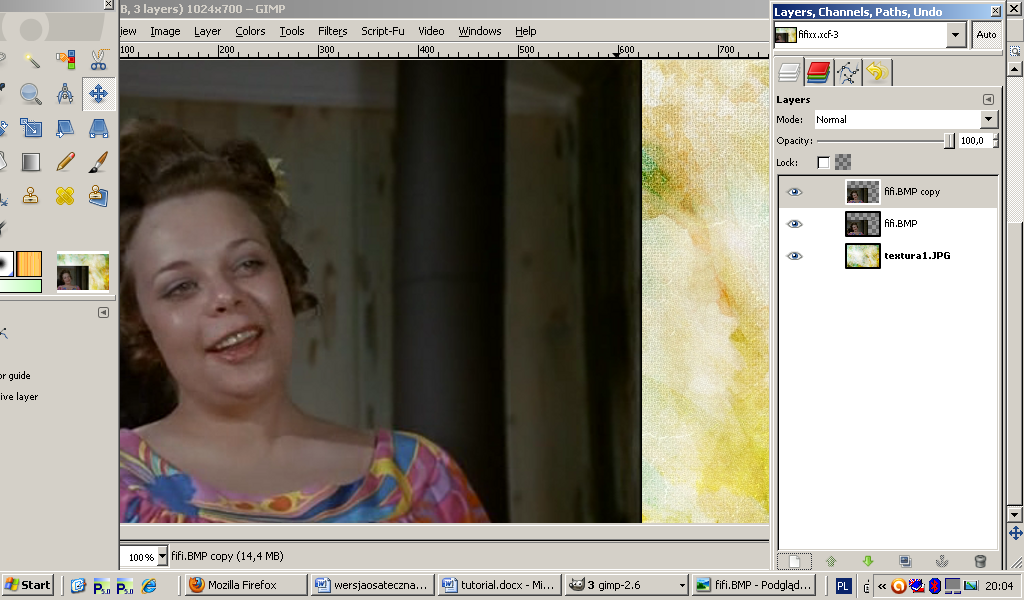
This is what we have:
Step 14
http://i1093.photobucket.com/albums/i427/NickyGabriel2/tutorial/step14.png
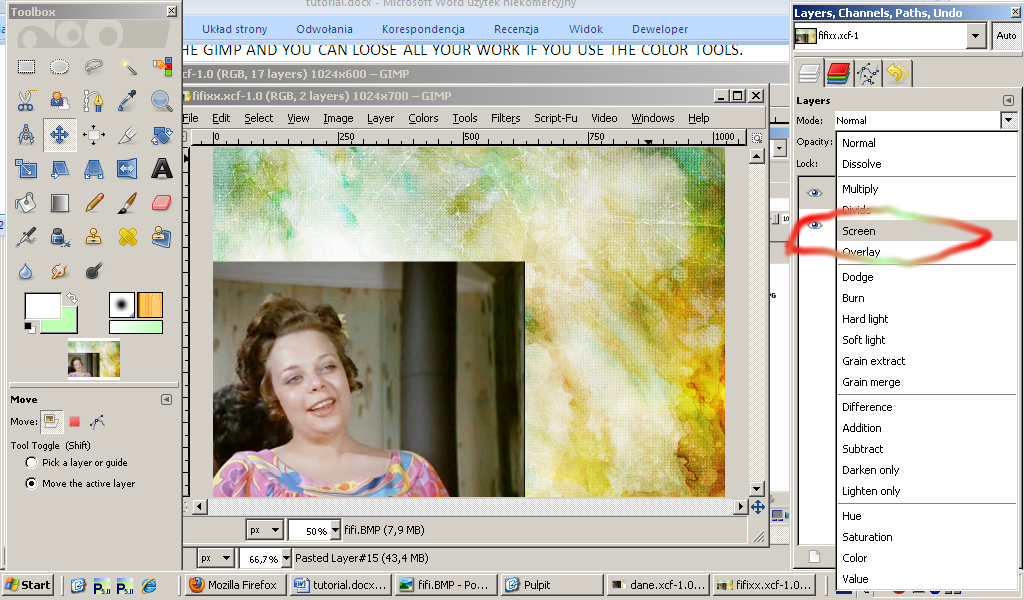
Now a few little secrets those are very helpful. You see, every layer can be set to a specific mode. The default is normal. That means you see it as you see it. But there is a set of pre-made modes (you can create your own one if you know how, but it’s very advanced mathematics because modes use matrixes and it’s a little complicated to predict the result if you don’t know the basics) and we will use now a few of them.
First - to make a layer brighter without losing the contrast, we will use the mode “Screen”. So set the mode of the upper layer to screen. Duplicate the layer that is on top (with Fifi) and change the Opacity (it is right under the Mode section) to 50%.
Step 15
http://i1093.photobucket.com/albums/i427/NickyGabriel2/tutorial/step15.png
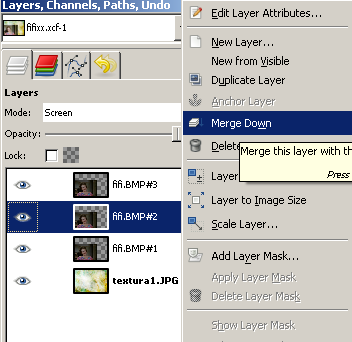
We have three layers with Fifi and one background. Now right button click on the middle one with Fifi and then choose Merge Down. You will have in the result one layer with bright Fifi (in normal mode) and one with dark that is set to Screen 50%. Now click on the top layer and again Merge Down. Now you have two layers - one background with texture and one with bright Fifi. We are almost there :)
Step 16
http://i1093.photobucket.com/albums/i427/NickyGabriel2/tutorial/step16.png
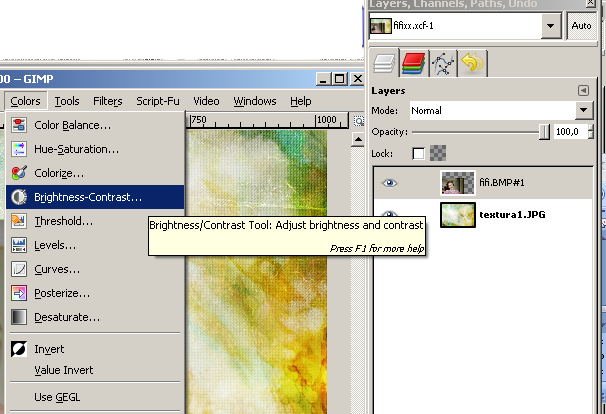
Now we will improve the contrast.
SAVE YOUR FILE: FILE -> SAVE
Now we have highlighted the layer with Fifi and we click:
Colors -> Brightness-Contrast
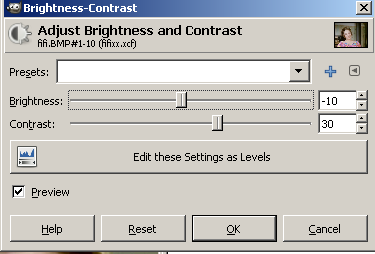
Set Brightness to -10 and Contrast to 30.
Step 17
http://i1093.photobucket.com/albums/i427/NickyGabriel2/tutorial/step17.png
Step 18
http://i1093.photobucket.com/albums/i427/NickyGabriel2/tutorial/step18.png
If you are using other caps you can play with the numbers, but your image should be bright (but not VERY bright) and sharp in the end.
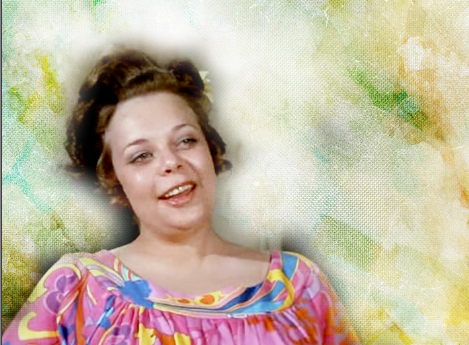
Now she looks more or less like that:
Step 19
http://i1093.photobucket.com/albums/i427/NickyGabriel2/tutorial/step19.png
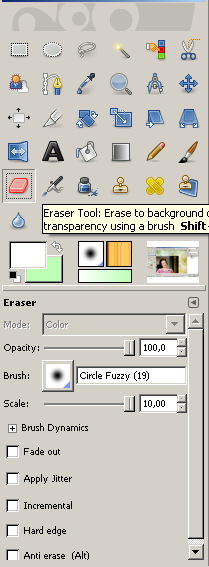
So, we need to remove the background. We use the Eraser Tool with settings like below:
Step 20
http://i1093.photobucket.com/albums/i427/NickyGabriel2/tutorial/step20.png
Now remove the background but don’t do it very precisely. We will need the darker highlight around her later to make her look more ‘texture-like’. If your eraser is painting instead of removing, click right button on the layer with Fifi and then Add Alpha Channel, but with this image there should be no such problem.
Now if your image is too bright, change the brightness to -20. You know already how.
This is what we have:
Step 21
http://i1093.photobucket.com/albums/i427/NickyGabriel2/tutorial/step21.png
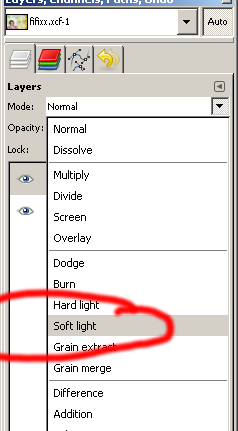
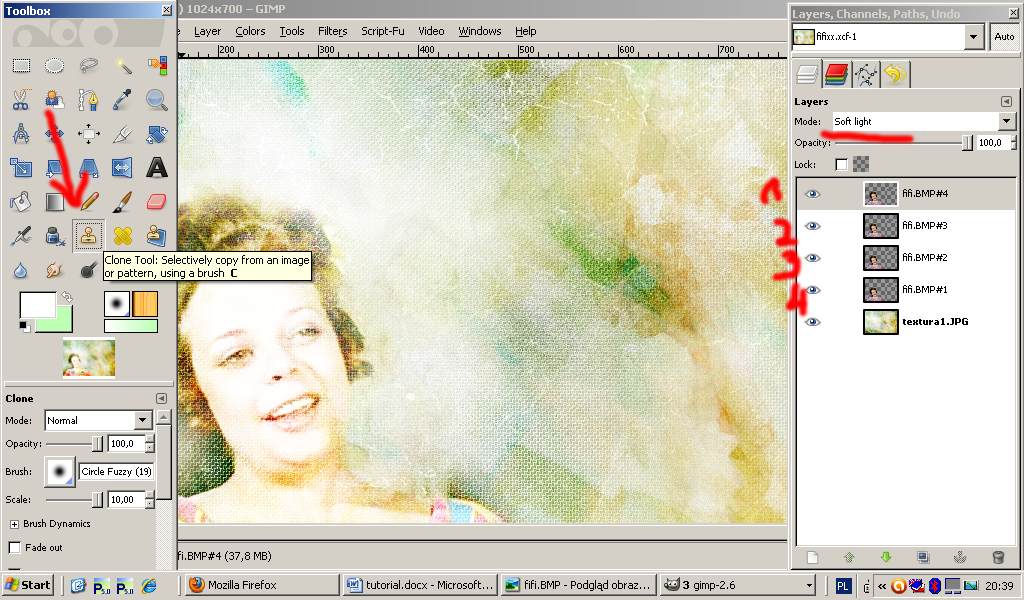
Now set the mode of our layer with Fifi to Soft Light. She kind of disappeared, but it’s okay. Duplicate the layer two times more so you have now four layers with Fifi.
Step 22
http://i1093.photobucket.com/albums/i427/NickyGabriel2/tutorial/step22.png
Step 23
http://i1093.photobucket.com/albums/i427/NickyGabriel2/tutorial/step23.png
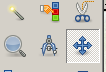
Okay, now the hardest part. We will use a tool that is in my opinion the most useful tool ever :D
It’s a Clone Tool :) I marked it on the previous screencap.
How it works - you select a part of your layer that you want to copy and holding the Control key pressed once click on the image. Then, release the key and you can paint with parts of your image. Because the texture is too bright where Fifi’s face is, we have to make it darker, so I will use part of the image to put it under her face.
So, click on the background layer so it’s highlighted and then set the options on the Clone Tool as on the example:
Step 24
http://i1093.photobucket.com/albums/i427/NickyGabriel2/tutorial/step24.png
If the part you selected is too bright or dark, select again something else until you are satisfied.
Step 25
http://i1093.photobucket.com/albums/i427/NickyGabriel2/tutorial/step25.png
This is what I like. Your result may be different.
Step 26
http://i1093.photobucket.com/albums/i427/NickyGabriel2/tutorial/step26.png
Now we will put Hutch here.
He is here. You already know how to copy and past him so this is what you do now.
Step 27
http://i1093.photobucket.com/albums/i427/NickyGabriel2/tutorial/step27.png
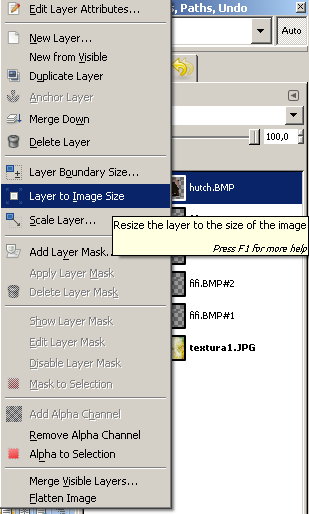
Now repeat all the steps with this layer beginning with duplicating the layer and setting the mode to Screen. Here you will have to add the top left corner of the image using the Clone Tool as well :)
To make it work, before you start changing the layer right button click on the layer and then select Layer to Image Size. This will make the layer resized to the size of the image.
Step 28
http://i1093.photobucket.com/albums/i427/NickyGabriel2/tutorial/step28.png
In the end you should get the result we wanted to get. I don’t add text here because I’m very lousy with Fonts LOL
Last Step
http://i1093.photobucket.com/albums/i427/NickyGabriel2/tutorial/wallfh.jpg
If you are done Save a Copy -> name.jpg
Don’t change any options in the box you get here or change the Quality to 100%, but the image will take a lot of place on your disc :)
The End
And if you try it, can you tell me what is not sufficiently explained so I can correct it?
Gimp2 is here: http://www.gimp.org/downloads/
I use version 2.6
We will be creating a wallpaper/banner that in the end will look like that:
End Result
http://i1093.photobucket.com/albums/i427/NickyGabriel2/tutorial/wallfh.jpg
Open the photo editor and create new file.
File ->New
Step 1
http://i1093.photobucket.com/albums/i427/NickyGabriel2/tutorial/step1.png
Width: 1024
Height: 700
Click on the ‘+’ Advanced Options
Fill with: Transparency (this is very important, because we will use transparency on some layers and without Alpha Channel it won’t work)
Don’t change other options there unless you want to print your image (then the resolution should be at least 300).
Step 2
http://i1093.photobucket.com/albums/i427/NickyGabriel2/tutorial/step2.png
This is what we have now:
Step 3
http://i1093.photobucket.com/albums/i427/NickyGabriel2/tutorial/step3.png
If you don’t have this window on the right visible, click: Windows -> Recently Closed Docs -> Layers, Channels, Paths, Undo
Step 4
http://i1093.photobucket.com/albums/i427/NickyGabriel2/tutorial/step4.png
If you don’t have such option, click: Windows -> Dockable Dialogs -> Layers
Step 5
http://i1093.photobucket.com/albums/i427/NickyGabriel2/tutorial/step5.png
This is what we (let’s hope) have now :)
(see) Step 3
http://i1093.photobucket.com/albums/i427/NickyGabriel2/tutorial/step3.png
Now we will fill the file with the following texture (by hgx) Texture Here.
Click the link above -> right button click -> copy image (or whatever sounds like that, depending on what browser you are using). Go back to our file, click: Edit -> Paste
This is what you get on the Layer window:
Step 6
http://i1093.photobucket.com/albums/i427/NickyGabriel2/tutorial/step6.png
Click at the bottom of the window to add new layer to the texture (red arrow).
This is what we have so far:
Step 7
http://i1093.photobucket.com/albums/i427/NickyGabriel2/tutorial/step7.png
To see full size of the image, press ‘1’ on your keyboard. If you want resize the image to your screen press Ctrl+Shift+e.
If you don’t want to see the control windows: Toolbox (left) and Layers (right), press Tab. To see it again, press Tab once more. It’s very useful if your screen is so small as mine is (1024x600).
Okay, now we will change the layer because for my wallpaper it will work better mirrored. We have two layers on the Layer window. We don’t need the background one so we will delete it: Select the background one (just click on the layer, it will be highlighted) and then click the trash icon on the bottom of the window.
Step 8
http://i1093.photobucket.com/albums/i427/NickyGabriel2/tutorial/step8.png
If you have never worked with layers, the icons on the bottom are for:
1 Adding new layers,
2 moving layers up
3 and down,
4 duplicating layers (we will use this one),
5 anchoring (to the active-highlighted layer) and
6 deleting layers.
You can achieve it all as well when you right button click on the selected layer.
So now we have just one layer and it’s our background. Click: Layer -> Transform -> Flip Vertically
Step 9
http://i1093.photobucket.com/albums/i427/NickyGabriel2/tutorial/step9.png
Now we will need Fifi. She’s here: Fifi. Copy and paste the image to our file. You know how, we already did it.
This is what we should have in the end.
Step 10
http://i1093.photobucket.com/albums/i427/NickyGabriel2/tutorial/step10.png
As we can see, the layer is dark, there is no contrast and the coloring doesn’t fit our background. There is one very simple way to make it work.
First we will place her where we want her. Use the marked tool.
Step 10a
http://i1093.photobucket.com/albums/i427/NickyGabriel2/tutorial/step10a.png
Remember that the layer with Fifi must be selected-highlighted. Otherwise you will move the background. If that happens, you can always use Edit -> Undo or Ctrl+z or the Undo tab on the Layers window.
First of all, we need to resize the layer with Fifi, because she is too small :)
Layer -> Scale Layer
Step 11
http://i1093.photobucket.com/albums/i427/NickyGabriel2/tutorial/step11.png
Width: 700
Step 12
http://i1093.photobucket.com/albums/i427/NickyGabriel2/tutorial/step12.png
Now she is perfect :)
Click Layer -> Duplicate Layer, or use the icon I explained above.
Step 13
http://i1093.photobucket.com/albums/i427/NickyGabriel2/tutorial/step13.png
BEFORE YOU GO ANY FARTHER, PLESE SAVE YOUR FILE BECAUSE THERE ARE SOME BUGS IN CERTAIN VERSIONS OF THE GIMP AND YOU CAN LOOSE ALL YOUR WORK IF YOU USE THE COLOR TOOLS.
FILE -> SAVE AS -> name.xcf
This is what we have:
Step 14
http://i1093.photobucket.com/albums/i427/NickyGabriel2/tutorial/step14.png
Now a few little secrets those are very helpful. You see, every layer can be set to a specific mode. The default is normal. That means you see it as you see it. But there is a set of pre-made modes (you can create your own one if you know how, but it’s very advanced mathematics because modes use matrixes and it’s a little complicated to predict the result if you don’t know the basics) and we will use now a few of them.
First - to make a layer brighter without losing the contrast, we will use the mode “Screen”. So set the mode of the upper layer to screen. Duplicate the layer that is on top (with Fifi) and change the Opacity (it is right under the Mode section) to 50%.
Step 15
http://i1093.photobucket.com/albums/i427/NickyGabriel2/tutorial/step15.png
We have three layers with Fifi and one background. Now right button click on the middle one with Fifi and then choose Merge Down. You will have in the result one layer with bright Fifi (in normal mode) and one with dark that is set to Screen 50%. Now click on the top layer and again Merge Down. Now you have two layers - one background with texture and one with bright Fifi. We are almost there :)
Step 16
http://i1093.photobucket.com/albums/i427/NickyGabriel2/tutorial/step16.png
Now we will improve the contrast.
SAVE YOUR FILE: FILE -> SAVE
Now we have highlighted the layer with Fifi and we click:
Colors -> Brightness-Contrast
Set Brightness to -10 and Contrast to 30.
Step 17
http://i1093.photobucket.com/albums/i427/NickyGabriel2/tutorial/step17.png
Step 18
http://i1093.photobucket.com/albums/i427/NickyGabriel2/tutorial/step18.png
If you are using other caps you can play with the numbers, but your image should be bright (but not VERY bright) and sharp in the end.
Now she looks more or less like that:
Step 19
http://i1093.photobucket.com/albums/i427/NickyGabriel2/tutorial/step19.png
So, we need to remove the background. We use the Eraser Tool with settings like below:
Step 20
http://i1093.photobucket.com/albums/i427/NickyGabriel2/tutorial/step20.png
Now remove the background but don’t do it very precisely. We will need the darker highlight around her later to make her look more ‘texture-like’. If your eraser is painting instead of removing, click right button on the layer with Fifi and then Add Alpha Channel, but with this image there should be no such problem.
Now if your image is too bright, change the brightness to -20. You know already how.
This is what we have:
Step 21
http://i1093.photobucket.com/albums/i427/NickyGabriel2/tutorial/step21.png
Now set the mode of our layer with Fifi to Soft Light. She kind of disappeared, but it’s okay. Duplicate the layer two times more so you have now four layers with Fifi.
Step 22
http://i1093.photobucket.com/albums/i427/NickyGabriel2/tutorial/step22.png
Step 23
http://i1093.photobucket.com/albums/i427/NickyGabriel2/tutorial/step23.png
Okay, now the hardest part. We will use a tool that is in my opinion the most useful tool ever :D
It’s a Clone Tool :) I marked it on the previous screencap.
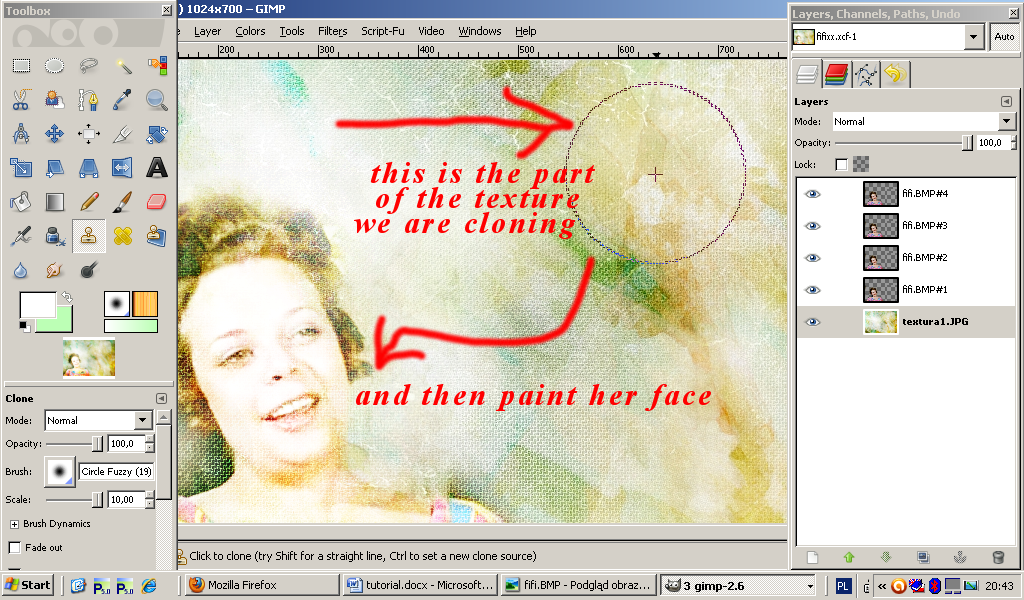
How it works - you select a part of your layer that you want to copy and holding the Control key pressed once click on the image. Then, release the key and you can paint with parts of your image. Because the texture is too bright where Fifi’s face is, we have to make it darker, so I will use part of the image to put it under her face.
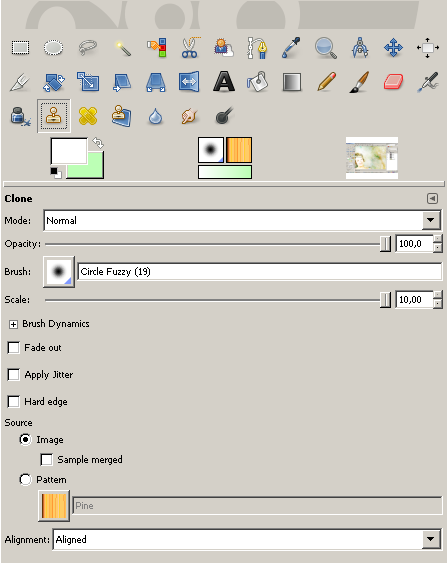
So, click on the background layer so it’s highlighted and then set the options on the Clone Tool as on the example:
Step 24
http://i1093.photobucket.com/albums/i427/NickyGabriel2/tutorial/step24.png
If the part you selected is too bright or dark, select again something else until you are satisfied.
Step 25
http://i1093.photobucket.com/albums/i427/NickyGabriel2/tutorial/step25.png
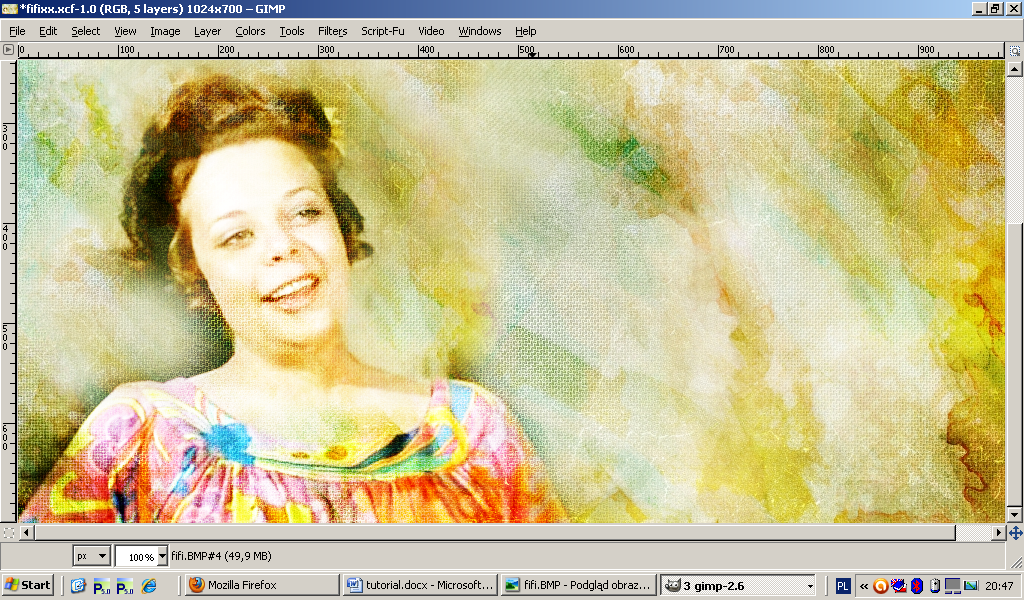
This is what I like. Your result may be different.
Step 26
http://i1093.photobucket.com/albums/i427/NickyGabriel2/tutorial/step26.png
Now we will put Hutch here.
He is here. You already know how to copy and past him so this is what you do now.
Step 27
http://i1093.photobucket.com/albums/i427/NickyGabriel2/tutorial/step27.png
Now repeat all the steps with this layer beginning with duplicating the layer and setting the mode to Screen. Here you will have to add the top left corner of the image using the Clone Tool as well :)
To make it work, before you start changing the layer right button click on the layer and then select Layer to Image Size. This will make the layer resized to the size of the image.
Step 28
http://i1093.photobucket.com/albums/i427/NickyGabriel2/tutorial/step28.png
In the end you should get the result we wanted to get. I don’t add text here because I’m very lousy with Fonts LOL
Last Step
http://i1093.photobucket.com/albums/i427/NickyGabriel2/tutorial/wallfh.jpg
If you are done Save a Copy -> name.jpg
Don’t change any options in the box you get here or change the Quality to 100%, but the image will take a lot of place on your disc :)
The End