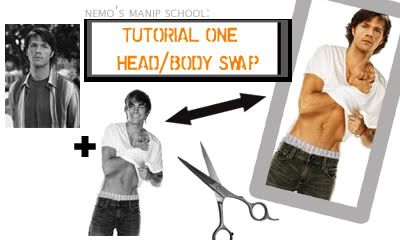
Manip school: Tutorial 1 - Head/body swap
A while back I looked at a few of the incredibly talented nyaubaby's unposted manips and con critted her like I know all about manipping. Which I really don't. Still, while I prayed I didn't kill all of her will to manip again (I didn't! Look! She's made pretties over here!) I promised I'd make a manip tutorial.
(Yes, this is number one, there may be more to come...)
Not dial-up friendly!
Examples, older manips on which I've used this technique:
#1 (Logan)
#2 (Wentworth)
Important things to know:
- I'm using Photoshop 7.0. This tut is probably easy to translate to other versions of PS but to PSP? I have no idea.
- My PS is in Swedish. I hope I've got the names of everything right. If not, just ask. :P
- I've really tried to make this as basic and easy to follow as possible, although it does require some knowledge about the tools in PS. Don't hesitate to ask if you've got questions!
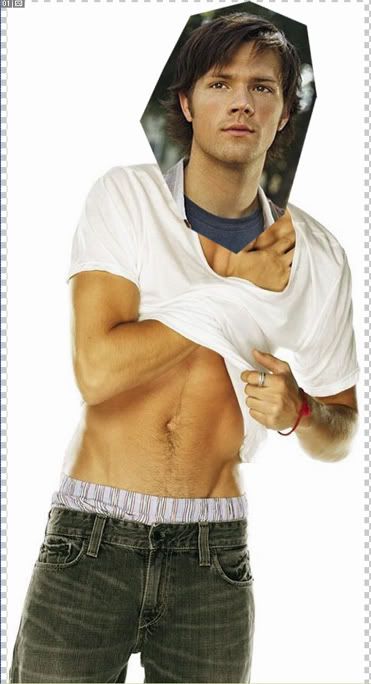
These are my bases:
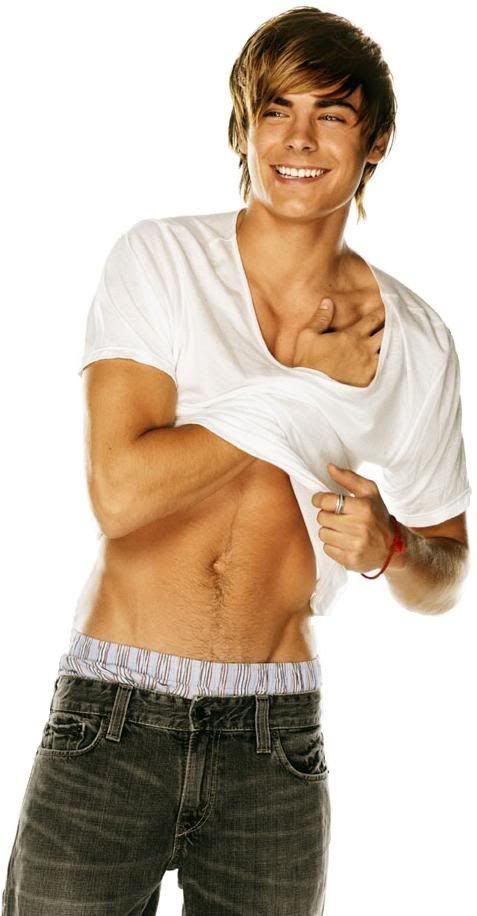
Click for full size
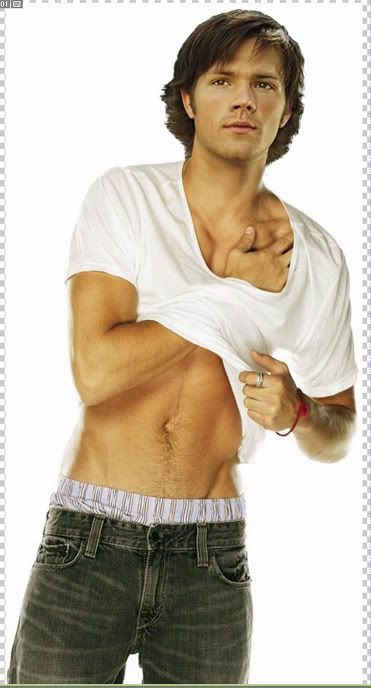
Yes, it's Zac Efron. (Sorry fans!) He has the (fine) body I imagine Jared did when he was a few years younger. Still wondering why?! and tearing your hair out in despair? Here's the pic that says it all.
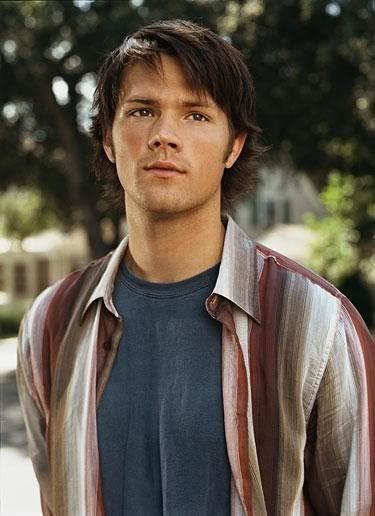
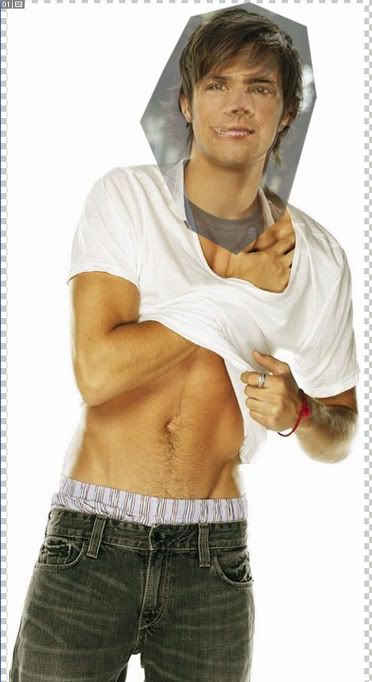
Old GG promo pic of Jared Padalecki...
Here we go:
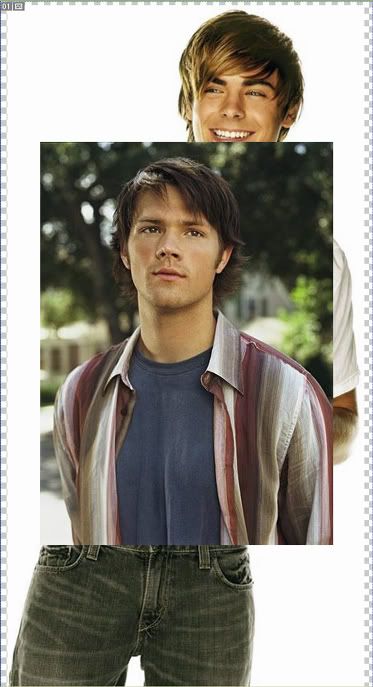
Both pics in one .psd file (on different layers)
I have:
- turned the pic of Jared horisontically
- cut his head out some to make it easier to calculate size and angle
When positioning the head it is often easier to lower the opacity some (to 50-60%) so that the base pic shines through. Matching the eyes and/or the mouths is often helpful.
Click for larger
I'm zooming in on the head and removing more of the background. Instead of using the eraser tool I prefer adding a masking layer and painting with a black hard brush, which gives the same result (although it's foolproof and you don't have to worry about making a mistake - you can always erase your mask).
Click for larger
I'm copying my base layer of Zac and painting over his head with white so that Zac won't shine through if Jared's head would turn out to be smaller. (I was lucky my background was just one color, if you've got a more complicated background, remember, the clone tool is your best friend. :))
Click for larger
Making hair look realistic when you've cut out a head is always hard. I prefer to remove (mask) the background "by hand" when it's only a head I'm cutting out. I also prefer using a irregular, small brush to make the hair look less flat and cut out. This brush is a standard brush and called "stänk 14 pixlar" in Swedish, probably something like "splash 14px" in English.
Click for larger
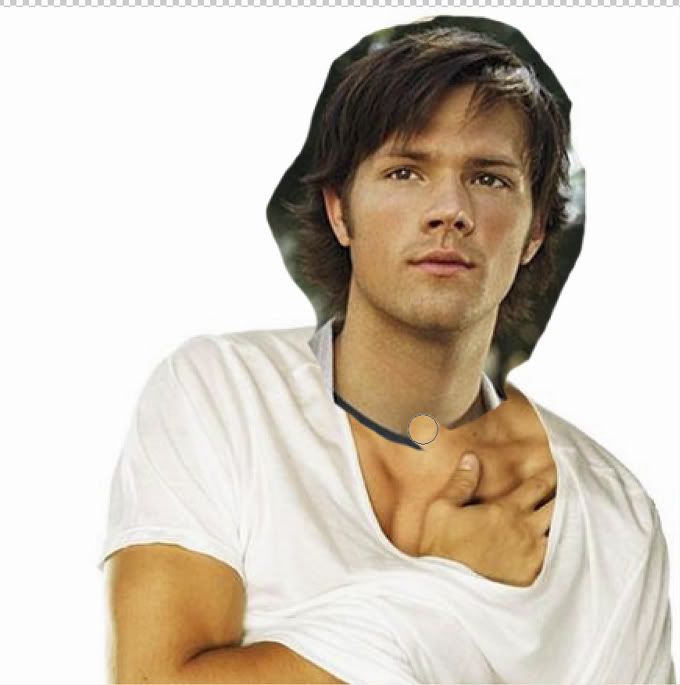
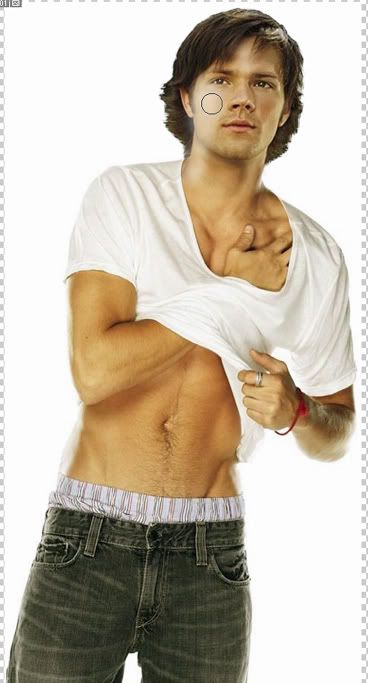
I'm removing Jared's neck (masking) with a round and soft airbrush set on low opacity. If too much of Zac shines through I'm fixing it easily by erasing on my mask, also with a soft brush.
Click for larger
The skintones of Zac and Jared in these pictures are almost the same, but often when manipping the skintones are completely different. Sometimes you need to tinker a lot with the color balance and the contrast/intensity to get it right. I was lucky and didn't have to change much when it comes to color balance, but notice that I've done my changes on a copy of the Jared layer - so that I can go back to my old settings if I'd muck something up.
Click for larger
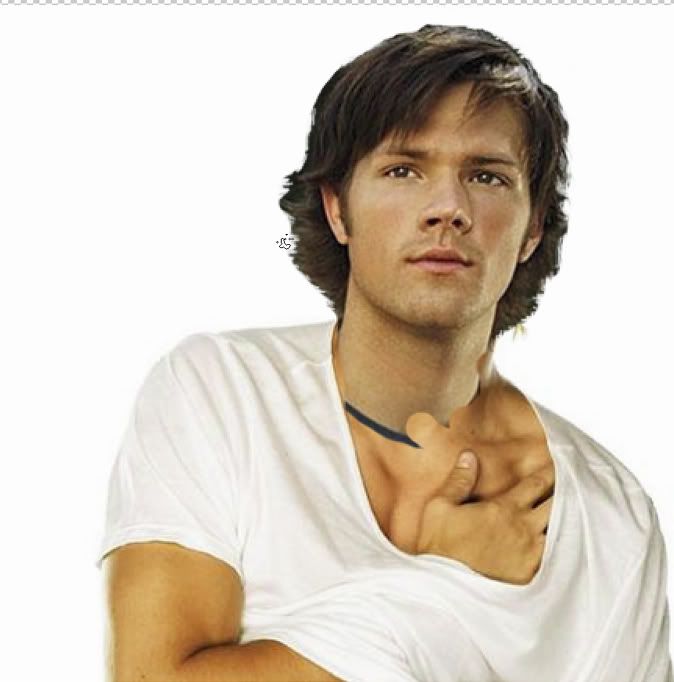
I'm using the smudge tool (12px, 12% opacity) on the area around the neck to make the transition from Jared's neck to Zac's body smoother. As you can see, the pic of Jared is a bit more grainy than the pic of Zac and therefore I use the smudge tool on chosen parts of Jared's face as well.
Jared this far.
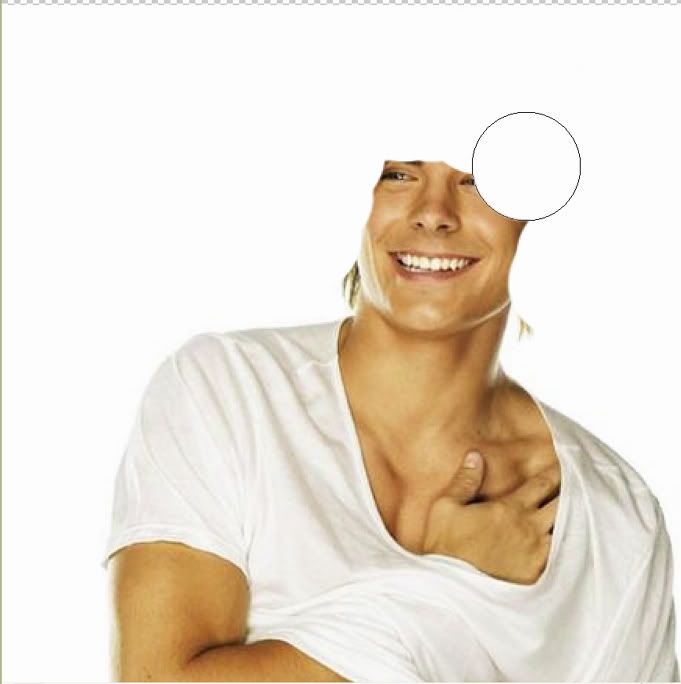
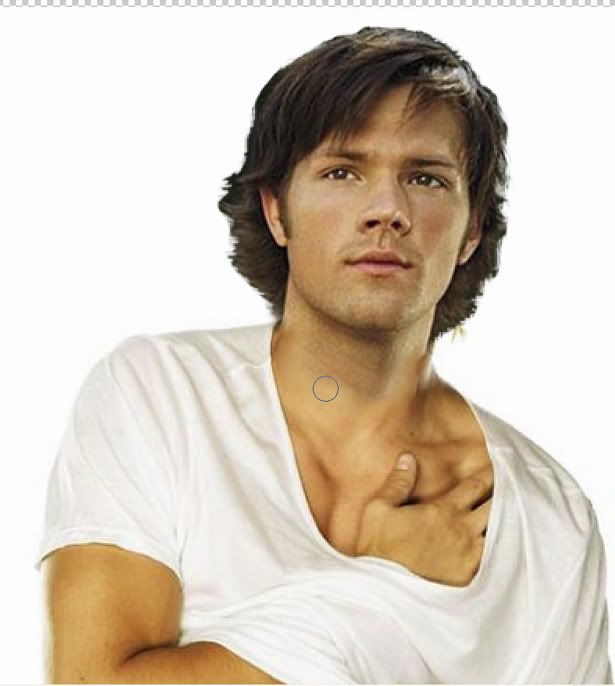
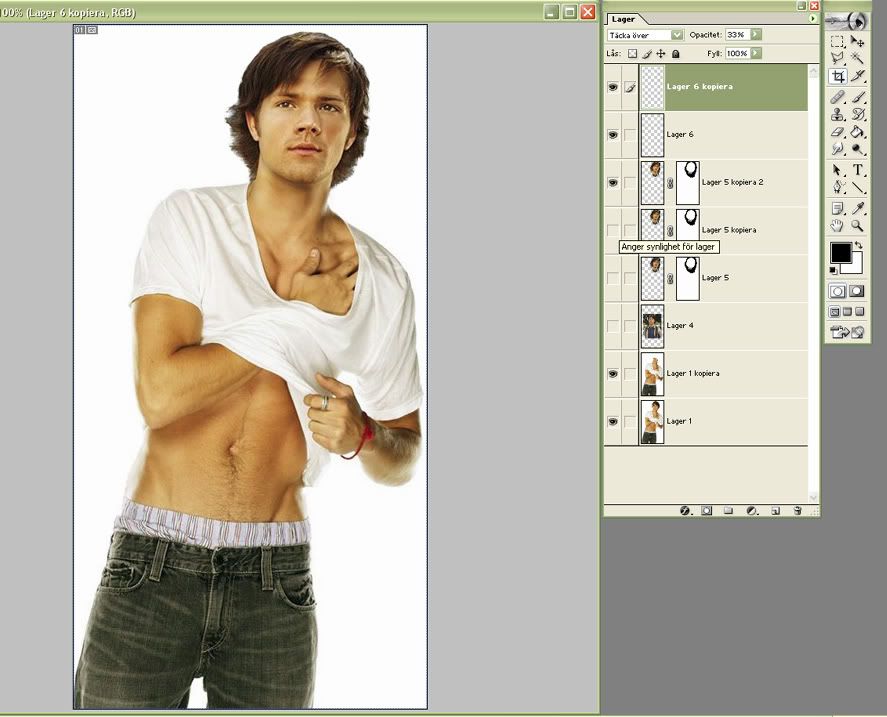
Zac has a lot of light on him coming from the left, and while lighting is extremely difficult to recreate we can at least try. Here, I'm painting with a soft, white airbrush on a new (top) layer...
...I've set the layer with the white doodle at soft light, 100% opacity, and made a copy of it on top, put on overlay 33%. However, usually it's enough with an 'overlay' layer, it depends on the picture.
Click for larger
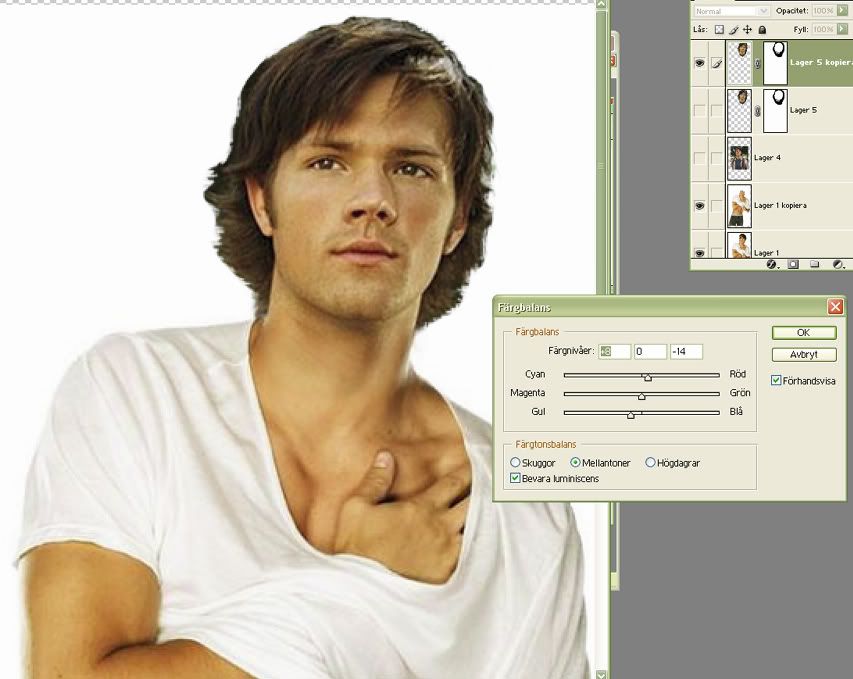
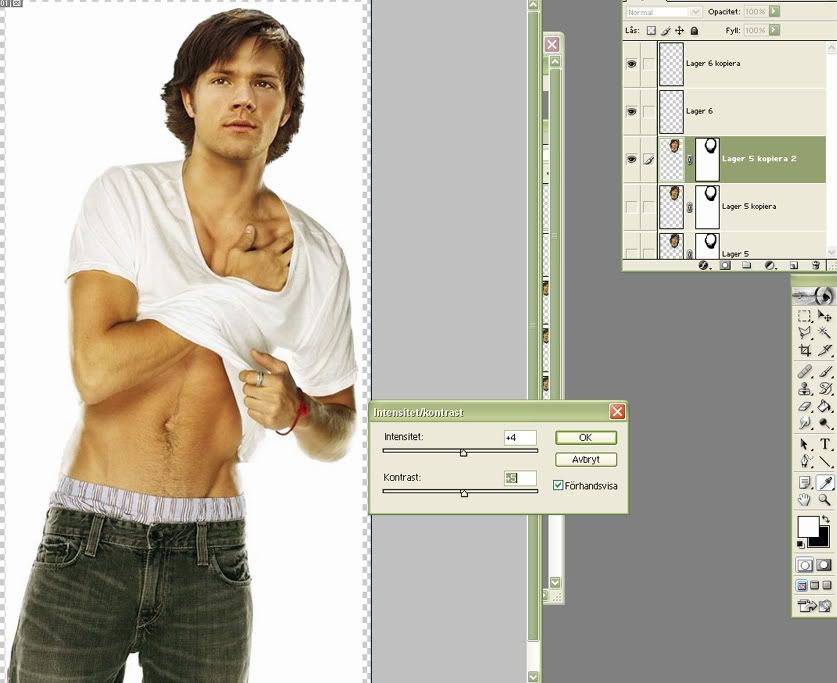
Some extra contrast (on an extra copy of the Jared layer)...
Click for larger
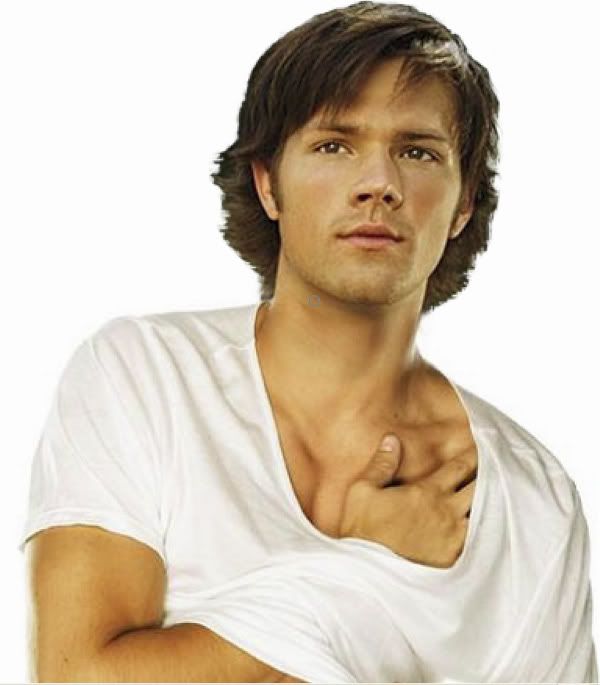
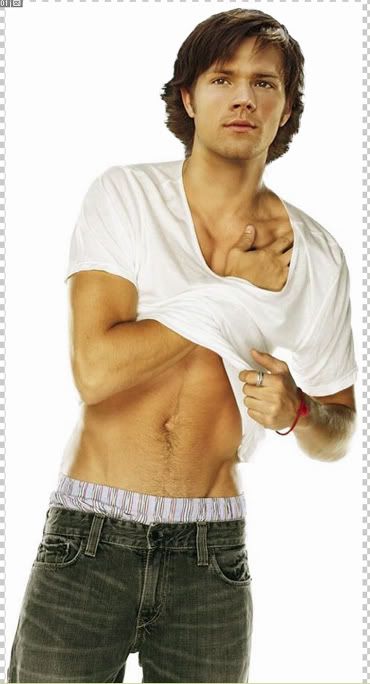
And were done! Here you can see all of my layers.
The manip in all it's finished glory:

Zip with all of the pics of the steps and my .psd file if it interests anyone.
Not perfect, but I think it's all right considering how little time I spent on it.
Questions? Comments? I'd love to see you guys try it! :D
Older tutorials by Nemo
My most recent manips
My Supernatural fanart
Next: Tutorial 2 - The Couple
(Yes, this is number one, there may be more to come...)
Not dial-up friendly!
Examples, older manips on which I've used this technique:
#1 (Logan)
#2 (Wentworth)
Important things to know:
- I'm using Photoshop 7.0. This tut is probably easy to translate to other versions of PS but to PSP? I have no idea.
- My PS is in Swedish. I hope I've got the names of everything right. If not, just ask. :P
- I've really tried to make this as basic and easy to follow as possible, although it does require some knowledge about the tools in PS. Don't hesitate to ask if you've got questions!
These are my bases:
Click for full size
Yes, it's Zac Efron. (Sorry fans!) He has the (fine) body I imagine Jared did when he was a few years younger. Still wondering why?! and tearing your hair out in despair? Here's the pic that says it all.
Old GG promo pic of Jared Padalecki...
Here we go:
Both pics in one .psd file (on different layers)
I have:
- turned the pic of Jared horisontically
- cut his head out some to make it easier to calculate size and angle
When positioning the head it is often easier to lower the opacity some (to 50-60%) so that the base pic shines through. Matching the eyes and/or the mouths is often helpful.
Click for larger
I'm zooming in on the head and removing more of the background. Instead of using the eraser tool I prefer adding a masking layer and painting with a black hard brush, which gives the same result (although it's foolproof and you don't have to worry about making a mistake - you can always erase your mask).
Click for larger
I'm copying my base layer of Zac and painting over his head with white so that Zac won't shine through if Jared's head would turn out to be smaller. (I was lucky my background was just one color, if you've got a more complicated background, remember, the clone tool is your best friend. :))
Click for larger
Making hair look realistic when you've cut out a head is always hard. I prefer to remove (mask) the background "by hand" when it's only a head I'm cutting out. I also prefer using a irregular, small brush to make the hair look less flat and cut out. This brush is a standard brush and called "stänk 14 pixlar" in Swedish, probably something like "splash 14px" in English.
Click for larger
I'm removing Jared's neck (masking) with a round and soft airbrush set on low opacity. If too much of Zac shines through I'm fixing it easily by erasing on my mask, also with a soft brush.
Click for larger
The skintones of Zac and Jared in these pictures are almost the same, but often when manipping the skintones are completely different. Sometimes you need to tinker a lot with the color balance and the contrast/intensity to get it right. I was lucky and didn't have to change much when it comes to color balance, but notice that I've done my changes on a copy of the Jared layer - so that I can go back to my old settings if I'd muck something up.
Click for larger
I'm using the smudge tool (12px, 12% opacity) on the area around the neck to make the transition from Jared's neck to Zac's body smoother. As you can see, the pic of Jared is a bit more grainy than the pic of Zac and therefore I use the smudge tool on chosen parts of Jared's face as well.
Jared this far.
Zac has a lot of light on him coming from the left, and while lighting is extremely difficult to recreate we can at least try. Here, I'm painting with a soft, white airbrush on a new (top) layer...
...I've set the layer with the white doodle at soft light, 100% opacity, and made a copy of it on top, put on overlay 33%. However, usually it's enough with an 'overlay' layer, it depends on the picture.
Click for larger
Some extra contrast (on an extra copy of the Jared layer)...
Click for larger
And were done! Here you can see all of my layers.
The manip in all it's finished glory:
Zip with all of the pics of the steps and my .psd file if it interests anyone.
Not perfect, but I think it's all right considering how little time I spent on it.
Questions? Comments? I'd love to see you guys try it! :D
Older tutorials by Nemo
My most recent manips
My Supernatural fanart
Next: Tutorial 2 - The Couple