tutorial - colouring - simple black and white
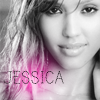
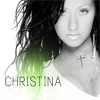
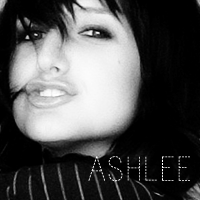
My friend asked me to make this tutorial so here it is! It's very simple ... just making an image black and white with a coloured fuzzy blob thingy lol. Like these:


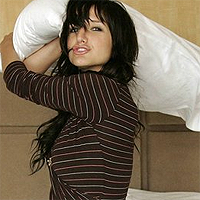
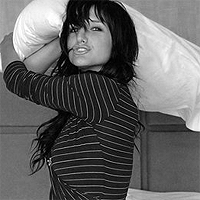
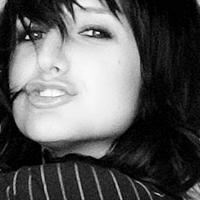
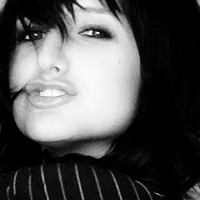
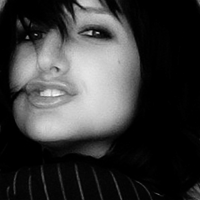
We'll be using this image of Ashlee Simpson.
First, if your image is in colour desaturate it. You can do this in three ways.
1) Image --> Adjustments --> Desaturate
2) Image --> Adjustments --> Hue/Saturation --> Set saturation to 0
3) Create a new layer, fill it with black (#000000), set the layer to "colour"
-->
Now, I cropped it so that you could see the effects of the different layers better. But you can keep the image as it is and figure out how you want to crop it later.
Duplicate the base and set it to "screen"

-->
Duplicate the base again onto a top layer. Blur it: Filter --> Blur --> Gaussian Blur --> Radius 5.0px
Set the layer to "soft light"
-->
-->
As you can see ... there really isn't a difference between the screen layer and the blur soft light layer. This is because the image is very light. But, as you can see, if we didn't put the screen layer in it changes noticeably.
-->
Take the text tool and make a text box. Type out whatever you want (I chose the actress/musician's name) in whatever font you want (I chose Print Dashed available from DaFont) in white (#ffffff) if it will be placed on a black section of the image, or in black (#000000) if it will be placed on a white section of the image. It's a good idea to try and get either a dark section or a light section as if you choose a part where it's half/half, you won't be able to see the text. You might be able to choose a grey colour for the text, but I haven't tried it, so I don't know how good it would look.
-->
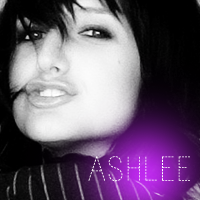
Now make a new layer UNDERNEATH the text layer. Choose a bright colour (I chose a purple #be28ef) and place it in the middle of the word/text with a soft round brush in a size that fits the text, and doesn't cover the image.
Set the layer to "screen"
-->
Resize the image to 100x100. When you resize the image, sometimes the text gets very scraggly ... so what I do is to use the text tool and click the text. You will be back in the textbox. Now, you can change the size of the text to the closest whole number, or half number (ie. 5.78 = 6, 27.62 = 27.5). This will fix the problem, because fonts aren't made to be .74 of a size lol.
Sometimes you won't need the screened base layer if your image is light enough, or if you think it looks better darker.
The colours I used are:

PINK #f918a7
BLUE #4aa9fa
GREEN #71db09
PURPLE #be28ef
I use Photoshop CS2 and I don't have any other program, nor have I used any other progam so I'm sorry but I don't know if it translates well to others. I'm sure that you could use the same techniques for other version of Photoshop though since from what I've seen it hasn't changed very much.
Edit: Someone asked me about the font. I posted a link to DaFont, but I just realised that if you search for "Print Dashed" it won't come up. That's because it's a variation of "Print Clearly." Here's a direct link to the font :)
Edit #2: Some rude things have been said, and that makes me a little sad. I didn't ask anyone to read this, I didn't say that everyone should like it. I just think that people should be a little more mature, and have a little more tact in them. We're not animals people, if you don't have anything nice to say... don't say anything at all. Isn't that what we were all taught? Anyways, I am not discouraged, but thanks to everyone who stood up for me :)
We'll be using this image of Ashlee Simpson.
First, if your image is in colour desaturate it. You can do this in three ways.
1) Image --> Adjustments --> Desaturate
2) Image --> Adjustments --> Hue/Saturation --> Set saturation to 0
3) Create a new layer, fill it with black (#000000), set the layer to "colour"
-->
Now, I cropped it so that you could see the effects of the different layers better. But you can keep the image as it is and figure out how you want to crop it later.
Duplicate the base and set it to "screen"
-->
Duplicate the base again onto a top layer. Blur it: Filter --> Blur --> Gaussian Blur --> Radius 5.0px
Set the layer to "soft light"
-->
-->
As you can see ... there really isn't a difference between the screen layer and the blur soft light layer. This is because the image is very light. But, as you can see, if we didn't put the screen layer in it changes noticeably.
-->
Take the text tool and make a text box. Type out whatever you want (I chose the actress/musician's name) in whatever font you want (I chose Print Dashed available from DaFont) in white (#ffffff) if it will be placed on a black section of the image, or in black (#000000) if it will be placed on a white section of the image. It's a good idea to try and get either a dark section or a light section as if you choose a part where it's half/half, you won't be able to see the text. You might be able to choose a grey colour for the text, but I haven't tried it, so I don't know how good it would look.
-->
Now make a new layer UNDERNEATH the text layer. Choose a bright colour (I chose a purple #be28ef) and place it in the middle of the word/text with a soft round brush in a size that fits the text, and doesn't cover the image.
Set the layer to "screen"
-->
Resize the image to 100x100. When you resize the image, sometimes the text gets very scraggly ... so what I do is to use the text tool and click the text. You will be back in the textbox. Now, you can change the size of the text to the closest whole number, or half number (ie. 5.78 = 6, 27.62 = 27.5). This will fix the problem, because fonts aren't made to be .74 of a size lol.
Sometimes you won't need the screened base layer if your image is light enough, or if you think it looks better darker.
The colours I used are:
PINK #f918a7
BLUE #4aa9fa
GREEN #71db09
PURPLE #be28ef
I use Photoshop CS2 and I don't have any other program, nor have I used any other progam so I'm sorry but I don't know if it translates well to others. I'm sure that you could use the same techniques for other version of Photoshop though since from what I've seen it hasn't changed very much.
Edit: Someone asked me about the font. I posted a link to DaFont, but I just realised that if you search for "Print Dashed" it won't come up. That's because it's a variation of "Print Clearly." Here's a direct link to the font :)
Edit #2: Some rude things have been said, and that makes me a little sad. I didn't ask anyone to read this, I didn't say that everyone should like it. I just think that people should be a little more mature, and have a little more tact in them. We're not animals people, if you don't have anything nice to say... don't say anything at all. Isn't that what we were all taught? Anyways, I am not discouraged, but thanks to everyone who stood up for me :)