SGA - Elizabeth Tutorial
Huh, first tutorial ever. It's for Photoshop CS. Have mercy with me, okies?
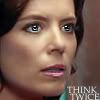
We go from this to
I used some of the steps from this great tutorial.
[01] Open the image, dublicate it and crop the dublicate to 100x100. I always use the crop tool. Width and hight are set to 3,53 cm, resolution 72. That's the icon size.
[02] Go to Filter -> Sharpen -> Sharpen.
[03] Zoom in until you can see the eyes clearly.
[04] Now, first use the Blur Tool (Mode: Normal, Strenght: 12%) and blur carefully over her skin. Avoid hair, eyes and lips.
[05] Then, switch over to the Sharpen Tool (Mode: Normal, Strenght: 10%) and move carefully(!) over her eyes and mouth. Try out what looks best.
[06] Dublicate the layer. Now move down to the first layer and go to Image -> Adjustments -> Auto Levels

[07] Set now the second layer to Soft Light, opacity 60%.

[08] New layer, filled with this color
, set to Soft Light, opacity 45%.
Add a layer mask and use a soft round brush in black on the layer mask to go over the eyes and any other white or bright areas.

[09] New layer, filled with this color
, set to Muliply, opacity 70%.
Add a layer mask and use a soft round brush in black on the layer mask to go over the eyes and any other white or bright areas.

[10} Add your text

[11] Dublicate Layer 2 and bring it on top (Mode: Soft Light, opacity: 60%)

[12] New layer, filled with this color
, set to Soft Light, opacity 40%.
Add a layer mask and use a soft round brush in black on the layer mask to go over the eyes and any other white or bright areas.

[13] Add a black border, size 1px.

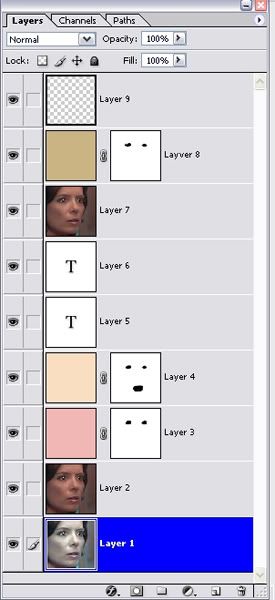
That's it ^-^ Here's my layer palette. Looks funny, I know ;)

Hope it isn't too confusing. Comments are love (just like criticism)
We go from this to

I used some of the steps from this great tutorial.
[01] Open the image, dublicate it and crop the dublicate to 100x100. I always use the crop tool. Width and hight are set to 3,53 cm, resolution 72. That's the icon size.
[02] Go to Filter -> Sharpen -> Sharpen.
[03] Zoom in until you can see the eyes clearly.
[04] Now, first use the Blur Tool (Mode: Normal, Strenght: 12%) and blur carefully over her skin. Avoid hair, eyes and lips.
[05] Then, switch over to the Sharpen Tool (Mode: Normal, Strenght: 10%) and move carefully(!) over her eyes and mouth. Try out what looks best.
[06] Dublicate the layer. Now move down to the first layer and go to Image -> Adjustments -> Auto Levels

[07] Set now the second layer to Soft Light, opacity 60%.

[08] New layer, filled with this color

, set to Soft Light, opacity 45%.
Add a layer mask and use a soft round brush in black on the layer mask to go over the eyes and any other white or bright areas.

[09] New layer, filled with this color

, set to Muliply, opacity 70%.
Add a layer mask and use a soft round brush in black on the layer mask to go over the eyes and any other white or bright areas.

[10} Add your text

[11] Dublicate Layer 2 and bring it on top (Mode: Soft Light, opacity: 60%)

[12] New layer, filled with this color

, set to Soft Light, opacity 40%.
Add a layer mask and use a soft round brush in black on the layer mask to go over the eyes and any other white or bright areas.

[13] Add a black border, size 1px.

That's it ^-^ Here's my layer palette. Looks funny, I know ;)

Hope it isn't too confusing. Comments are love (just like criticism)