Tutorial: Defining Brushes -- awesome timesaver
Sick of defining brushes from imagepacks? When you've downloaded countless brushsets, its a pain to open each image, define it, close it, open the next one, define it, etc. hiddensarah showed me an easier way. It's so easy, I can't believe I wasted all that time before o_O
This tutorial will show you how to create your own action to automate defining brushes, and then how to use the action to create a brushset. I'm using Photoshop 6 but it's probably translatable.
PS7 users: There's a downloadable PS7 action here if you don't want to create it yourself. There's also a tutorial here by grrliz_icons. (its for defining textures, but it essentially works the same way for brushes)
on with the tutorial for PS6
1) Clear out your brush menu to make room for the new set. (I usually just load a set with 2 brushes and delete them) Or load the brushset you will be adding these stamps onto.
2) Open/create an image. Doesn't matter what it is for now, it's going to be a template for the action.
Creating the Action
3) Find the Action Tab. (in PS6, its behind the History tab) If you can't find it press Alt+F9 or go to Window > Show Actions
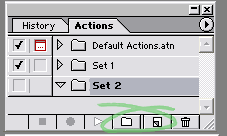
4) Click on the folder at the bottom of the pane to create a new set.

5) Click the piece of paper next to the folder to create a new action. You can name the action "brushes" or something so you remember it. Once this action is created, PS will record everything you do after that.
6) Select the image you opened earlier. Follow the steps you normally would to define a brush:
Go to Select > All or Ctrl+A. Then Edit > Define Brush.
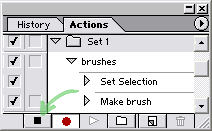
Hit the Stop button, right next to the red button to stop recording.

Using the Action
7) Open the folder that contains the stamps of the brushset. Click on one image, then press Ctrl+A to select all. (or click in empty space and drag to box them all) Press Open.

8) Make sure each stamp is in it's own image. (one stamp per image)
If you have several stamps in one image, select each one and copy and paste it into a new image.
9) Go to File > Automate > Batch. Select your action from the drop-down boxes. (whatever you named it)
Change the source to Opened Files and destination to None. Click OK.

10) Save your set and you're done! To close all the open files at once, hold down Shift and Ctrl+W.
No more defining brushes by hand ^_^ You can use this for defining patterns and gradients as well, just create another action.
Alternatively, you can also choose "Folder" for the source in Step 9, but only if all of your stamps are in their own image. This will allow you to skip Step 7.
I hope this helped! Let me know if there are any problems =]
+ added some stuff thanks to txvoodoo
This tutorial will show you how to create your own action to automate defining brushes, and then how to use the action to create a brushset. I'm using Photoshop 6 but it's probably translatable.
PS7 users: There's a downloadable PS7 action here if you don't want to create it yourself. There's also a tutorial here by grrliz_icons. (its for defining textures, but it essentially works the same way for brushes)
on with the tutorial for PS6
1) Clear out your brush menu to make room for the new set. (I usually just load a set with 2 brushes and delete them) Or load the brushset you will be adding these stamps onto.
2) Open/create an image. Doesn't matter what it is for now, it's going to be a template for the action.
Creating the Action
3) Find the Action Tab. (in PS6, its behind the History tab) If you can't find it press Alt+F9 or go to Window > Show Actions
4) Click on the folder at the bottom of the pane to create a new set.

5) Click the piece of paper next to the folder to create a new action. You can name the action "brushes" or something so you remember it. Once this action is created, PS will record everything you do after that.
6) Select the image you opened earlier. Follow the steps you normally would to define a brush:
Go to Select > All or Ctrl+A. Then Edit > Define Brush.
Hit the Stop button, right next to the red button to stop recording.

Using the Action
7) Open the folder that contains the stamps of the brushset. Click on one image, then press Ctrl+A to select all. (or click in empty space and drag to box them all) Press Open.

8) Make sure each stamp is in it's own image. (one stamp per image)
If you have several stamps in one image, select each one and copy and paste it into a new image.
9) Go to File > Automate > Batch. Select your action from the drop-down boxes. (whatever you named it)
Change the source to Opened Files and destination to None. Click OK.

10) Save your set and you're done! To close all the open files at once, hold down Shift and Ctrl+W.
No more defining brushes by hand ^_^ You can use this for defining patterns and gradients as well, just create another action.
Alternatively, you can also choose "Folder" for the source in Step 9, but only if all of your stamps are in their own image. This will allow you to skip Step 7.
I hope this helped! Let me know if there are any problems =]
+ added some stuff thanks to txvoodoo