Idina Menzel Icon Tutorial for PSP10
Go from 
to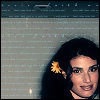
In PSP (though it should be transferable), without curves. =]
1- Crop and sharpen to your liking. I always start with 98x98 because I love adding borders.

2- Layers > New Adjustment Layer >Brightness/Contrast
Brightness: -3 Contrast: 30

3- Layers > New Raster Layer
Fill with the color #011325 set to exclusion and duplicate the layer twice.

4- Duplicate base layer and drag it to the top, gray scale the layer and set it to soft layer

5- Layers > New Raster Layer
Fill with #fee5a8 and set to Multiply at 30%

6- Layers > New Raster Layer
Fill with #a8f4fe and set to Burn (or Color Burn) at about 22%

7- Duplicate your gray scale layer and drag it to the top, keeping it on softlight.

8- Adjust > Blur > Gaussian Blur > Radius = 6

9- Add whatever text or brushes you want and add your border and you're done!
Hope you liked the tutorial and I would love to see your results!
to
In PSP (though it should be transferable), without curves. =]
1- Crop and sharpen to your liking. I always start with 98x98 because I love adding borders.
2- Layers > New Adjustment Layer >Brightness/Contrast
Brightness: -3 Contrast: 30
3- Layers > New Raster Layer
Fill with the color #011325 set to exclusion and duplicate the layer twice.
4- Duplicate base layer and drag it to the top, gray scale the layer and set it to soft layer
5- Layers > New Raster Layer
Fill with #fee5a8 and set to Multiply at 30%
6- Layers > New Raster Layer
Fill with #a8f4fe and set to Burn (or Color Burn) at about 22%
7- Duplicate your gray scale layer and drag it to the top, keeping it on softlight.
8- Adjust > Blur > Gaussian Blur > Radius = 6
9- Add whatever text or brushes you want and add your border and you're done!
Hope you liked the tutorial and I would love to see your results!