New VLC Automatic Screencapping Tutorial
Program: VLC (version 0.9.9--the newest version) + a bit of Windows Media Player (another similar program can be substituted)
Involves: automatic screencapping and setting preferences on a screencapping program
Translatable: No, it's just for VLC
Steps: 16-21 (depending on whether or not you choose to use Windows Media Player to help you at a specific part of the tutorial)
Difficulty: Easy to Moderate
Because THIS TUTORIAL got so much response and VLC has released many new versions of VLC since I made that tutorial, I decided to download the newest version of VLC and do a new tutorial for everyone who has the newest version of VLC. This morning again we will go literally step-by-step as I teach you how to automatically screencap with VLC. (i.e., the computer does it for you.)
If you have any questions, feel free to ask me; I'll try my best to answer them. (Or direct you to a place where you can find answers.)
So to start off with, download VLC (VideoLan - VLC Media Player) from HERE. After you install the program to your computer, open up VLC like you would any other program (using a desktop icon or from the programs menu). If you are using the same version as me (the latest--0.9.9), you should get a screen similar to this:
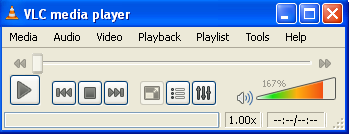
See where it says “Tools” near the top? Click that and a pop down window will appear; scroll down until you see “Preferences” and click on that.
You will be acquainted with a window such as this:
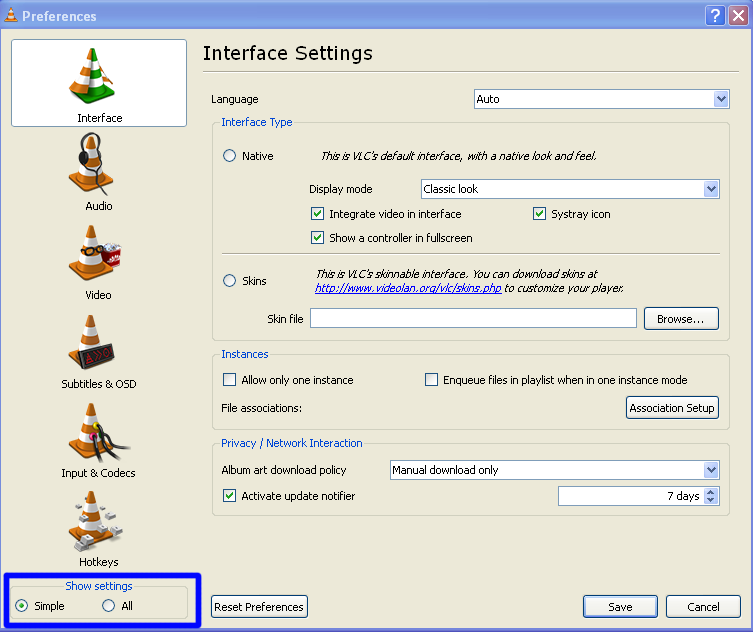
Note: It will not have the blue box there--that blue box (or circle later on) will be my way of pointing out exactly what you should focus on in this tutorial to achieve the end result--automatically taken screencaps.
And the blue box is important--you need to click "All" under the "Show settings" text to really get where you need to get in VLC. Once you do, you will be acquainted with a window such as this:
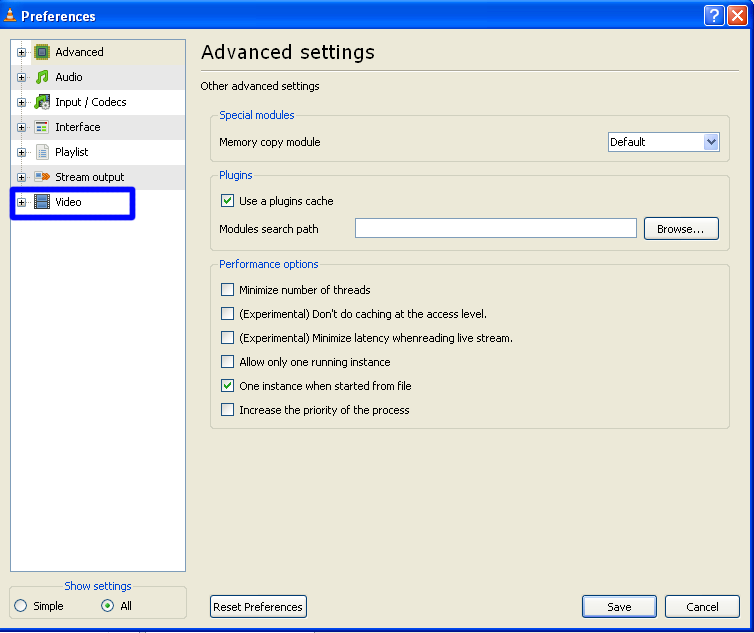
Now the left-hand menu is more precise and has more options, see? We're going to click on the "+" sign next to "Video" to expand the information under the video setting.
You should see this:
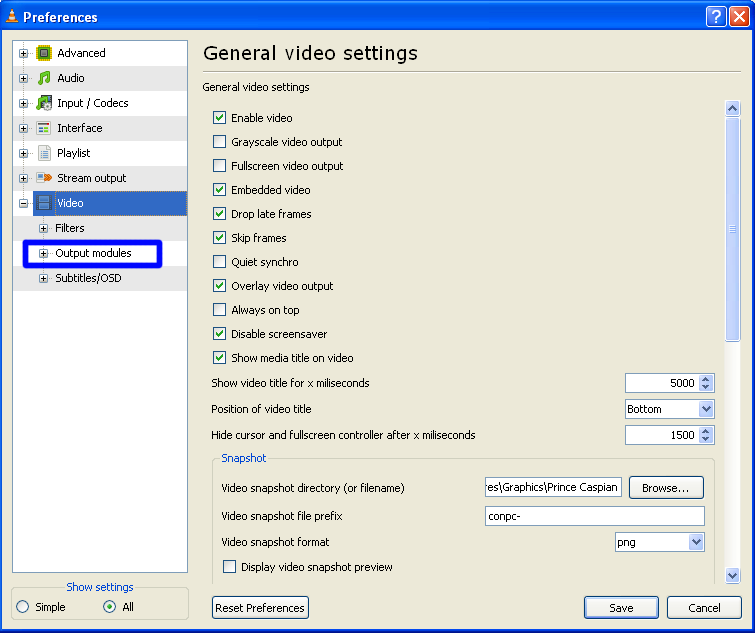
Now you can see the options under video. We're going to click on the "+" next to "Output modules" here. This will expand the information under the output modules setting.
You should see this window:
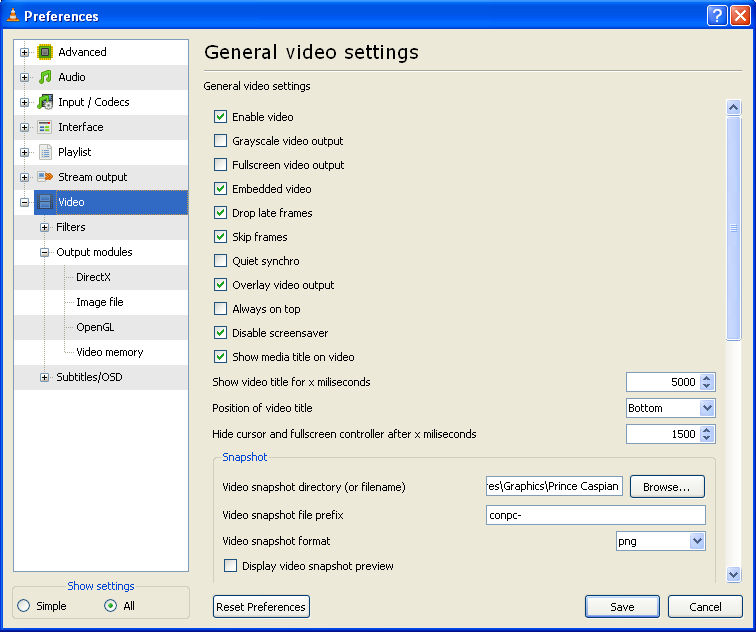
Now we're getting somewhere. This time you'll click on the actual text of "Output modules"--we're still under the main video screen right now.
Your window should look like this now:
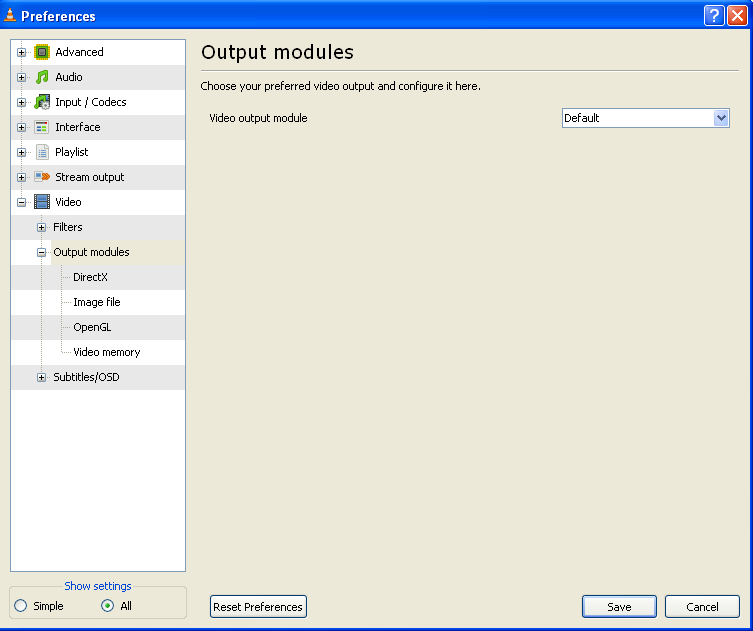
If you haven't done anything to your preferences before now, your settings should look like this. See near the top where it says, “Video Output Module” and says, “Default” in the drop down window? Click the drop down window and change it to “Image Video Output," giving you this window:
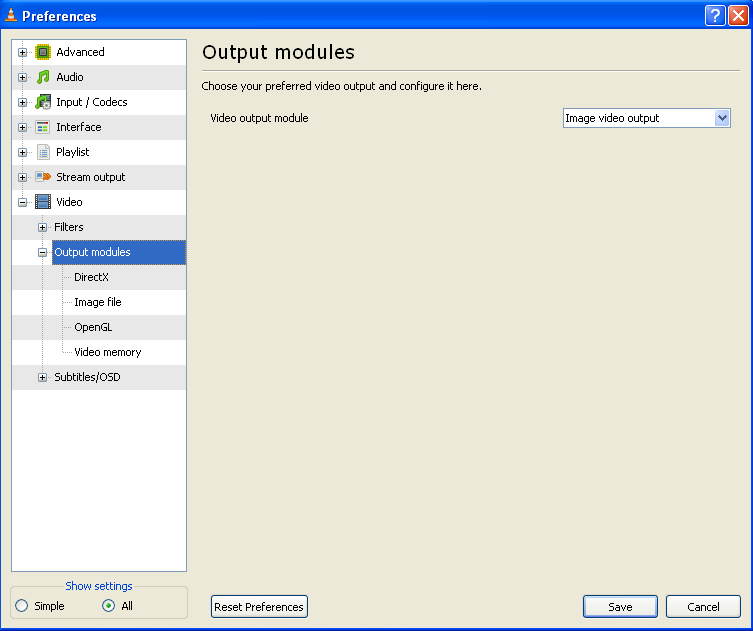
Now see on the left hand panel underneath “Output Modules” where it says “Image file”? Click on that and you should see a screen like this:
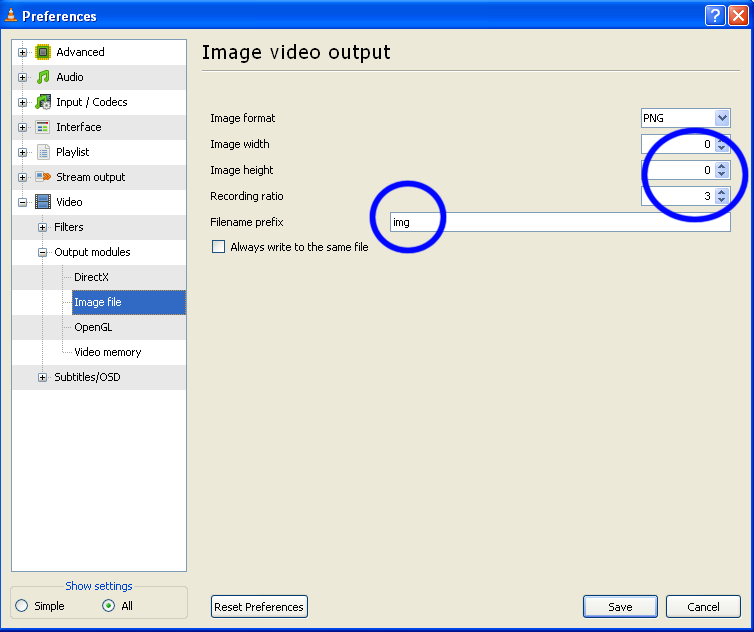
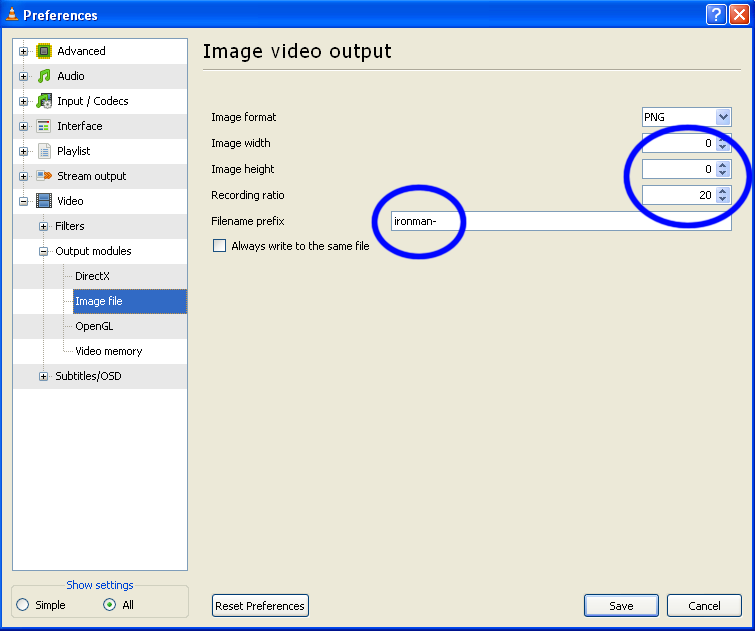
I've got four things circled on this screenshot because they're the most important things here. Technically you could change the image format to "JPEG" or something else, but PNGs produce the highest quality screencaps--though the file size is much larger than JPEGs, just to let you know.
Also, we're going to keep the image width and image height set at zero--that's the default setting within VLC; it means that VLC will screencap according to the proportions of the video. (Example: some videos are widescreen and will thus produce wider caps and caps with more black/blank space than fullscreen videos. ) Only change those two settings if you wish to have specific sized caps--but be warned; if the caps are smaller than the size you indicated, they will come out pixelated and/or stretched.
What we WILL change is the recording ratio and the filename prefix. The recording ratio tells VLC to take that many caps for a specific amount of time (I'm not quite sure) and the bigger the recording ratio, the more caps there'll be for that specific time period. From trial and error, I've found that anywhere from 20-25 is good for the recording ratio. I used 25 to screencap The Day After Tomorrow (a film that's over two hours, I believe) and got a little over 5,000 caps to begin with. (Before deleting some blurry caps, ect.)
However, with Iron Man (the film I'll be screencapping for this tutorial), I'll be using 20. 5,000 screencaps is a bit too many for me, especially for a film about two hours long. And so I also changed the filename prefix to ironman- so my caps will be appropriately named. Change the filename prefix to whatever you prefer; I always change it to the name of the movie I'm capping just as a reminder to me of what the screencaps are of. :) Do not forget to add the dash at the end of the filename or else your image files will be one big sloppy mess.
After doing all that, you should have a window that looks something like this:
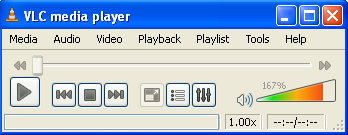
Click "Save" at the bottom of the screen and you should be back to this window:
Now, without closing out of VLC, put your movie in the disc drive (this part is only if you're screencapping a movie or an episode/t.v. show DVD--you don't need to do these next few steps if the file is already on your computer.) and open Windows Media Player. (If you have a Mac, open a similar program.) This may seem like a tangent, but it'll save you A LOT of hassle later, believe me.
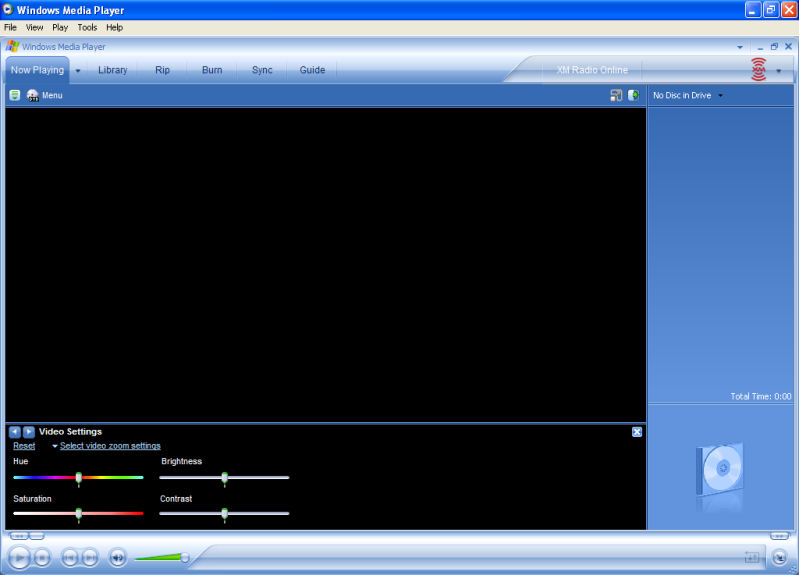
You should be acquainted with this screen before putting your disc in the drive:
And this (or something similar) will be the screen after you put your movie in the drive:
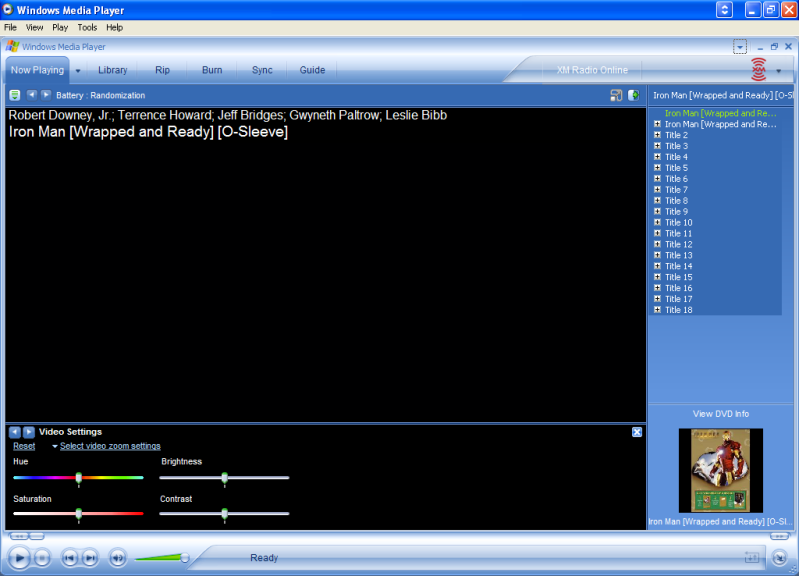
Now I want you to let the movie play, until you get to the point where the menu appears. (It doesn't show up in the next screencap, but the next screencap is the screencap of Iron Man's menu, trust me.)
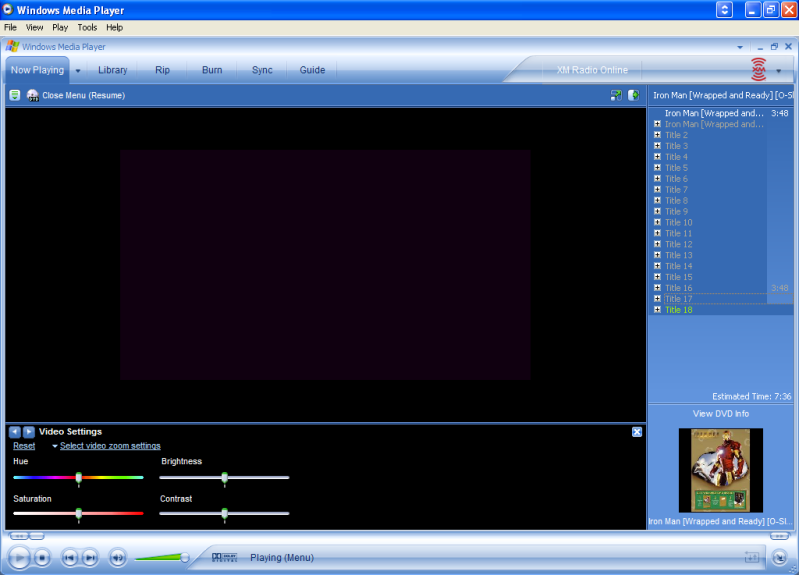
Click the "Play" button (or whatever button allows the movie to actually show the movie on the cover) and let the movie play. My window looked like this once Iron Man actually started:
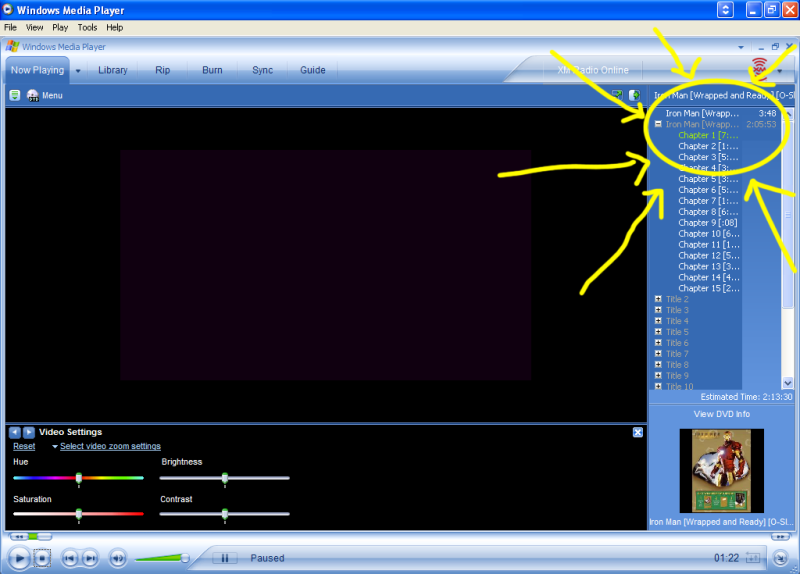
(Without the yellow circle and arrows, of course!) But the yellow circle and arrows are important--they're circling WHERE the movie is located in the many titles and chapters of the DVD. In this case, Iron Man is located quite easily--in Title 1, Chapter 1. (Chapter 1 of title 1 is in green, indicating where the DVD is playing right now.)
However, that's not always the case--which is why I had you look in Windows Media Player FIRST. The Chronicles of Narnia: Prince Caspian, for instance, doesn't really start until Title 58. And I spent over an HOUR trying to figure out where it capped in VLC, only to fail ever time, trying title 0 and 1 and variations of that with different chapters and so forth.
So be smart and use Windows Media Player or the like first to find out where your movie is located--otherwise you'll end up capping menus FOREVER, no joke.
Now we're going back to VLC. (You can close out of Windows Media Player; you won't need to use it anymore.) You should still be on the main screen, like this:

Now we're going to click on the button at the top that says, "Media," achieving us a screen like this:
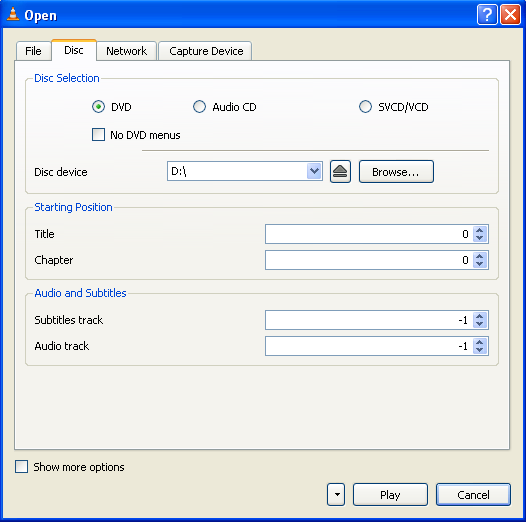
Remember what we just looked up? It was the title and chapter for the location of the actual movie--not the menus. So we're going to change the title and chapter to what Windows Media Player (or similar) told us. In Iron Man's case, it was Title 1, Chapter 1--like this:
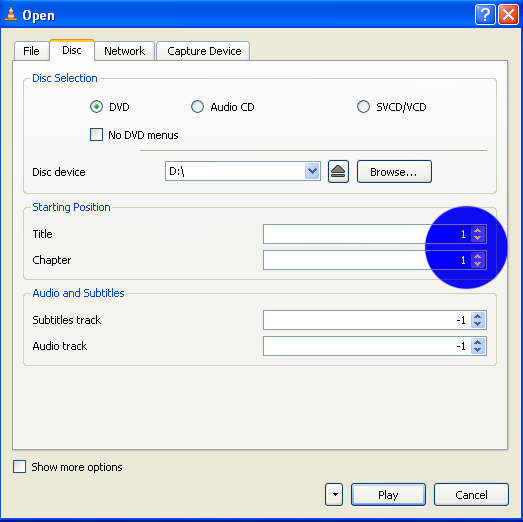
Again, your settings may be different than mine--it really all depends on the movie/video file you're using.
Generally, however, do not change ANY of the options except for “Title” to “1” on EVERYTHING and ONLY change “Chapter” for Avatar or other EPISODE related DVD’s; for MOVIES keep the “Chapter” at 0 or else you will only screencap THAT scene and the movie and screencapping will stop; believe me I’ve done this and it took me awhile to figure out what I was doing wrong so don’t repeat my mistake. (Example: If you are screencapping Avatar and want to screencap the 3rd episode of that DVD; change “Chapter” to 3)
Now we're going to look at the top tabs of this screen--see the one that says "File"? Click on that and you should get a screen similar to this:
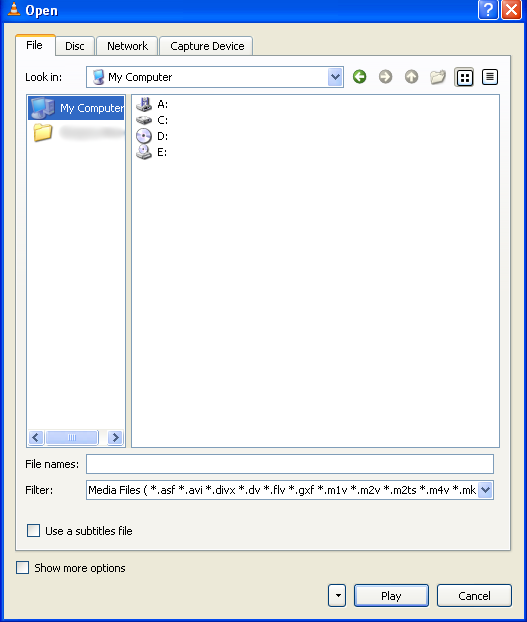
Here (on a Windows XP computer, as I have) it shows you on the left-hand side an icon of "my computer" and of the "my documents" folder (my name blurred out). Click on the "My computer" icon if it hasn't been clicked on already and you should see the screen above. Now click on the "D" drive (or whatever drive your movie/video file is located under) to get this screen:
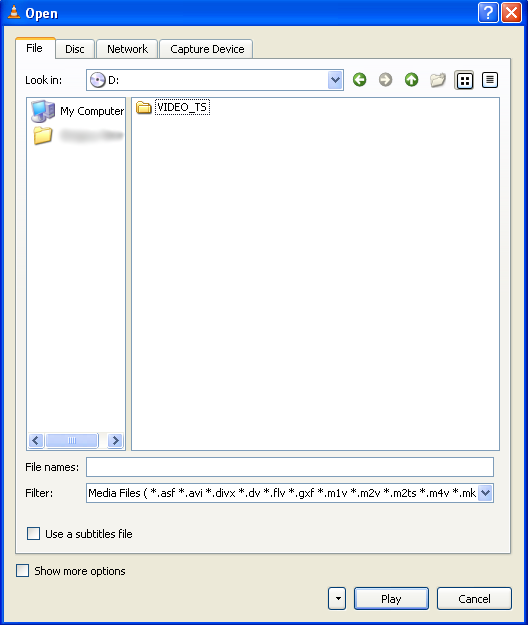
Click on the folder (the only folder here), "Video TS" to get this screen or similar:
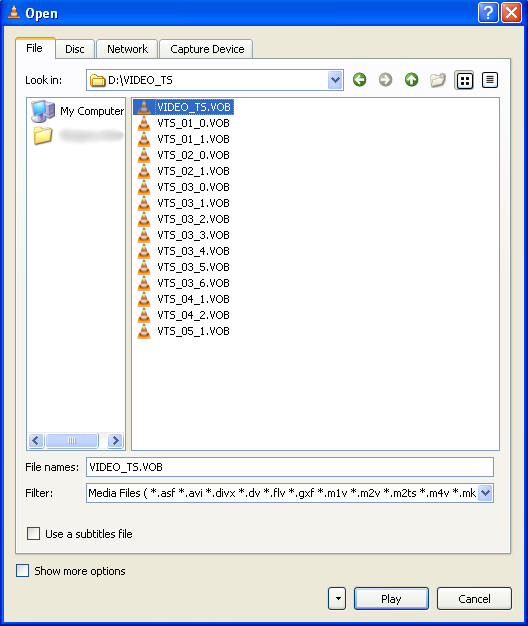
See where it says, “VIDEO_TS.VOB” near the top with an icon with a little traffic cone next to it? Click on THIS--not anything else or it will NOT work.
Finally click “Play” and your movie/episode should start in about 30 or so seconds; be patient as depending on how fast your computer is it will be faster or slower.
If you followed the tutorial correctly and VLC doesn't have a problem somehow, your movie should be playing with just audio and your VLC main screen should look like this:
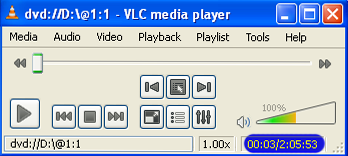
The 00:03/2:05:53 highlighted in blue indicates that my movie is through three seconds of the two hour and five minute (and fifty three second) movie, VLC actively and automatically screencapping the movie.
Again, DO NOT FREAK OUT IF YOU ONLY HAVE AUDIO AFTER GOING THROUGH ALL THESE STEPS-that is how it is; only audio plays when VLC screencaps things.
Finally, again, if something doesn’t work or if you have any questions, feel free to ask me. :)
-----------------
NOTES:
::::::LOCATION OF SCREENCAPS::::::
So basically--if you have a Mac it'll be different, sorry--you have a "C" drive (mine's under "my computer"), right, with all your program files? And you can go under program files and see all the programs that are on your computer with their respective folders, right?
Well, go all the way down till you see "Video LAN"; click on it, then click, "VLC".
THAT is where all your automatic caps go; and that is the only place they go. (Remember, VLC is automatically capping your movie--so be patient if the screencaps don't instantly show up after you started the movie! Exit the folder and re-enter it and they'll probably be there!)
(You should see all your screencaps there; cap again and they will all pop up there. You can move them to a different folder if you like or delete them once you're done with them.)
::::VOLUME:::::
Just click the speaker icon to mute it, or click to the right or left of the colored volume meter (right makes the volume meter bigger and the volume louder; left does the opposite) on the main screen of VLC to either lower or mute the volume if you don't want to listen to the movie when it's automatically capping/rather prefer listening to other music and so forth.
::::A VID TUTORIAL FOR MAC USERS USING .AVI FILES::::
LINK. By adela_nightmoon.
:::::FINDING SCREENCAPS REDUX::::::
Having trouble finding your screencaps still? elvenqueen86 has great advice that has worked for people in THIS COMMENT. :)
Anything I missed? Be sure to tell me so I can add it to this tutorial! Any questions? Just ask and I'll try to help you as best as I can. :) This tutorial is also at my journal, HERE.
Involves: automatic screencapping and setting preferences on a screencapping program
Translatable: No, it's just for VLC
Steps: 16-21 (depending on whether or not you choose to use Windows Media Player to help you at a specific part of the tutorial)
Difficulty: Easy to Moderate
Because THIS TUTORIAL got so much response and VLC has released many new versions of VLC since I made that tutorial, I decided to download the newest version of VLC and do a new tutorial for everyone who has the newest version of VLC. This morning again we will go literally step-by-step as I teach you how to automatically screencap with VLC. (i.e., the computer does it for you.)
If you have any questions, feel free to ask me; I'll try my best to answer them. (Or direct you to a place where you can find answers.)
So to start off with, download VLC (VideoLan - VLC Media Player) from HERE. After you install the program to your computer, open up VLC like you would any other program (using a desktop icon or from the programs menu). If you are using the same version as me (the latest--0.9.9), you should get a screen similar to this:

See where it says “Tools” near the top? Click that and a pop down window will appear; scroll down until you see “Preferences” and click on that.
You will be acquainted with a window such as this:

Note: It will not have the blue box there--that blue box (or circle later on) will be my way of pointing out exactly what you should focus on in this tutorial to achieve the end result--automatically taken screencaps.
And the blue box is important--you need to click "All" under the "Show settings" text to really get where you need to get in VLC. Once you do, you will be acquainted with a window such as this:

Now the left-hand menu is more precise and has more options, see? We're going to click on the "+" sign next to "Video" to expand the information under the video setting.
You should see this:

Now you can see the options under video. We're going to click on the "+" next to "Output modules" here. This will expand the information under the output modules setting.
You should see this window:

Now we're getting somewhere. This time you'll click on the actual text of "Output modules"--we're still under the main video screen right now.
Your window should look like this now:

If you haven't done anything to your preferences before now, your settings should look like this. See near the top where it says, “Video Output Module” and says, “Default” in the drop down window? Click the drop down window and change it to “Image Video Output," giving you this window:

Now see on the left hand panel underneath “Output Modules” where it says “Image file”? Click on that and you should see a screen like this:

I've got four things circled on this screenshot because they're the most important things here. Technically you could change the image format to "JPEG" or something else, but PNGs produce the highest quality screencaps--though the file size is much larger than JPEGs, just to let you know.
Also, we're going to keep the image width and image height set at zero--that's the default setting within VLC; it means that VLC will screencap according to the proportions of the video. (Example: some videos are widescreen and will thus produce wider caps and caps with more black/blank space than fullscreen videos. ) Only change those two settings if you wish to have specific sized caps--but be warned; if the caps are smaller than the size you indicated, they will come out pixelated and/or stretched.
What we WILL change is the recording ratio and the filename prefix. The recording ratio tells VLC to take that many caps for a specific amount of time (I'm not quite sure) and the bigger the recording ratio, the more caps there'll be for that specific time period. From trial and error, I've found that anywhere from 20-25 is good for the recording ratio. I used 25 to screencap The Day After Tomorrow (a film that's over two hours, I believe) and got a little over 5,000 caps to begin with. (Before deleting some blurry caps, ect.)
However, with Iron Man (the film I'll be screencapping for this tutorial), I'll be using 20. 5,000 screencaps is a bit too many for me, especially for a film about two hours long. And so I also changed the filename prefix to ironman- so my caps will be appropriately named. Change the filename prefix to whatever you prefer; I always change it to the name of the movie I'm capping just as a reminder to me of what the screencaps are of. :) Do not forget to add the dash at the end of the filename or else your image files will be one big sloppy mess.
After doing all that, you should have a window that looks something like this:

Click "Save" at the bottom of the screen and you should be back to this window:

Now, without closing out of VLC, put your movie in the disc drive (this part is only if you're screencapping a movie or an episode/t.v. show DVD--you don't need to do these next few steps if the file is already on your computer.) and open Windows Media Player. (If you have a Mac, open a similar program.) This may seem like a tangent, but it'll save you A LOT of hassle later, believe me.
You should be acquainted with this screen before putting your disc in the drive:

And this (or something similar) will be the screen after you put your movie in the drive:

Now I want you to let the movie play, until you get to the point where the menu appears. (It doesn't show up in the next screencap, but the next screencap is the screencap of Iron Man's menu, trust me.)

Click the "Play" button (or whatever button allows the movie to actually show the movie on the cover) and let the movie play. My window looked like this once Iron Man actually started:

(Without the yellow circle and arrows, of course!) But the yellow circle and arrows are important--they're circling WHERE the movie is located in the many titles and chapters of the DVD. In this case, Iron Man is located quite easily--in Title 1, Chapter 1. (Chapter 1 of title 1 is in green, indicating where the DVD is playing right now.)
However, that's not always the case--which is why I had you look in Windows Media Player FIRST. The Chronicles of Narnia: Prince Caspian, for instance, doesn't really start until Title 58. And I spent over an HOUR trying to figure out where it capped in VLC, only to fail ever time, trying title 0 and 1 and variations of that with different chapters and so forth.
So be smart and use Windows Media Player or the like first to find out where your movie is located--otherwise you'll end up capping menus FOREVER, no joke.
Now we're going back to VLC. (You can close out of Windows Media Player; you won't need to use it anymore.) You should still be on the main screen, like this:

Now we're going to click on the button at the top that says, "Media," achieving us a screen like this:

Remember what we just looked up? It was the title and chapter for the location of the actual movie--not the menus. So we're going to change the title and chapter to what Windows Media Player (or similar) told us. In Iron Man's case, it was Title 1, Chapter 1--like this:

Again, your settings may be different than mine--it really all depends on the movie/video file you're using.
Generally, however, do not change ANY of the options except for “Title” to “1” on EVERYTHING and ONLY change “Chapter” for Avatar or other EPISODE related DVD’s; for MOVIES keep the “Chapter” at 0 or else you will only screencap THAT scene and the movie and screencapping will stop; believe me I’ve done this and it took me awhile to figure out what I was doing wrong so don’t repeat my mistake. (Example: If you are screencapping Avatar and want to screencap the 3rd episode of that DVD; change “Chapter” to 3)
Now we're going to look at the top tabs of this screen--see the one that says "File"? Click on that and you should get a screen similar to this:

Here (on a Windows XP computer, as I have) it shows you on the left-hand side an icon of "my computer" and of the "my documents" folder (my name blurred out). Click on the "My computer" icon if it hasn't been clicked on already and you should see the screen above. Now click on the "D" drive (or whatever drive your movie/video file is located under) to get this screen:

Click on the folder (the only folder here), "Video TS" to get this screen or similar:

See where it says, “VIDEO_TS.VOB” near the top with an icon with a little traffic cone next to it? Click on THIS--not anything else or it will NOT work.
Finally click “Play” and your movie/episode should start in about 30 or so seconds; be patient as depending on how fast your computer is it will be faster or slower.
If you followed the tutorial correctly and VLC doesn't have a problem somehow, your movie should be playing with just audio and your VLC main screen should look like this:

The 00:03/2:05:53 highlighted in blue indicates that my movie is through three seconds of the two hour and five minute (and fifty three second) movie, VLC actively and automatically screencapping the movie.
Again, DO NOT FREAK OUT IF YOU ONLY HAVE AUDIO AFTER GOING THROUGH ALL THESE STEPS-that is how it is; only audio plays when VLC screencaps things.
Finally, again, if something doesn’t work or if you have any questions, feel free to ask me. :)
-----------------
NOTES:
::::::LOCATION OF SCREENCAPS::::::
So basically--if you have a Mac it'll be different, sorry--you have a "C" drive (mine's under "my computer"), right, with all your program files? And you can go under program files and see all the programs that are on your computer with their respective folders, right?
Well, go all the way down till you see "Video LAN"; click on it, then click, "VLC".
THAT is where all your automatic caps go; and that is the only place they go. (Remember, VLC is automatically capping your movie--so be patient if the screencaps don't instantly show up after you started the movie! Exit the folder and re-enter it and they'll probably be there!)
(You should see all your screencaps there; cap again and they will all pop up there. You can move them to a different folder if you like or delete them once you're done with them.)
::::VOLUME:::::
Just click the speaker icon to mute it, or click to the right or left of the colored volume meter (right makes the volume meter bigger and the volume louder; left does the opposite) on the main screen of VLC to either lower or mute the volume if you don't want to listen to the movie when it's automatically capping/rather prefer listening to other music and so forth.
::::A VID TUTORIAL FOR MAC USERS USING .AVI FILES::::
LINK. By adela_nightmoon.
:::::FINDING SCREENCAPS REDUX::::::
Having trouble finding your screencaps still? elvenqueen86 has great advice that has worked for people in THIS COMMENT. :)
Anything I missed? Be sure to tell me so I can add it to this tutorial! Any questions? Just ask and I'll try to help you as best as I can. :) This tutorial is also at my journal, HERE.