Tutorial 2: Complexity Guide
Omg, can this be real? Have I finally got something done? YES I HAVE! :D
GUIDE TO COMPLEXITY
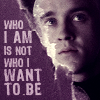
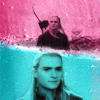
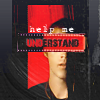
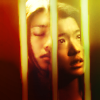
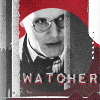
In my Ask The Maker thread, applepips16 asked me for a general guide to complex composition, giving these as examples:

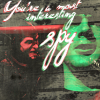
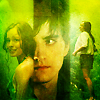
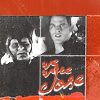
...so I tried to explain a bit about each of these, and also a lot more :)
I don’t really follow a set pattern when I make complex icons so all I can really do here is give some random pieces of advice, hope it will do!
This isn't really about the technicalities of how to do stuff (it's mostly really easy, just cutting things with layer masks), but about the concepts :>
Sometimes I start an icon as a simple base and then randomly decide to add complexity, but I have to say that more often than not the complexity will look forced that way. So all my better complex icons were designed to be the way they are, and there is some point to the composition. I like to have a plan, a concept, a direction clear in my mind so that each step I take will lead towards that! That's at least what works for me the best, for others it might be more effective to experiment around until something cool happens :)
* * *
1. COMING UP WITH COMPOSITIONS
The tricky part of course is coming up with that concept, so I'll just give some examples that work for me:
1.1. This is the one that I do the most often: start with a texture. Find a nice composition texture that you can build your icon upon. For me, textures aren't just embellishment, they can also be crucial parts of the design of the icon. Of course that requires a certain type of texture, something that already has a design of its own, such as these (hover for credit, but most of them are by innocent_lexys, she makes so many great textures for this kind of things):


For example, when making this
I started with this lovely texture by pandavirus:
Other examples on textures giving me direct inspiration:

->

->

->

->

+
+
->

->

->

->
Some of those inspirations are ridiculously straightforward, so they weren’t nearly as complex to make as they might seem :p
1.2. Sometimes what inspires me is a specific prompt or theme, which is why I mostly icon for 20in20s and other icon challenges with prompts. They can guide the icon into a direction I wouldn’t have otherwise thought of. For example, on the 20th round of 20inspirations - the 'About me' round - I did a lot of complex icons and for all of them I had pretty much decided the concept before opening PS. I had made a list of the things I wanted to tell about myself through icons, and then started thinking how it could be reflected in the composition. For example, the composition (and coloring to a lesser extent) of this icon:
is supposed to repsesent conctrolled chaos. The strict symmetry is the controlled part and how many blocks there are and in such weird colors is the chaotic part. (If you're interested in more examples you can read the post itself).
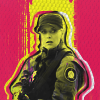
Anyway, the thing in most of my complex icons is that whenever I'm asked to do something for a prompt, even a vague, general one, I mostly try to reflect the prompt not only by cap choice but also by the composition and coloring and that's how almost half of my complex compositions come to be. And in some cases a techical prompt might pretty much dictate the look of the icon, like with this one:
The prompt was ’vertical levels’, so... vertical levels it was :D
1.3. Another way to get inspiration for me is to think of different shapes and patterns. It’s easiest to do as described above and use textures as a base, but they’re really easy to make on your own too. Nothing is more boring than complexity that always follows the same pattern, for example your basic two horizontal levels. There's so much more stuff to try, such as triangles, circles, frames, all kinds of panels, even something completely crazy like these:
And, um, those two are pretty much the only major ways I get my inspiration for complexity. Other things worth mentioning might be seeing something cool by others (don’t be a copycat though, I always try to put my own spin on everything so if I’m inspired by a composition, I’ll go into a totally different direction with everything else!), or something else that is visually inspiring like ads, posters, cd covers, music videos... everything!
Anyway when planning/executing the composition, don't be too scared of the smallness of the blocks. Even really narrows slices can be identifiable, especially if they’re from the same picture! And even if the slices are so narrow that you can't really make out the image, they can still add to the composition as decorative elements, as long as you have something identifiable in the other parts of the icon.
* * *
2. DUPLICATION AND COMBINING MULTIPLE IMAGES
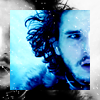
The thought behind the composition is especially important to me when combining multiple different images, since there's usually a reason to pick certain characters or certain images of the same character. There's something about those images that relates to each other, something you want to highlight, maybe the dynamics between the characters (with this icon
i really wanted to highlight John and Scorpius' antagonistic first meeting, making the coloring really contrast, and have the villain Scorpy loom in the shadows and the tortured hero in the front), or maybe just showcase a specific scene, like here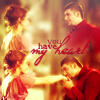
and here
. Really, icons with more than one image blended/blocked together are your perfect opportunity to tell stories, be it from canon or your imagination. If it's not really clear from the composition why you chose those two images, maybe you can try some text to tie them together, like a quote from the scene or a lyric that describes the relationship/character etc.
I find that in blocking icons, simple duplication or different cropping of the same image can work really great. One of the easiest way to add really simple complexity (why yes there is such a thing k? :D ) is to make a basic icon first, then copymerge everything, maybe change the coloring on the new layer, and make it smaller so that the original icon shows underneath it as a frame of a sort. This is what I'm talking of:


In blending icons, using the same cap multiple times might be pretty random and dull so in those I try to use different images, most often of two characters who have a connection, or sometimes I show two images of the same character. In blending, three types of composition that often work for me are
1) going with symmetry: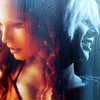
,
2) using really different images where one is a faraway crop and the other a closer crop:
,
, or
3) blending regular images with silhouettes:
,
Textures and masking are always great ways to hide any blend imperfections :)
* * *
3. CLARITY IN COMPLEXITY
A major step in complex compositions for me is the work on the background(s). If you take a cap or caps with a messy background and then use them for blocking or any duplication, soon you'll end up with a horrible pile of busy. So, the more images/duplications you want, the cleaner the actual image(s) should be imo, and this can be achieved mainly by these three methods:
1) picking caps that already have a clean background
2) picking a cap with a somewhat bearable background and smoothening it with the blur tool, the smudge tool, and/or other methods; my favorite is the patch tool, it's very handy for smoothening specific busy parts of the background in a way that makes it look about as natural as possible.
3) by getting rid of the natural background altogether and replacing it with a smooth gradient, texture or a solid color.
For example, imagine this if there was a busy background on the two Adamas: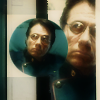
Yeah.
Also I mostly recommend using caps with only one person in them, for this kind of purposes, and cropped kind of close, otherwise they figures can get really really small and unrecognizeable. Sometimes this can be what you want though, for example if the motion/body language is what you want to highlight and it doesn't bother you if the characters lose a lot of their features. You might even want to take this sort of thing to a silhouette level so it’s clearer that you intended it that way?
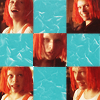
Another way to combine clarity with complexity is using symmetry. Some might find this kind of blocking a little boring but I find it works pretty well especially when there really are a *lot* of blocks. For example, if the blocks in this icon were all in random positions: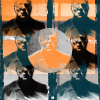
...it would look just all over the place, no? But the symmetrical composition and really simple, also kind of symmetrical coloring help keep it together.
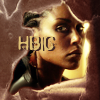
The symmetry axel can be more creatively placed than that, too, for example: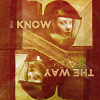
This
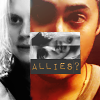
has a less obvious kind of symmetry going on, but I think it is what makes it kinda work: there are two blocks with faraway crops and green negative space, and a close cropped image between them to give it some variety. The composition wouldn’t really work if the panels were in a different order cause then the way the close crop differs from the others wouldn’t look as intentional. Also from a more technical POV it creates these very clear obvious block lines between the images which often is the point of blocking - if the third panel was the same green as the other two, it would look like Skye's body on the left just randomly ends there and that's a bit distracting effect. So in short, try to make the contrast between your blocks clear and use visible block lines.
Also when you're doing levels or blocking, experiment a bit with different shapes and sizes of blocks, some maybe rotated, cropped differently, colored differently, some could be just small little slices since the context will let the viewer know what’s in it.
Then again I wouldn’t use more than one or two of these effects in one icon - don’t go over the top cause if all of your blocks are differently rotated, diffferent sizes, and their colors have no cohesiveness, then it will most likely be a big mess :p For example here: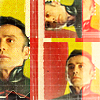
I have different rotations and sizes, but the coloring keeps it from falling apart, while here:
it's the same size and rotation but there's a color difference to keep it from being boring.
If you happen to decide on a composition with just two clear blocks, one of my favorite ways to spice it up is to use complementary colors to really make the blocks contrast: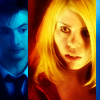
This would be quite a boring icon imo if the colors in the halves were closer to each other.
Sometimes the opposite works too, trying to tie the colorings of your (different) images together - for example here I tried to make the icon look more like a whole by taking the cyan of the sky and the orange of Sikozu's hair in the smaller image and using them for lighting in the larger image: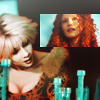
Otherwise they would have been just two random images with nothing in common!
For this purpose I've recently learned a neat little trick. If you use PS, you can make the coloring of cap B automatically fit the coloring of cap A with 'Image->Adjustments->Fit color' (or something like that, don’t have the English version of PS :) ). Anyway you can choose the layer you want the colors of your selected layer to be fitted to. This sometimes screws up the brightness and the contrast big time, but it’s a start and you can play with different layer modes and opacities to at least push the colors a little bit towards the right direction!
* * *
4. COMPLEXITY != BLENDING/BLOCKING
I've mostly talked about the blocking kind of composition here because most of the icons in the actual question were those, but it's good to keep in mind that there are many many other ways to do complex than blocking, blending or any other kind of duplication/combination of several caps. Sometimes you can achieve a sort of complex look just by textures, text or in some cases even coloring. These are some of my icons that I'd personally classify as 'complex' even though there's only one image, hopefully they'll give you ideas :)


...and countless other examples really. Just have an open mind and experiment around :)
* * *
Alright, that’s it then, gah this guide is overly long and all over the place but I tried, so I hope someone has the stamina to read through it and hopefully will get something out of it :D
This is vague to the point of probably leaving everyone with questions. Please do ask them, I only left more specific explanations out because I suck at estimating what is and what isn't relevant :p
Ask The Maker is still a thing so if you happen just now to think of any questions not directly related to this guide, go ahead and ask them (I'm rn working on the other requested tutorials and things).

Ask The Maker || My Thread
GUIDE TO COMPLEXITY
In my Ask The Maker thread, applepips16 asked me for a general guide to complex composition, giving these as examples:
...so I tried to explain a bit about each of these, and also a lot more :)
I don’t really follow a set pattern when I make complex icons so all I can really do here is give some random pieces of advice, hope it will do!
This isn't really about the technicalities of how to do stuff (it's mostly really easy, just cutting things with layer masks), but about the concepts :>
Sometimes I start an icon as a simple base and then randomly decide to add complexity, but I have to say that more often than not the complexity will look forced that way. So all my better complex icons were designed to be the way they are, and there is some point to the composition. I like to have a plan, a concept, a direction clear in my mind so that each step I take will lead towards that! That's at least what works for me the best, for others it might be more effective to experiment around until something cool happens :)
* * *
1. COMING UP WITH COMPOSITIONS
The tricky part of course is coming up with that concept, so I'll just give some examples that work for me:
1.1. This is the one that I do the most often: start with a texture. Find a nice composition texture that you can build your icon upon. For me, textures aren't just embellishment, they can also be crucial parts of the design of the icon. Of course that requires a certain type of texture, something that already has a design of its own, such as these (hover for credit, but most of them are by innocent_lexys, she makes so many great textures for this kind of things):
For example, when making this
I started with this lovely texture by pandavirus:
Other examples on textures giving me direct inspiration:
->
->
->
->
+
+
->
->
->
->
Some of those inspirations are ridiculously straightforward, so they weren’t nearly as complex to make as they might seem :p
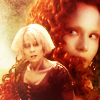
1.2. Sometimes what inspires me is a specific prompt or theme, which is why I mostly icon for 20in20s and other icon challenges with prompts. They can guide the icon into a direction I wouldn’t have otherwise thought of. For example, on the 20th round of 20inspirations - the 'About me' round - I did a lot of complex icons and for all of them I had pretty much decided the concept before opening PS. I had made a list of the things I wanted to tell about myself through icons, and then started thinking how it could be reflected in the composition. For example, the composition (and coloring to a lesser extent) of this icon:
is supposed to repsesent conctrolled chaos. The strict symmetry is the controlled part and how many blocks there are and in such weird colors is the chaotic part. (If you're interested in more examples you can read the post itself).
Anyway, the thing in most of my complex icons is that whenever I'm asked to do something for a prompt, even a vague, general one, I mostly try to reflect the prompt not only by cap choice but also by the composition and coloring and that's how almost half of my complex compositions come to be. And in some cases a techical prompt might pretty much dictate the look of the icon, like with this one:
The prompt was ’vertical levels’, so... vertical levels it was :D
1.3. Another way to get inspiration for me is to think of different shapes and patterns. It’s easiest to do as described above and use textures as a base, but they’re really easy to make on your own too. Nothing is more boring than complexity that always follows the same pattern, for example your basic two horizontal levels. There's so much more stuff to try, such as triangles, circles, frames, all kinds of panels, even something completely crazy like these:
And, um, those two are pretty much the only major ways I get my inspiration for complexity. Other things worth mentioning might be seeing something cool by others (don’t be a copycat though, I always try to put my own spin on everything so if I’m inspired by a composition, I’ll go into a totally different direction with everything else!), or something else that is visually inspiring like ads, posters, cd covers, music videos... everything!
Anyway when planning/executing the composition, don't be too scared of the smallness of the blocks. Even really narrows slices can be identifiable, especially if they’re from the same picture! And even if the slices are so narrow that you can't really make out the image, they can still add to the composition as decorative elements, as long as you have something identifiable in the other parts of the icon.
* * *
2. DUPLICATION AND COMBINING MULTIPLE IMAGES
The thought behind the composition is especially important to me when combining multiple different images, since there's usually a reason to pick certain characters or certain images of the same character. There's something about those images that relates to each other, something you want to highlight, maybe the dynamics between the characters (with this icon
i really wanted to highlight John and Scorpius' antagonistic first meeting, making the coloring really contrast, and have the villain Scorpy loom in the shadows and the tortured hero in the front), or maybe just showcase a specific scene, like here
and here
. Really, icons with more than one image blended/blocked together are your perfect opportunity to tell stories, be it from canon or your imagination. If it's not really clear from the composition why you chose those two images, maybe you can try some text to tie them together, like a quote from the scene or a lyric that describes the relationship/character etc.
I find that in blocking icons, simple duplication or different cropping of the same image can work really great. One of the easiest way to add really simple complexity (why yes there is such a thing k? :D ) is to make a basic icon first, then copymerge everything, maybe change the coloring on the new layer, and make it smaller so that the original icon shows underneath it as a frame of a sort. This is what I'm talking of:
In blending icons, using the same cap multiple times might be pretty random and dull so in those I try to use different images, most often of two characters who have a connection, or sometimes I show two images of the same character. In blending, three types of composition that often work for me are
1) going with symmetry:
,
2) using really different images where one is a faraway crop and the other a closer crop:
,
, or
3) blending regular images with silhouettes:
,
Textures and masking are always great ways to hide any blend imperfections :)
* * *
3. CLARITY IN COMPLEXITY
A major step in complex compositions for me is the work on the background(s). If you take a cap or caps with a messy background and then use them for blocking or any duplication, soon you'll end up with a horrible pile of busy. So, the more images/duplications you want, the cleaner the actual image(s) should be imo, and this can be achieved mainly by these three methods:
1) picking caps that already have a clean background
2) picking a cap with a somewhat bearable background and smoothening it with the blur tool, the smudge tool, and/or other methods; my favorite is the patch tool, it's very handy for smoothening specific busy parts of the background in a way that makes it look about as natural as possible.
3) by getting rid of the natural background altogether and replacing it with a smooth gradient, texture or a solid color.
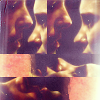
For example, imagine this if there was a busy background on the two Adamas:
Yeah.
Also I mostly recommend using caps with only one person in them, for this kind of purposes, and cropped kind of close, otherwise they figures can get really really small and unrecognizeable. Sometimes this can be what you want though, for example if the motion/body language is what you want to highlight and it doesn't bother you if the characters lose a lot of their features. You might even want to take this sort of thing to a silhouette level so it’s clearer that you intended it that way?
Another way to combine clarity with complexity is using symmetry. Some might find this kind of blocking a little boring but I find it works pretty well especially when there really are a *lot* of blocks. For example, if the blocks in this icon were all in random positions:
...it would look just all over the place, no? But the symmetrical composition and really simple, also kind of symmetrical coloring help keep it together.
The symmetry axel can be more creatively placed than that, too, for example:
This
has a less obvious kind of symmetry going on, but I think it is what makes it kinda work: there are two blocks with faraway crops and green negative space, and a close cropped image between them to give it some variety. The composition wouldn’t really work if the panels were in a different order cause then the way the close crop differs from the others wouldn’t look as intentional. Also from a more technical POV it creates these very clear obvious block lines between the images which often is the point of blocking - if the third panel was the same green as the other two, it would look like Skye's body on the left just randomly ends there and that's a bit distracting effect. So in short, try to make the contrast between your blocks clear and use visible block lines.
Also when you're doing levels or blocking, experiment a bit with different shapes and sizes of blocks, some maybe rotated, cropped differently, colored differently, some could be just small little slices since the context will let the viewer know what’s in it.
Then again I wouldn’t use more than one or two of these effects in one icon - don’t go over the top cause if all of your blocks are differently rotated, diffferent sizes, and their colors have no cohesiveness, then it will most likely be a big mess :p For example here:
I have different rotations and sizes, but the coloring keeps it from falling apart, while here:
it's the same size and rotation but there's a color difference to keep it from being boring.
If you happen to decide on a composition with just two clear blocks, one of my favorite ways to spice it up is to use complementary colors to really make the blocks contrast:
This would be quite a boring icon imo if the colors in the halves were closer to each other.
Sometimes the opposite works too, trying to tie the colorings of your (different) images together - for example here I tried to make the icon look more like a whole by taking the cyan of the sky and the orange of Sikozu's hair in the smaller image and using them for lighting in the larger image:
Otherwise they would have been just two random images with nothing in common!
For this purpose I've recently learned a neat little trick. If you use PS, you can make the coloring of cap B automatically fit the coloring of cap A with 'Image->Adjustments->Fit color' (or something like that, don’t have the English version of PS :) ). Anyway you can choose the layer you want the colors of your selected layer to be fitted to. This sometimes screws up the brightness and the contrast big time, but it’s a start and you can play with different layer modes and opacities to at least push the colors a little bit towards the right direction!
* * *
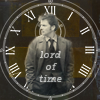
4. COMPLEXITY != BLENDING/BLOCKING
I've mostly talked about the blocking kind of composition here because most of the icons in the actual question were those, but it's good to keep in mind that there are many many other ways to do complex than blocking, blending or any other kind of duplication/combination of several caps. Sometimes you can achieve a sort of complex look just by textures, text or in some cases even coloring. These are some of my icons that I'd personally classify as 'complex' even though there's only one image, hopefully they'll give you ideas :)
...and countless other examples really. Just have an open mind and experiment around :)
* * *
Alright, that’s it then, gah this guide is overly long and all over the place but I tried, so I hope someone has the stamina to read through it and hopefully will get something out of it :D
This is vague to the point of probably leaving everyone with questions. Please do ask them, I only left more specific explanations out because I suck at estimating what is and what isn't relevant :p
Ask The Maker is still a thing so if you happen just now to think of any questions not directly related to this guide, go ahead and ask them (I'm rn working on the other requested tutorials and things).
Ask The Maker || My Thread