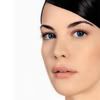
My Third Tutorial.
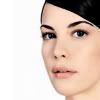
How to go from this to 
in 11 easy steps.
1. Crop your image down to 100x100. In my case, the image wasn't 100 pixels wide, so I set it on top of a white background. Leave it at 100% opacity on normal.
2. Duplicate the base image, desaturate it, and set it to soft light at 100% opacity.
3. Duplicate the base image again, drag it on top of the desaturated layer, and set the new layer to screen at 80% opacity. (Or if your image is brighter, a lower opacity, if darker, a higher opacity).
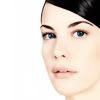
4. Create a fill layer and fill it with #FF0000, then set it to hue at 50% opacity. This gives it a slight rosy tint.
5. Create another fill layer and fill it with #101235 (or any dark blue) and set it to exclusion at 100% opacity.

6. Create another fill layer and fill it with #FF00EA and set it to soft light at 30% opacity and 50% fill. This gives it a bit more of a different kind of rosy hue.

7. Create another fill layer and fill it with #FF0000 again, setting it to screen at 20% opacity and 50% fill.

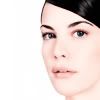
8. Create a new layer, and using a soft brush (I used it at 21 pixels) and the color #F68B8B, create a spot, as big as you want, in the empty space next to Liv's head. Go to Filter->Blur->Gaussian Blur and apply the gaussian blur at a 10.5 pixel radius, then I set it to 70% opacity.

9. I thought that was too light, so I duplicated the spot layer and applied the gaussian blur again, but at a 5.5 pixel radius.

10. Apply text. I used the font blackjack in white at a size of 14pt and wrote Liv, then rotated it by going to Edit->Transform->Rotate.
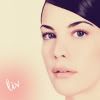
11. Then came the simple task of applying a border. Create a new layer and press ctrl-a. Then go to Edit->Stroke and stroke the inside in black, 1px.
And voila!
Let me know what you thought of the tutorial and feel free to show me your results!
in 11 easy steps.
1. Crop your image down to 100x100. In my case, the image wasn't 100 pixels wide, so I set it on top of a white background. Leave it at 100% opacity on normal.
2. Duplicate the base image, desaturate it, and set it to soft light at 100% opacity.
3. Duplicate the base image again, drag it on top of the desaturated layer, and set the new layer to screen at 80% opacity. (Or if your image is brighter, a lower opacity, if darker, a higher opacity).
4. Create a fill layer and fill it with #FF0000, then set it to hue at 50% opacity. This gives it a slight rosy tint.
5. Create another fill layer and fill it with #101235 (or any dark blue) and set it to exclusion at 100% opacity.
6. Create another fill layer and fill it with #FF00EA and set it to soft light at 30% opacity and 50% fill. This gives it a bit more of a different kind of rosy hue.
7. Create another fill layer and fill it with #FF0000 again, setting it to screen at 20% opacity and 50% fill.
8. Create a new layer, and using a soft brush (I used it at 21 pixels) and the color #F68B8B, create a spot, as big as you want, in the empty space next to Liv's head. Go to Filter->Blur->Gaussian Blur and apply the gaussian blur at a 10.5 pixel radius, then I set it to 70% opacity.
9. I thought that was too light, so I duplicated the spot layer and applied the gaussian blur again, but at a 5.5 pixel radius.
10. Apply text. I used the font blackjack in white at a size of 14pt and wrote Liv, then rotated it by going to Edit->Transform->Rotate.
11. Then came the simple task of applying a border. Create a new layer and press ctrl-a. Then go to Edit->Stroke and stroke the inside in black, 1px.
And voila!
Let me know what you thought of the tutorial and feel free to show me your results!