Caught on Film Cho Tutorial
This is a tutorial request for sawcat and felixkarin and anyone interested in how I got this effect. :)
Tutorial made using PSP 9.
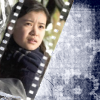
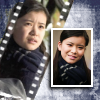
Go from this
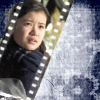
to this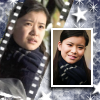
1.) Find an image you like and crop it down to 100x100 pixels. Keep the focus of your image to the left side. I decided to use an image of Cho Chang. The coloring and all that jazz looks fine so I'm not going to make an adjustments, but other images might need some. It's up to you.
2.) Take this texture by jadedicons.
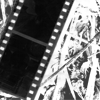
Set it on the top of your base and set it to SCREEN 100.
3.)
This is what you end up with. The white line going across her face is annoying so I erase it. I don't like the texture on the right side of the icon (mainly because you can still see the background) so I take a round 10pt size white brush HARDNESS 100 OPACITY 100 and color in that side.
4.)
The right side is now ready for a colorful texture.
5.) I chose this one by colorfilter.
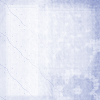
It was orginally a shade of green, but that doesn't match the icon so I changed it to blue. ADJUST >> HUE and SATURATION >> COLORIZE. You can adjust the coloring to whatever you want from there.
6.) Set the texture to DARKEN 100 and erase the bits covering up the filmstrip squares, Cho's face, and the top left corner.
7.) Duplicate the texture layer and mirror it. Once again, erase all parts covering Cho's face and the filmstrip squares. Also erase everything on the right side.
8.) Now just merge the top two blue texture layers. Select the topmost layer. LAYERS >> MERGE >> MERGE DOWN. It should still be set to DARKER, but now I want to change the opacity. LAYERS >> PROPERTIES. Change the setting to OPACITY 80. Merge all your layers.

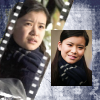
9.) Now it's time to add your mini image. Yay! I selected a different image of Cho and cropped it down to something nice and tiny.

Copy the image and paste it as a new layer onto your 100x100 image.
10.) Move around the mini image until you find a placement you like.

11.) Duplicate the layer and set it to SOFT LIGHT 100. Merge down that layer. After the soft light Cho is a bit too colorful so desaturate the image. ADJUST >> AUTOMATIC SATURATION ENHANCEMENT. I put the settings on BIAS less colorful & STRENGHT normal. Make sure the "skintones present" box is checked. ;)
12.) Select your brush tool again and set the size to a square SIZE 2 HARDNESS 100 OPACITY 100. Draw around the mini image of Cho.
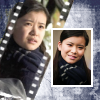
13.) Now we need to make the mini image stand out a bit more, almost make it pop. EFFECTS >> 3D EFFECTS >> DROP SHADOW. Adjust the settings to OFFSET VERTICAL 2 HORIZONTAL -2 & ATTRIBUTES OPACITY 100 BLUR 5. I chose black, but you could almost use any color.
14.) Don't merge your layers yet. Select the bottom layer then your brush tool. It's time to add the white stars. I used my Shooting Stars brush set to get this effect. Create a new raster layer. LAYERS >> NEW RASTER LAYER. Then just stamping away. The brush set has seven different brushes. I chose the last one.
15.) I wanted to make the stars glow a bit, so once again I used the drop shadow effect from above (same settings and all).

16.) Duplicate the layer and erase all the stars on the right. Use the drop shadow effect again and this time change the color to white. Set the layer to SCREEN 100.
And there we have it. Merge all your layers and you're all done. ^^
Tutorial made using PSP 9.
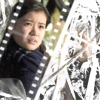
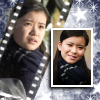
Go from this
to this
1.) Find an image you like and crop it down to 100x100 pixels. Keep the focus of your image to the left side. I decided to use an image of Cho Chang. The coloring and all that jazz looks fine so I'm not going to make an adjustments, but other images might need some. It's up to you.
2.) Take this texture by jadedicons.
Set it on the top of your base and set it to SCREEN 100.
3.)
This is what you end up with. The white line going across her face is annoying so I erase it. I don't like the texture on the right side of the icon (mainly because you can still see the background) so I take a round 10pt size white brush HARDNESS 100 OPACITY 100 and color in that side.
4.)
The right side is now ready for a colorful texture.
5.) I chose this one by colorfilter.
It was orginally a shade of green, but that doesn't match the icon so I changed it to blue. ADJUST >> HUE and SATURATION >> COLORIZE. You can adjust the coloring to whatever you want from there.
6.) Set the texture to DARKEN 100 and erase the bits covering up the filmstrip squares, Cho's face, and the top left corner.
7.) Duplicate the texture layer and mirror it. Once again, erase all parts covering Cho's face and the filmstrip squares. Also erase everything on the right side.
8.) Now just merge the top two blue texture layers. Select the topmost layer. LAYERS >> MERGE >> MERGE DOWN. It should still be set to DARKER, but now I want to change the opacity. LAYERS >> PROPERTIES. Change the setting to OPACITY 80. Merge all your layers.
9.) Now it's time to add your mini image. Yay! I selected a different image of Cho and cropped it down to something nice and tiny.
Copy the image and paste it as a new layer onto your 100x100 image.
10.) Move around the mini image until you find a placement you like.
11.) Duplicate the layer and set it to SOFT LIGHT 100. Merge down that layer. After the soft light Cho is a bit too colorful so desaturate the image. ADJUST >> AUTOMATIC SATURATION ENHANCEMENT. I put the settings on BIAS less colorful & STRENGHT normal. Make sure the "skintones present" box is checked. ;)
12.) Select your brush tool again and set the size to a square SIZE 2 HARDNESS 100 OPACITY 100. Draw around the mini image of Cho.
13.) Now we need to make the mini image stand out a bit more, almost make it pop. EFFECTS >> 3D EFFECTS >> DROP SHADOW. Adjust the settings to OFFSET VERTICAL 2 HORIZONTAL -2 & ATTRIBUTES OPACITY 100 BLUR 5. I chose black, but you could almost use any color.
14.) Don't merge your layers yet. Select the bottom layer then your brush tool. It's time to add the white stars. I used my Shooting Stars brush set to get this effect. Create a new raster layer. LAYERS >> NEW RASTER LAYER. Then just stamping away. The brush set has seven different brushes. I chose the last one.
15.) I wanted to make the stars glow a bit, so once again I used the drop shadow effect from above (same settings and all).
16.) Duplicate the layer and erase all the stars on the right. Use the drop shadow effect again and this time change the color to white. Set the layer to SCREEN 100.
And there we have it. Merge all your layers and you're all done. ^^