'Blue Coloring' Tutorial
This is a requested tutorial and is also my first so sorry if you don't understand something. If the is something you don't understand just ask and I'll do my best to explain it to you.
Go from this: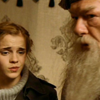
to this: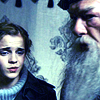
This tutorial was made using Photoshop 7.
1. Crop your picture and run a sharpen filter on it. I then used Fade Sharpen set to 50%. If you don't have photoshop duplicating the picture layer and sharpening that and then lowering the opacity might also work. That gave me this: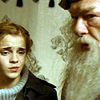
2. I then used Auto Levels.
3. I made a new layer and filled it with # 7196B5 and set it to soft light at 48% opacity.
4. I then made another new layer and filled it with # 1433A4 and set it to overlay at 60% opacity.
5. I created yet another new layer and filled it with # 0B1A55 and set it to screen at 51%.
6. This step is optional. I use a selective colors adjustment layer. I choose blacks from the drop down menu when the dialog comes up. I then turn up the black a bit and the cyan and magenta a bit.
6. Lastly, I made the picture layer the active layer again and used brightness/contrast on it. My settings were: Brightness: +12
Contrast:+7
And all those steps bring me to the final peice:
That's it. The opacity settings really only work for this specific icon so you will have to mess around with the settings to get it to look right.
Hope you understood it. Let me know if this was useful to you.
Heaven x