CLOUD Final Fantasy Cosplay Making Of
HOKAY GAIS ITS MAI TURN NAO!
So because we are un-awesome in the upkeep of this comm and havent posted anything since... last year sometime.... I'm gonna do the rest of the FFVII progress post first and leave Ai No Kusbai and Fuyu No Semi til... later. yep *shifty eyes*
And because there are a hundred and one how-to-make-Cloud-cosplay tutorials out there I'm not gonna go through the making of my costume word for word, if anything I'll post some pretty pictures and write about any problems I encountered and then if anyone wants to ask more detailed questions they can.
(AS ALWAYS, THE FOLLOWING CUT IS IMAGE HEAVY. BEWARE 56K CONNECTIONS, DEATH AWAITS HURHURHUR!)
SO.
HOW TO MAKE A CLOUD COSTUME :D
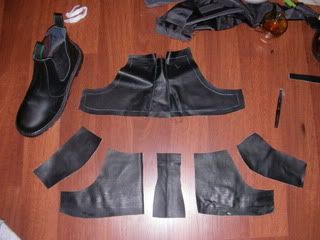
Believe it or not I did things exactly the opposite from alita_b_angel, I made my shoes FIRST MOOHAHAHA. I bought a pair of $15 generic black work boots from Salvos to use as the base. Second-hand stores are your best friend in cosplay lol. The easiest way to get a pattern from a shoe is to use duct tape, and tape around the area you want to make a pattern of and then peel the duct tape off. Voila! Aaaaand thats how I got the pattern for these shoes in the above picture. Because I am stingy I dug around in my material closet and came up with a bunch of black leather/upholstery material that I had scrounged from the carcass of a dead couch, so I didnt have to buy leather.
If you look at Cloud's boots closely you can see he has a zipper that runs down the centre of his boot and then two zippers than run along on the sides. I took a look at some of the custom-made Cloud boots online and came to the same conclusion they did, which is you cant have a full zipper running on the side of the boot as you cannot get the same curvature and it will just look redonk. So I cheated and used a half-zipper on each side, it looks just as good.
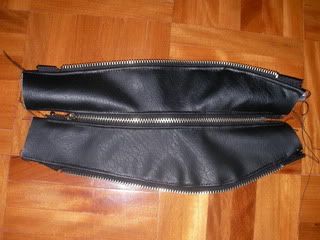
This is what it looks like after I sewed everything together. See by using duct tape as a pattern you get a really close fitting to the shoe.
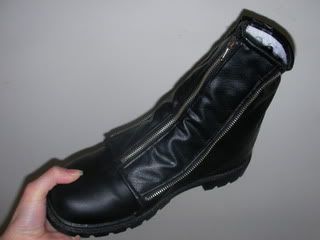
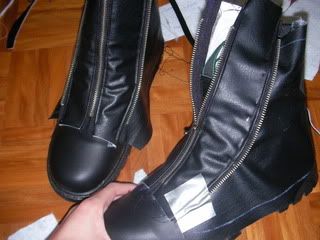
Aaaaaand then I glued it onto the base of the real boot and OMG LOOK ITS HARRY POTTER MAAAAAGIC! I'm so proud of the boots, too bad no one really noticed the care I put into them because my pants hid most of the awesomeness :(
You wont believe the trouble I went to find this stupid stupid vest, I searched every op-shop and Salvos and Vinnies etc around my area and then on WEDNESDAY, three days before the con I go to Salvos in Glebe and find two almost exact matches! There was one that was the right colour but the ribbed pattern was a bit narrow, then there was a black one but the ribbed pattern was wider and more exact. I chose the black, thanked the gods of cosplay for my luck and went on my merry way. At one point I was so worried I wouldnt find one that I asked amenokitarou if I could borrow his Cloud costume just in case. Thanks Will for lending me your costume!
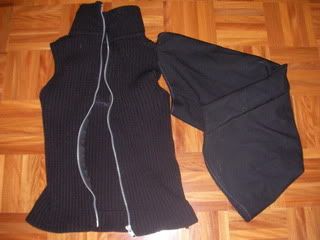
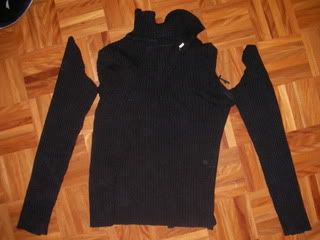
I love my $8 vest <3 all I did to alter the pattern was cut the sleeves off, fit the collar with some plastic so it didnt just flop all over the place, and put a zipper in. Sounds simple but it wasnt, I re-did the armholes about three times because everytime I thought I sewed it straight the knit fabric stretched under my machine foot and sewed wonky. And then I made a super large sleeve (size 16 I think) out of the same material as my pants, which is a rough cotton weave I found in a Vietnamese fabric store in Cabramatta. Gotta love Cabra!
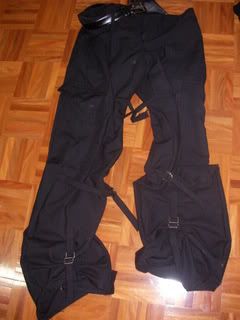
Unfortunately I didnt take many pictures when I was sewing the pants, but if anyone wants more detailed pictures for help I'll go back later and take some more. The small silver buckles I actually obtained from all over the place, some are from bags that I dont use anymore and cut up, and some are small silver D-rings from Lincraft, not the right shape but they do the same job. Because Nomura is a dick and likes making life hard for all cosplayers around the globe, Cloud has stupid little straps and buckles all over his trousers that dont seem to provide any functional purpose but to look WOW!COOL. Thats not the bad thing, the bad thing is I couldnt find any refs or images AT ALL to show me the crappery of these pants, so I just went off some macro-high-res pictures someone on the internet took of that new giant Cloud doll-figurine-to-end-all-figurines and guessed it was accurate to the character. I also used some artistic licence *shhhhhhhhh* :P
Man you wont believe how much luck I had with this costume. You see the two shiny silver buckles on Cloud's shawl? The ones in the above picture? I was so close to just sculpting some out of modelling clay coz I couldnt find any the right size, but on FRIDAY, THE DAY BEFORE THE CONVENTION ZOMG, at Paddy's Market I bought these two babies (for about $3 each) from the only leather belts and buckles stall in the place. Props to Alita for telling me about it.

NOW ONTO THE PAULDRONS. I bet you didnt think I was gonna have any LOL pictures in this post did you >:D
I went to a costuming store in Glebe with Alita, where we purchased small plastic kiddie's toy helmets for the pauldrons. Because my head is tiny mine actually fit me. I took the thing apart and carved it into the right shape with a pair of scissors. If you are going to do this dont use good scissors that you intend to keep around for precision cutting or fabric cutting, because they will be as blunt as anything after this. And yeah, check out my guns in that picture ROFL XDDDDDD
Alita made me do weights coz she said I was too scrawny and needed to look more like a man, so now I'm all chunky :3
Again this is the point I wished I'd taken more photos coz it was kind of interesting how I got this to work. I'll just have to explain and hope no one gets confused. I decided that after carving it the pauldron looked a bit tiny even for my puny shoulder, so I covered the entire thing inside out with some thin yoga-mat foam, glued with some special-bonding glue used on shoes called KS BOND. This turned out to be a good idea, because I could then glue the leather onto the foam and it would stick properly without falling off. As you can see in the picture above I couldnt find a way around not making a seam down the pauldron, I tried stretching the leather but it just didnt work. So what I did is cut the leather into three sections, stretch the two outer layers onto the pauldron first, let them dry, and then carefully cut and stretch the middle section down over the top. This took a lot of time and effort to get it right, if you look closely at the pauldron you can see the seams but otherwise they are not noticeable unless I point them out.
And then I bought some elastic trimming from lincraft and stretched that around the edge of the pauldron and glued it down. If you are going to do this instead of sewing the actual stitch pattern then you have to make sure the trimming is stretchy or has some give to it so it can curve around the edges properly, otherwise it just looks awful.
NOW FOR THE BEST BIT, CLOUD'S WOLFY HEAD >:3
What I did is I took a look at the size of the wolf emblem compared to Cloud's head (disregading his hair of course) and came to the conclusion it was about... 6-7cm give or take. But then again my head is small, if you have a larger head your emblem will probably be larger. I made a thin round base out of Fimo (which is similar stuff to Sculpey) and then moulded the appropriate shapes for certain parts of the head.
I kept building more clay onto the head and smoothing it out with a special sculpting tool I bought from Newtown. If you are sculpting something that is quite large you can probably do it with your hands or just use make-shift tools you can find around the house (small sharp objects that allow for precision like metal nail file, skewer etc) but because I'm crazy and pedantic I had to buy a $30 tool. A $30 tool that I have now somehow managed to lose in the process of making this emblem >_<
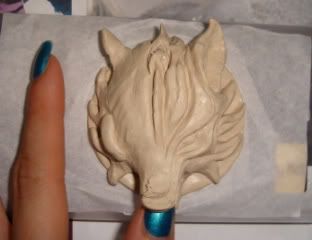
As soon as I had enough clay built onto the head I began sculpting the actual ridges out, putting more clay onto the places that needed more building up as I went. This is where it is useful to have many good ref images, I ended up getting stills from the movie and printing out a bunch of pictures so I could get a closer look at all the details.
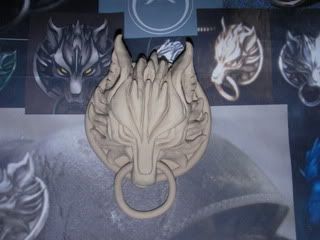
Aaaaand this is what it looked like after I finished, you can see my ref sheet underneath. To get the ring inside the mouth I baked the emblem and the ring separately, then put the ring inside the mouth and added teeth so it wouldn't fall out, and re-baked it. If you look at the real emblem closely enough you'll see that its not a 100% accurate representation, but you know, artistic licence and everything :D
After baking it I spray painted it black at first, and then coated it carefully with a layer of silver spray paint. I did this to give the emblem a more 3D effect, as the ridges or creases stay black and make the silver "pop". This is actually a bad photo for an explanation, as you cant see it too clearly here, but it looks great in real life. It looks better than just spraying it silver, but you dont have to do it.
The wolfy emblem was probably the piece I was most proud of, but it did take a lot of time, probably more than I shouldve spent on it. I probably worked on and off for a month just sculpting it trying to get it right because I am pedantic and a perfectionist FFFFFF- *wants to kill self sometimes* but the fact that people didnt even realise I had made the emblem myself and thought I had bought it made all the time and fiddling worth it! Unless you consider the fact that people just assumed I bought it... and didnt bother asking me... that I made... err... hmmmm...
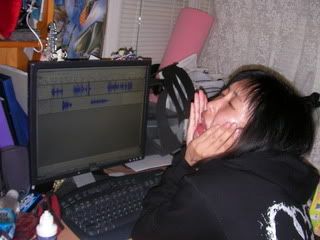
While I was slowly making my way through the pieces of my costume Alita was having a good old time splicing together the skit. Doesnt she look like she's having SO MUCH FUN? One of these days I'll get my act together and offer to do the skit audio myself for a change, just to you know, give her a well-earned break. One of these days...
NOW WHERE WOULD I BE WITHOUT A CRAPPY FAIL!CLOUD WIG?? Here comes the poorest part of my costume D:
I'm not gonna post up too many pictures because there are seriously a bazillion-squillion-gamillion tutorials on the internet in How-To-Style-A-Cloud-Wig. Seriously. I'm just gonna show you kiddies how I added extra extensions.
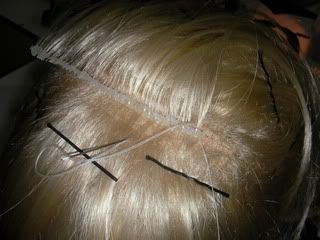
What I did is I cut the ends off the shoulder-length wig and made extra extensions by glueing them along the edge. Tutorials out there will tell you to use caulking which is a good idea, but I'm cheap and running out of time so I just used a mixture of hot glue and PVA glue. I sewed the majority of the extensions where I thought more hair might be needed, at the crown of the head where it stands up, and I sewed one extension after two layers of hair and so forth. It helps to buy a blonde wig that has already been teased and treated at the roots to make it stand up, one way to tell if this is so is the roots of the hair at the base of the wig (its only a few millimetres in length) will feel rougher and be slightly crimped so that it can stand up. I got mine from Alita who had purchased our wigs from China. Thats another secret folks, if you dont have a Chinese friend MAKE ONE RIGHT NOW. Then when they go back to Ye Olde Home Country ask them to get you some wigs, even wigs that are made out of REAL HAIR over there are cheap as chips, and if you cant find a wig thats right THEY'LL MAKE ONE FOR YOU. But thats a story for another time... *cough-fuyu-no-semi-cough*

After I sewed all the extensions in it looked like this. I know it doesnt seem like much but the fact that the hair at the crown is standing up helps a lot for styling crazy spikes-coming-out-of-everywhere hair.
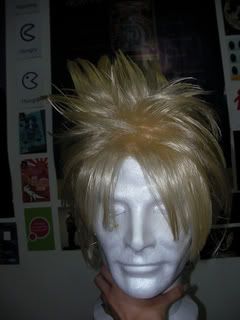
And then came the spiking of the wig. I have new-found appreciation for anyone who has ever had to style a crazy FF wig before. All I can say is NEVER AGAIN RAAAAARRGHHH.
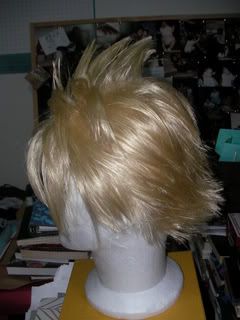
I can truthfully say I fucked up on this one, after all the cosplays I've done you think I'd have learnt by now but nooooooo. I did the rookie mistake of leaving the wig til last, so by the time I actually started the wig it was 2am on the morning of the con. I finished the wig by 6am *DIES*. You know those times where you style a wig on a wig head and you're like "looks pretty good"... but then you put it on your head, and it goes horribly wrong? This was one of those times :((((((((((
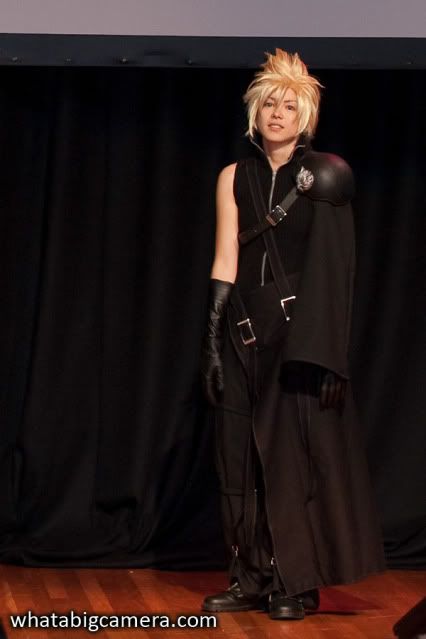
Anyway wig troubles aside, I quite enjoyed making this costume, and I enjoyed hanging around with the huge awesome FFVII group we made. Many fun times were had at Mini Animania, I hope all my cons are this enjoyable. Here are some awesome photos to show you the end result, courtesy of our wonderful photographer Anna:
Advent Children Group by ~queencattabby on deviantART
And thats how you make a Cloud costume ladies and gents!
...
....
......
........
..........you thought I was gonna end it there didnt you? YOU THOUGHT WRONG HARHARHAR!
Special Bonus: HOW TO MAKE WALLMARKET!CLOUD COSTUME >:D
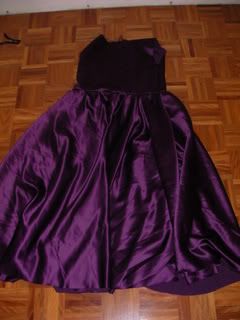
If you want to know why I had to make two costumes take a look at our hil-arious skit here. Originally there was going to be me as AC!Cloud and cattypatra as Wallmarket!Cloud but she had to drop out, and as I was SO determined to do the skit Alita and I had planned she gave me the dress she had started so I could finish it and use it in the skit for MAXIMUM COMEDIC EFFECT. She had already sewn the skirt together for me so all I had to do was add the sleeves and embellishments etc.
I started with putting in a zip. Unfortunately I didnt have time to go out and buy a purple zipper so I just used a pink one I had left over from the time I made my cousin's bridsemaid dresses.
Then I started on the sleeves. I traced a size 14 sleeve from a 1970s Butterick pattern for puffy sleeves I had lying around.

Then after some tricky manouevres I managed to make the sleeve fit the armhole of the dress. Then I sewed lace to the edge of the sleeve, and added elastic to get the poofyness.
Next came the collar, which was quite hard since I didnt really know what the collar was supposed to look like. But past cosplayers who have done Wallmarket!Cloud have made it a scoop collar and added lace on the edge, so I just did a variation of this.
I left this image bigger so you guys can see what I did to the edge of the material. As I was pressed for time I didnt have enough time to hem the skirt properly, and I figured since it would only be seen on stage for a few seconds no one would really notice the hem anyway. So to stop the edges from fraying I used a lighter and lightly burned the edge of the material, as it is mostly synthetic it melted when touched by the flame and thus sealed itself. Beware you can only do this very carefully and I wouldnt try it on ALL types of material, it mostly works best with satin and when you dont have an overlocker. One day Alita and I will shimmy over to Mew's house and claim our overlocking rights, one day *shakes fist at sky*
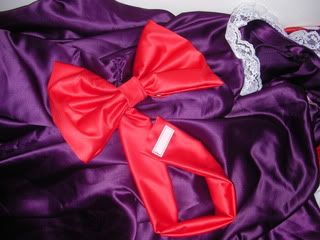
Then came the bow, made out of red satin which was velcroed around the waist of the dress to make it easier for me to get in and out of.

...AND THAT'S HOW YOU MAKE WALLMARKET!CLOUD GIRLS AND BOYS!!! Photo taken by my other half, alita_b_angel.
HERE, HAVE SOME MORE AWESOME PICTURES, COURTESY OF WHATABIGCAMERA.COM.
Me as a dazed and confused Cloud on stage.
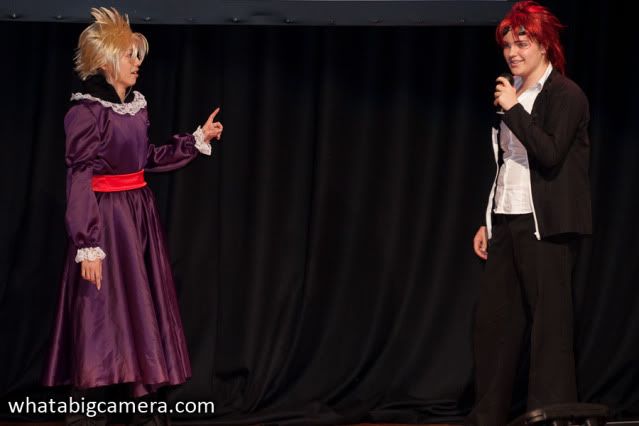
Cloud-ia and Reno on stage.
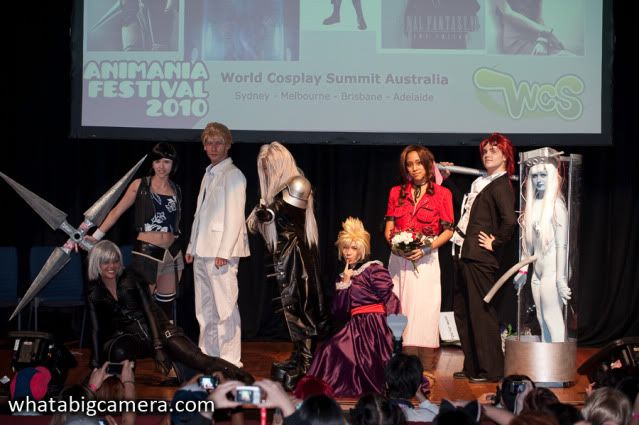
The whole group on stage. From left to right: tsubakichan as Kadaj, ryokophoenix as Yuffie, the_impaler as Rufus, alita_b_angel as Sephiroth, Myself as Cloud, athira as Aeris, budgi_e as Reno, and saerianne as Jenova.
Ok before I finish this post of epic proportions I have something to confess.
Now, this is gonna come out sooner or later, to those of you who know me if you don't find out from someone else I'm sure Alita will tell you, so I'll just say it now. Yes I broke her Cloud figurine. BUT I SWEAR TO GOD IT WASNT MY FAULT. You see, I was looking at my pants wondering how on earth to sew them when I innocently enough picked up her Cloud figurine to take a look at it. and it. FELL. APART. IN MY HANDS. I wasnt pulling at it, or shaking it around, or doing anything but HOLDING IT and the goddamn thing falls apart in my hands! He is now one-legged Cloud!!
BUT WAIT THERES MOAR.
Two days before the con Alita was angsting over how to do her boots, and asked for my opinion. I then proceeded to take the Sephiroth figurine from her hands so that I could inspect it for a proper shoe-evaluation when OMFG! Yes, this poor figurine also succumbed to the curse that is Ailee. It Fell. Apart. I KID YOU NOT LADIES AND GENTLEMEN.
THIS IS CLEARLY NOT ANY WRONGDOING ON MY PART, I AM OBVIOUSLY CURSED BY THE GODS.
Aaaaaaand thats not all that I broke. The night before the con I managed to kill my dad's 40 y.o. sewing machine. The one that could sew through ANYTHING. I BROKE IT. NNNNNNNOOOOOOOOOOOOOOOO!!!!!!!
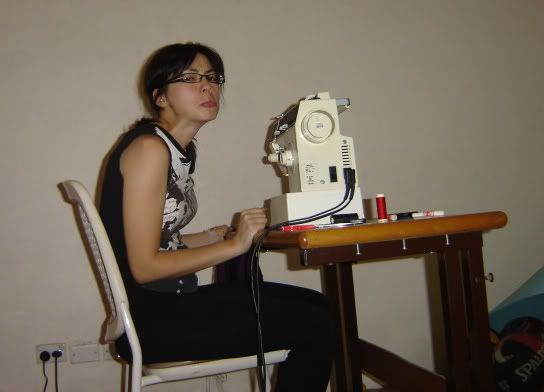
But its OK I fixed it! Sort of!! Well, something's still wrong with the tension so I'll have to take another look at it before I start my next costume.
And thats it. I hope someone finds this post useful, or if not, then mildly entertaining! Til next time folks!!!
So because we are un-awesome in the upkeep of this comm and havent posted anything since... last year sometime.... I'm gonna do the rest of the FFVII progress post first and leave Ai No Kusbai and Fuyu No Semi til... later. yep *shifty eyes*
And because there are a hundred and one how-to-make-Cloud-cosplay tutorials out there I'm not gonna go through the making of my costume word for word, if anything I'll post some pretty pictures and write about any problems I encountered and then if anyone wants to ask more detailed questions they can.
(AS ALWAYS, THE FOLLOWING CUT IS IMAGE HEAVY. BEWARE 56K CONNECTIONS, DEATH AWAITS HURHURHUR!)
SO.
HOW TO MAKE A CLOUD COSTUME :D
Believe it or not I did things exactly the opposite from alita_b_angel, I made my shoes FIRST MOOHAHAHA. I bought a pair of $15 generic black work boots from Salvos to use as the base. Second-hand stores are your best friend in cosplay lol. The easiest way to get a pattern from a shoe is to use duct tape, and tape around the area you want to make a pattern of and then peel the duct tape off. Voila! Aaaaand thats how I got the pattern for these shoes in the above picture. Because I am stingy I dug around in my material closet and came up with a bunch of black leather/upholstery material that I had scrounged from the carcass of a dead couch, so I didnt have to buy leather.
If you look at Cloud's boots closely you can see he has a zipper that runs down the centre of his boot and then two zippers than run along on the sides. I took a look at some of the custom-made Cloud boots online and came to the same conclusion they did, which is you cant have a full zipper running on the side of the boot as you cannot get the same curvature and it will just look redonk. So I cheated and used a half-zipper on each side, it looks just as good.
This is what it looks like after I sewed everything together. See by using duct tape as a pattern you get a really close fitting to the shoe.
Aaaaaand then I glued it onto the base of the real boot and OMG LOOK ITS HARRY POTTER MAAAAAGIC! I'm so proud of the boots, too bad no one really noticed the care I put into them because my pants hid most of the awesomeness :(
You wont believe the trouble I went to find this stupid stupid vest, I searched every op-shop and Salvos and Vinnies etc around my area and then on WEDNESDAY, three days before the con I go to Salvos in Glebe and find two almost exact matches! There was one that was the right colour but the ribbed pattern was a bit narrow, then there was a black one but the ribbed pattern was wider and more exact. I chose the black, thanked the gods of cosplay for my luck and went on my merry way. At one point I was so worried I wouldnt find one that I asked amenokitarou if I could borrow his Cloud costume just in case. Thanks Will for lending me your costume!
I love my $8 vest <3 all I did to alter the pattern was cut the sleeves off, fit the collar with some plastic so it didnt just flop all over the place, and put a zipper in. Sounds simple but it wasnt, I re-did the armholes about three times because everytime I thought I sewed it straight the knit fabric stretched under my machine foot and sewed wonky. And then I made a super large sleeve (size 16 I think) out of the same material as my pants, which is a rough cotton weave I found in a Vietnamese fabric store in Cabramatta. Gotta love Cabra!
Unfortunately I didnt take many pictures when I was sewing the pants, but if anyone wants more detailed pictures for help I'll go back later and take some more. The small silver buckles I actually obtained from all over the place, some are from bags that I dont use anymore and cut up, and some are small silver D-rings from Lincraft, not the right shape but they do the same job. Because Nomura is a dick and likes making life hard for all cosplayers around the globe, Cloud has stupid little straps and buckles all over his trousers that dont seem to provide any functional purpose but to look WOW!COOL. Thats not the bad thing, the bad thing is I couldnt find any refs or images AT ALL to show me the crappery of these pants, so I just went off some macro-high-res pictures someone on the internet took of that new giant Cloud doll-figurine-to-end-all-figurines and guessed it was accurate to the character. I also used some artistic licence *shhhhhhhhh* :P
Man you wont believe how much luck I had with this costume. You see the two shiny silver buckles on Cloud's shawl? The ones in the above picture? I was so close to just sculpting some out of modelling clay coz I couldnt find any the right size, but on FRIDAY, THE DAY BEFORE THE CONVENTION ZOMG, at Paddy's Market I bought these two babies (for about $3 each) from the only leather belts and buckles stall in the place. Props to Alita for telling me about it.
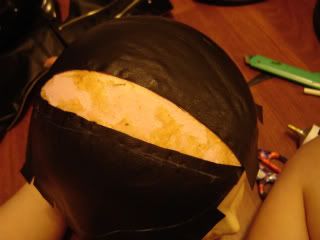
NOW ONTO THE PAULDRONS. I bet you didnt think I was gonna have any LOL pictures in this post did you >:D
I went to a costuming store in Glebe with Alita, where we purchased small plastic kiddie's toy helmets for the pauldrons. Because my head is tiny mine actually fit me. I took the thing apart and carved it into the right shape with a pair of scissors. If you are going to do this dont use good scissors that you intend to keep around for precision cutting or fabric cutting, because they will be as blunt as anything after this. And yeah, check out my guns in that picture ROFL XDDDDDD
Alita made me do weights coz she said I was too scrawny and needed to look more like a man, so now I'm all chunky :3
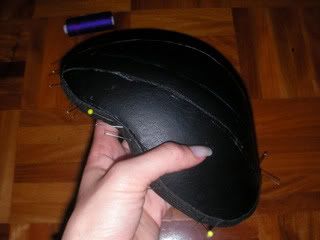
Again this is the point I wished I'd taken more photos coz it was kind of interesting how I got this to work. I'll just have to explain and hope no one gets confused. I decided that after carving it the pauldron looked a bit tiny even for my puny shoulder, so I covered the entire thing inside out with some thin yoga-mat foam, glued with some special-bonding glue used on shoes called KS BOND. This turned out to be a good idea, because I could then glue the leather onto the foam and it would stick properly without falling off. As you can see in the picture above I couldnt find a way around not making a seam down the pauldron, I tried stretching the leather but it just didnt work. So what I did is cut the leather into three sections, stretch the two outer layers onto the pauldron first, let them dry, and then carefully cut and stretch the middle section down over the top. This took a lot of time and effort to get it right, if you look closely at the pauldron you can see the seams but otherwise they are not noticeable unless I point them out.
And then I bought some elastic trimming from lincraft and stretched that around the edge of the pauldron and glued it down. If you are going to do this instead of sewing the actual stitch pattern then you have to make sure the trimming is stretchy or has some give to it so it can curve around the edges properly, otherwise it just looks awful.
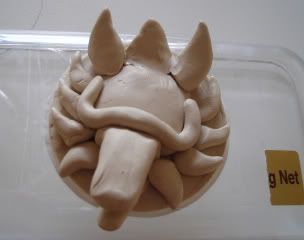
NOW FOR THE BEST BIT, CLOUD'S WOLFY HEAD >:3
What I did is I took a look at the size of the wolf emblem compared to Cloud's head (disregading his hair of course) and came to the conclusion it was about... 6-7cm give or take. But then again my head is small, if you have a larger head your emblem will probably be larger. I made a thin round base out of Fimo (which is similar stuff to Sculpey) and then moulded the appropriate shapes for certain parts of the head.
I kept building more clay onto the head and smoothing it out with a special sculpting tool I bought from Newtown. If you are sculpting something that is quite large you can probably do it with your hands or just use make-shift tools you can find around the house (small sharp objects that allow for precision like metal nail file, skewer etc) but because I'm crazy and pedantic I had to buy a $30 tool. A $30 tool that I have now somehow managed to lose in the process of making this emblem >_<
As soon as I had enough clay built onto the head I began sculpting the actual ridges out, putting more clay onto the places that needed more building up as I went. This is where it is useful to have many good ref images, I ended up getting stills from the movie and printing out a bunch of pictures so I could get a closer look at all the details.
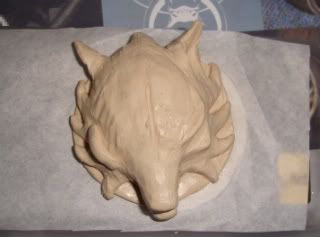
Aaaaand this is what it looked like after I finished, you can see my ref sheet underneath. To get the ring inside the mouth I baked the emblem and the ring separately, then put the ring inside the mouth and added teeth so it wouldn't fall out, and re-baked it. If you look at the real emblem closely enough you'll see that its not a 100% accurate representation, but you know, artistic licence and everything :D
After baking it I spray painted it black at first, and then coated it carefully with a layer of silver spray paint. I did this to give the emblem a more 3D effect, as the ridges or creases stay black and make the silver "pop". This is actually a bad photo for an explanation, as you cant see it too clearly here, but it looks great in real life. It looks better than just spraying it silver, but you dont have to do it.
The wolfy emblem was probably the piece I was most proud of, but it did take a lot of time, probably more than I shouldve spent on it. I probably worked on and off for a month just sculpting it trying to get it right because I am pedantic and a perfectionist FFFFFF- *wants to kill self sometimes* but the fact that people didnt even realise I had made the emblem myself and thought I had bought it made all the time and fiddling worth it! Unless you consider the fact that people just assumed I bought it... and didnt bother asking me... that I made... err... hmmmm...
While I was slowly making my way through the pieces of my costume Alita was having a good old time splicing together the skit. Doesnt she look like she's having SO MUCH FUN? One of these days I'll get my act together and offer to do the skit audio myself for a change, just to you know, give her a well-earned break. One of these days...
NOW WHERE WOULD I BE WITHOUT A CRAPPY FAIL!CLOUD WIG?? Here comes the poorest part of my costume D:
I'm not gonna post up too many pictures because there are seriously a bazillion-squillion-gamillion tutorials on the internet in How-To-Style-A-Cloud-Wig. Seriously. I'm just gonna show you kiddies how I added extra extensions.
What I did is I cut the ends off the shoulder-length wig and made extra extensions by glueing them along the edge. Tutorials out there will tell you to use caulking which is a good idea, but I'm cheap and running out of time so I just used a mixture of hot glue and PVA glue. I sewed the majority of the extensions where I thought more hair might be needed, at the crown of the head where it stands up, and I sewed one extension after two layers of hair and so forth. It helps to buy a blonde wig that has already been teased and treated at the roots to make it stand up, one way to tell if this is so is the roots of the hair at the base of the wig (its only a few millimetres in length) will feel rougher and be slightly crimped so that it can stand up. I got mine from Alita who had purchased our wigs from China. Thats another secret folks, if you dont have a Chinese friend MAKE ONE RIGHT NOW. Then when they go back to Ye Olde Home Country ask them to get you some wigs, even wigs that are made out of REAL HAIR over there are cheap as chips, and if you cant find a wig thats right THEY'LL MAKE ONE FOR YOU. But thats a story for another time... *cough-fuyu-no-semi-cough*
After I sewed all the extensions in it looked like this. I know it doesnt seem like much but the fact that the hair at the crown is standing up helps a lot for styling crazy spikes-coming-out-of-everywhere hair.
And then came the spiking of the wig. I have new-found appreciation for anyone who has ever had to style a crazy FF wig before. All I can say is NEVER AGAIN RAAAAARRGHHH.
I can truthfully say I fucked up on this one, after all the cosplays I've done you think I'd have learnt by now but nooooooo. I did the rookie mistake of leaving the wig til last, so by the time I actually started the wig it was 2am on the morning of the con. I finished the wig by 6am *DIES*. You know those times where you style a wig on a wig head and you're like "looks pretty good"... but then you put it on your head, and it goes horribly wrong? This was one of those times :((((((((((
Anyway wig troubles aside, I quite enjoyed making this costume, and I enjoyed hanging around with the huge awesome FFVII group we made. Many fun times were had at Mini Animania, I hope all my cons are this enjoyable. Here are some awesome photos to show you the end result, courtesy of our wonderful photographer Anna:
Advent Children Group by ~queencattabby on deviantART
And thats how you make a Cloud costume ladies and gents!
...
....
......
........
..........you thought I was gonna end it there didnt you? YOU THOUGHT WRONG HARHARHAR!
Special Bonus: HOW TO MAKE WALLMARKET!CLOUD COSTUME >:D
If you want to know why I had to make two costumes take a look at our hil-arious skit here. Originally there was going to be me as AC!Cloud and cattypatra as Wallmarket!Cloud but she had to drop out, and as I was SO determined to do the skit Alita and I had planned she gave me the dress she had started so I could finish it and use it in the skit for MAXIMUM COMEDIC EFFECT. She had already sewn the skirt together for me so all I had to do was add the sleeves and embellishments etc.
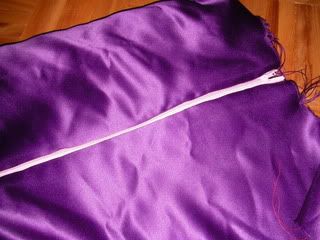
I started with putting in a zip. Unfortunately I didnt have time to go out and buy a purple zipper so I just used a pink one I had left over from the time I made my cousin's bridsemaid dresses.
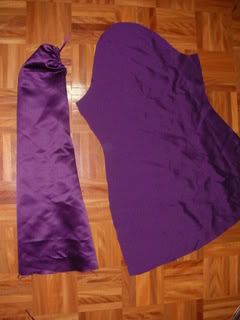
Then I started on the sleeves. I traced a size 14 sleeve from a 1970s Butterick pattern for puffy sleeves I had lying around.
Then after some tricky manouevres I managed to make the sleeve fit the armhole of the dress. Then I sewed lace to the edge of the sleeve, and added elastic to get the poofyness.
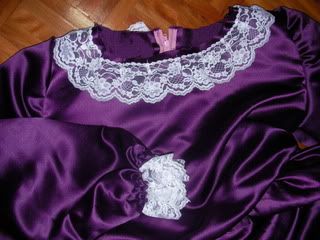
Next came the collar, which was quite hard since I didnt really know what the collar was supposed to look like. But past cosplayers who have done Wallmarket!Cloud have made it a scoop collar and added lace on the edge, so I just did a variation of this.
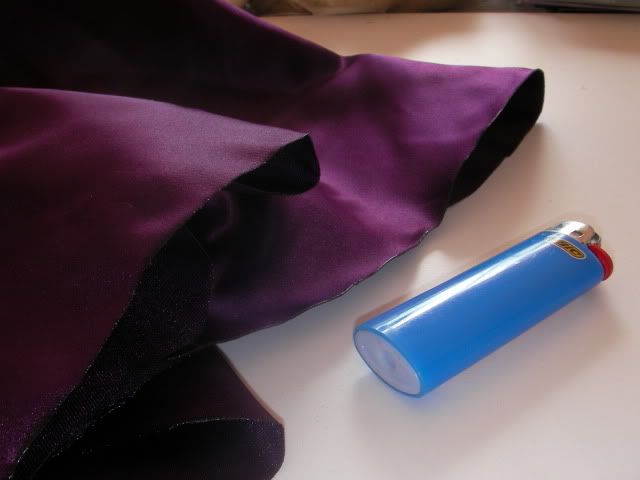
I left this image bigger so you guys can see what I did to the edge of the material. As I was pressed for time I didnt have enough time to hem the skirt properly, and I figured since it would only be seen on stage for a few seconds no one would really notice the hem anyway. So to stop the edges from fraying I used a lighter and lightly burned the edge of the material, as it is mostly synthetic it melted when touched by the flame and thus sealed itself. Beware you can only do this very carefully and I wouldnt try it on ALL types of material, it mostly works best with satin and when you dont have an overlocker. One day Alita and I will shimmy over to Mew's house and claim our overlocking rights, one day *shakes fist at sky*
Then came the bow, made out of red satin which was velcroed around the waist of the dress to make it easier for me to get in and out of.
...AND THAT'S HOW YOU MAKE WALLMARKET!CLOUD GIRLS AND BOYS!!! Photo taken by my other half, alita_b_angel.
HERE, HAVE SOME MORE AWESOME PICTURES, COURTESY OF WHATABIGCAMERA.COM.
Me as a dazed and confused Cloud on stage.
Cloud-ia and Reno on stage.
The whole group on stage. From left to right: tsubakichan as Kadaj, ryokophoenix as Yuffie, the_impaler as Rufus, alita_b_angel as Sephiroth, Myself as Cloud, athira as Aeris, budgi_e as Reno, and saerianne as Jenova.
Ok before I finish this post of epic proportions I have something to confess.
Now, this is gonna come out sooner or later, to those of you who know me if you don't find out from someone else I'm sure Alita will tell you, so I'll just say it now. Yes I broke her Cloud figurine. BUT I SWEAR TO GOD IT WASNT MY FAULT. You see, I was looking at my pants wondering how on earth to sew them when I innocently enough picked up her Cloud figurine to take a look at it. and it. FELL. APART. IN MY HANDS. I wasnt pulling at it, or shaking it around, or doing anything but HOLDING IT and the goddamn thing falls apart in my hands! He is now one-legged Cloud!!
BUT WAIT THERES MOAR.
Two days before the con Alita was angsting over how to do her boots, and asked for my opinion. I then proceeded to take the Sephiroth figurine from her hands so that I could inspect it for a proper shoe-evaluation when OMFG! Yes, this poor figurine also succumbed to the curse that is Ailee. It Fell. Apart. I KID YOU NOT LADIES AND GENTLEMEN.
THIS IS CLEARLY NOT ANY WRONGDOING ON MY PART, I AM OBVIOUSLY CURSED BY THE GODS.
Aaaaaaand thats not all that I broke. The night before the con I managed to kill my dad's 40 y.o. sewing machine. The one that could sew through ANYTHING. I BROKE IT. NNNNNNNOOOOOOOOOOOOOOOO!!!!!!!
But its OK I fixed it! Sort of!! Well, something's still wrong with the tension so I'll have to take another look at it before I start my next costume.
And thats it. I hope someone finds this post useful, or if not, then mildly entertaining! Til next time folks!!!