TRON LEGACY: QUORRA EL WIRE BUILD COSTUME FULL TUTORIAL
Hi All,
For Armaggedon this year I undertook the arduous task of a Tron Legacy illuminated outfit for Quorra. This is one of those notoriously difficult costumes I think people can benefit from knowing how I went about the build since it was probably the most finicky of any costume I’ve done in terms of patterning, electronics and materials.
QUORRA

arlo_arleh is doing Siren Gem, and as usual she managed to pull a costume out of ass at the most minute and it looks fantastic as that girl is crazy photogenic.
The easy-way-out for Tron costumes of course is to use light reflective tape which when photographed with a flash they will glow bright white, making a perfectly easy costume, which is the method Arleh decided to use, mostly because of time constraints.
… of course I didn’t want to do this because I’m all about the challenge so I decided to attempt an EL wire costume, because I want to LIGHT UP.
After washing up after an 100+ page thread read here: http://www.therpf.com/f24/tron-legacy-costume-planning-88230/
I’ve decided to go the EL wire way as it was the cheapest (HAAAA IRONY) as opposed to EL Sheet or EL Tape.
THE PATTERN
Materials:
Duct Tape Dummy $25
Old shirt vest
Calico
First I need to create an exact pattern in order to determine how much wire I would need.
This took ages. But with the help of a duct tape dummy, created by making a perfect mould of your body through duct taping your entire body and then ‘casting it’ by stuffing it full of news paper. Costs about $25 to make in total so I would recommend it for all cosplayers.
Then I got a singlet tank top which fit me well and about two boxes of pins in order to start laying down what I wanted on my dummy.
Making it tighter by pinning down the darts and then drawing on with chalk the shapes I wanted.
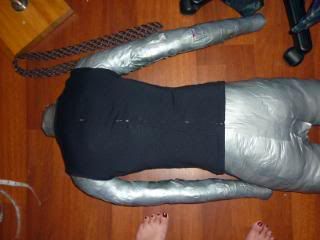
Then meticulously over about three days I would ‘pin’ placement where all the lines went, all the lights, all the cut out pieces.
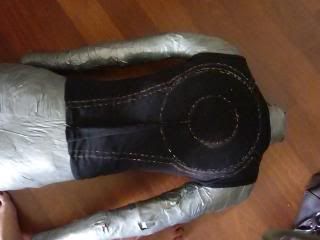
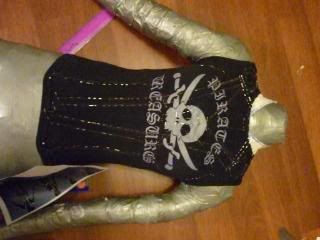
Then I added extra pieces of calico in order to lay down how the collar would work and the weird asymmetrical skirt Quorra has going on.
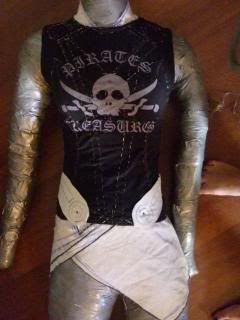
I had to pattern primarily as I wanted an asymmetrical zipper… a middle zipper would mean crossing light lines and my undoubtably heavy battery pack and driver wouldn’t have a stable service to stick to. So I decided to install a zipper just inside of the back ring of light.
Once my entire pattern was laid out, I could then figure out how much wire I needed.
The simplest way to do this was to use pieces of rope and rope around my pattern lines, pinning it down with pins.
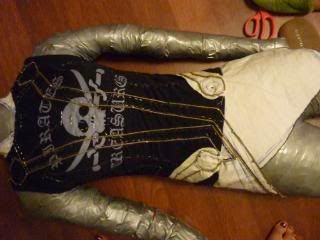
This tells me exactly how much I needed as EL wire is ass-expensive. I needed around 37ft of wire. Feet since they’re from the US.
THE ELECTRONICS
The method I chose for wiring my costume is to ‘double-wire’ where both sides of the light strips will have light running on them in order to maximize ‘glow’. IE if it was a rectangle then all edges of the rectangle will have light.
This does significantly increase the amount of wire I need but the Annise and Eddieadryr, the pioneers of the technique at RPF have shown it produces the best result when diffused and refracted by a white backing. Check how in depth how they did it: http://www.therpf.com/f24/tron-legacy-costume-planning-88230/index42.html
I purchased my EL wire from Cool Neon.com. Whom I recommend despite their exorbitant shipping prices. COUPON CODE: JRS to get a 10 % discount folks!
I purchased:
- 40 ft of 2.6mm HighBright EL white wire for 1.30m Coolneon sells real lytec wire so they will be more flexible and last longer.
- 8 wire side connectors (they give you one spare attached to your bit of wire)
-3 x 45cm extension leads (18”) for arms and leg side bit.
- 1 x 75 cm extension lead for boot.
- A 2-45 ft fish driver 12 volt. This is the best driver if you also want to ‘test’ your pieces. The sound activated driver is 20-50ft meaning you cannot test your pieces unless you have 20ft of wire attached. It’s better to buy this as secondary driver for when you want to nskt nskt nskt later at raves or whatnot. The smaller fish driver also fits inside the hub better but more on this later.
- 8AA battery cage because this is better to pump your EL full of electricity. Anything less will mean less brightness.
- I also got an AC adaptor (but this had an American straight plug) but you won’t really need this since I found it tended to overload my wire making me panic and freak out. It might be good for photo shoots later though in a studio. Where you won’t move much. Otherwise save your money.
There is also the option of getting them to solder your points for you however it costs $4 per solder joint and since I needed at least 8 solder points this meant $32 which I can be saving so I didn’t purchase this… and HAHA attempted it myself. They will also cut you custom lengths (as long as they are whole numbers).
The shipping for this lot cost a whopping $80. Which is ludicrous. However, it did come within 5 days. You can pay only $25 for shipping also if you’re not in any hurry but arrives around 4 weeks… and unfortunately I only had 1 month to make the costume ugh.
So for a typical Quorra costume it cost me around $160 for the electronics alone.
Quorra also doesn’t have as MUCH light strips as some of the other Tron characters so a Sam or a Siren costume will be much more expensive.
As I had bought the wire unsoldered I then had to cut that 40ft of raw EL wire into the 8 varying lengths I needed.
To figure out the exact length of the 8 pieces I needed exact patterns of the light up elements in the suit as there was no allowance for mistake anywhere.
The pinning method of patterning on the dummy therefore allowed me to then press on top and pin on calico and lightly scrub pen over it and the pins would then create an impression of the lines I needed onto the calico. This also allowed for the bend and flex of the body so it contours with your boob and whatnot.
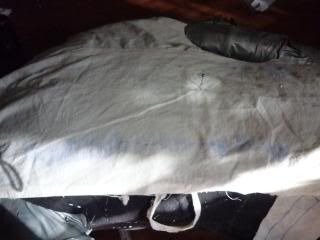
After that I had to redraw the lines clearer on the calico and calibrate them for straight edges. I would then trace this onto paper. One pattern piece as the complete whole, one for just the light strip, and one with the light strip cut out of the whole piece so make things easier later when you have to make several pieces.
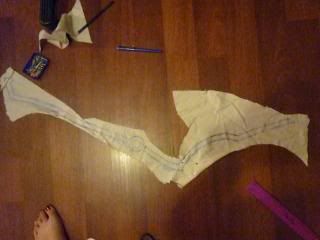
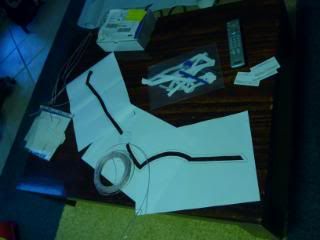
Once they were all laid out. I could then cut the wire by measuring carefully around the edges of my pattern within the 7mm seam allowance of the edge of where it would be lit up. The wire eventually will be masked by fabric and only the reflected light shown.
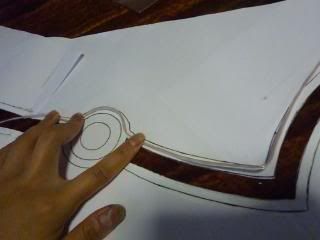
The EL wire then had to be bent into the shapes I needed before I could solder them.
Since I had odd lengths, I had previously made the decision to solder the wire myself (despite not knowing how) with a Soldering Iron and tin lead and did so with a friend’s help.
The fish driver for the EL has no off switch and would only operate when connected to the battery pack.. However there must always be a length of El connected to the driver before attaching power source or the cables would fry. I was super nervous about this so it’s something to be extra careful of.
Soldering the wire: For each piece the EL had to be stripped at the tip, and copper tape wrapped just before the raw phosphorous coating, but in the process the angel hair wires which powered the wire had to remain undamaged.
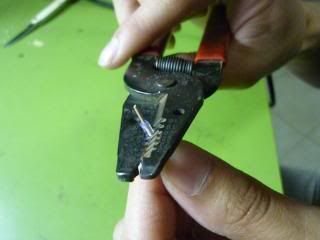
These angel hair wires were then bent back, and soldered onto the copper tape with melted tin. I would scrape the phosphorous coating off the raw metal inside the wire so it was ready to be soldered onto the wire-side connector.
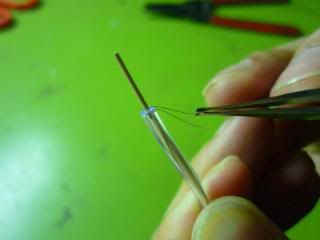
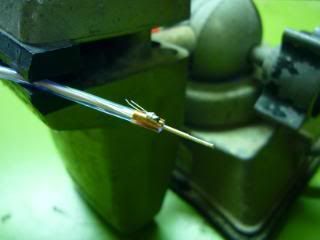
The long end would be soldered ontop of the angel hairs on the copper tape and the shorter end to the raw metal inside the wire.
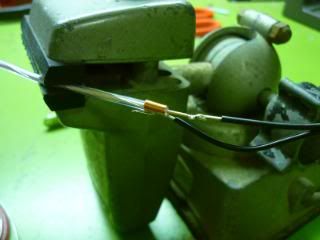
Then I would test the wire by attaching this to the driver and battery pack and hopefully it would work perfectly. If it lit up I would then wrap the shrink-heat tube around the soldered joint and melt the tube around the soldered joint for protection with a heat gun.
Soldering these 8 pieces took around 3 nights of work since it was a learning process. The ends of the EL wire were then coated in hot glue to stop any moisture from entering the tubes.
To connect these lengths to my driver I had also purchased a y-splitter and 2 quad splitters so I could connect 8 pieces to the one output on the driver. Everything hopefully will be stored in the “HUB” on the back and the exterior battery pack.
In hindsight I should’ve gotten spare quad and y-splitters as these were fragile connections not meant for stress.
Also in hindsight you should wrap A LOT (at least an inch) of copper tape before soldering the angel hairs as the copper’s adhesive tended to stop being sticky after soldering and loosen the connection, causing it to short out.
The highbright EL is supposed to be the brightest there is. But I’ve found it works better when contrasted against a black masking… on a Siren costume the white wire doesn’t work as well, and LEDs would probably be a better choice, or EL tape.
Examples of the raw EL: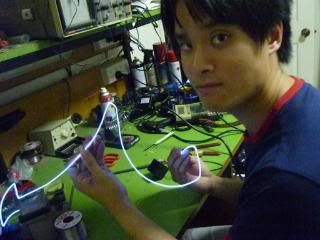
Lights off: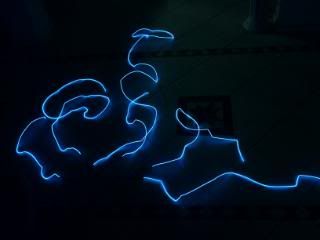
Lights on: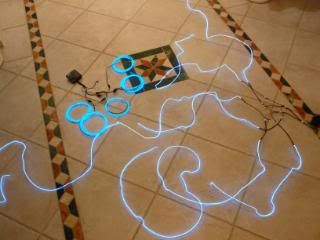
BOOTS:
Materials:
ZU leather boots for $100
1m of white vinyl leather from Spotlight for $19.95p/m
Contact sheets $3 a roll
Perspex diffusion sheet from reverse garbage
Reflective tape $21.95 p/4m
Black leather
Kwik Grip Glue $7.95
Black Duct tape
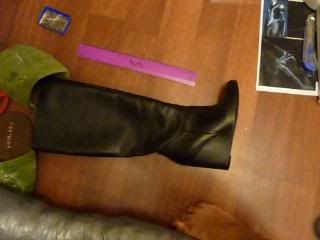
These were bought from ZUshoe.com.au for $100 (don’t think this is available anymore though) as they had the perfect wedge solid heel which was a rare find for Tron, sadly now destroyed (or made more awesome) by the light strip.
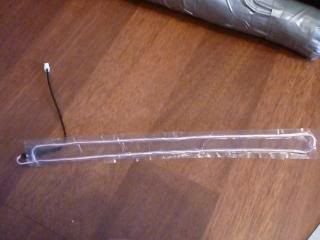
To attach my bent pieces of EL for this, I cut two exact pieces of transparent contact, the kind normally used in book covers and stuck then together with the EL side. This made sure that I retained the ‘pattern’ for my light strip and the EL would also not be allowed to move or be bent which caused the El stress and might make it short out.
I left the wire-side connector free so this can be plug and play when the costume is actually on me.
I then fitted it onto my duct tape dummy and matched the lines on the dummy to where the lines should end on the boot and marked them out with a texta on the dummy.
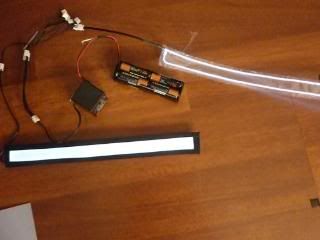
To enhance the brightness of the El, there had to be a white background to reflect the light off. Various tests showed that a mirrored backing didn’t spread the light enough. So I used white upholstery leather from Spotlight, a material known to be very tough, water resistant, thick but flexible and cut this as my backing behind my EL strip.
As the boot didn’t have bend or stretch with the contours of my body, I could use Perspex diffusion instead of fabric diffusion so on top of this. These layers were then duct taped around the edges of mask the edges.
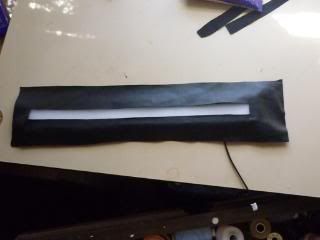
To stick it onto the boot I then cut out an exact piece of leather which then masked around the edges of the light/duct tape and glued it on using Kwik Grip since contact cement allowed a certain amount of bend and flex. The top of the leather was then hand sewn onto the edge of the boot and the wire would then be hidden on the inside.
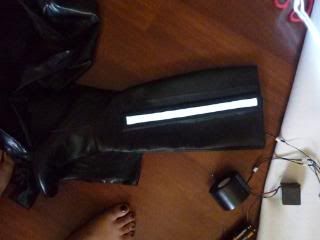
Reflective tape would then be added to the front and back of the heel for the light bits on there which were too small to put in with EL.
ARMS:
Materials
1m of white vinyl leather from Spotlight for $19.95p/m
Contact sheets $3 a roll
Diffusion Fabric on a clothes Hamper from a Hardware store $12.99
Kwik Grip Glue $7.95
Black Duct tape
Black lycra from a Star Trek shirt $7 a roll
Eva Skin foam from Reverse Garbage
To make the gloves I unpicked a pair of gloves for a tight glove pattern and then cut this onto a black lycra shirt I had left over from a Star Trek undershirt costume. This was mostly because I was low on lycra. The length of the gloves were extended to upper arm and then sewn together. Each glove takes around 2 hours work.to sew from scratch but it makes sure that the glove fabric matches the rest of the costume for flawless harmony.
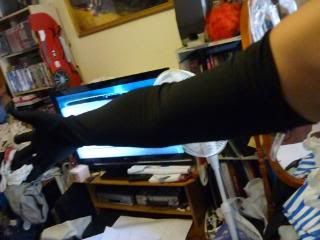
For the glove armour, I used Eva Skin foam from a place called Reverse Garbage which I then cut in the shape of the EL wire which I had previously shaped into the zig zag I needed with contact sheeting stuck on both sides. At the same time I cut the pattern to my lycra which would go on top.
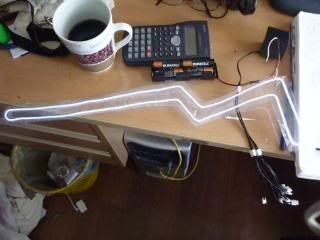
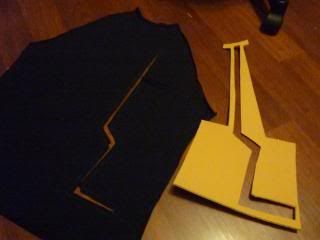
I would then glue the edges of the contact with Kwik Grip onto the edges of the foam carefully and then hold in place with pins.
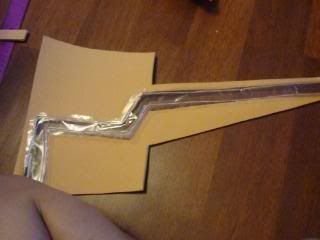
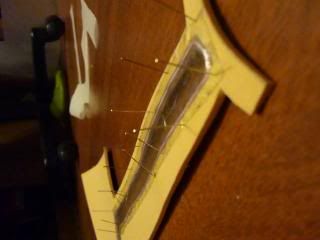
Then on the back I would glue the white leather which I had also cut into the shape of the zig zag with Kwik Grip. The white leather CANNOT be glued on flat as the curve of your arm dictates that the leather needs to curve with the shape of your arm. So make sure you glue this as a bended shape rather than flat on the ground. I had to redo this one several times because of this f-up.
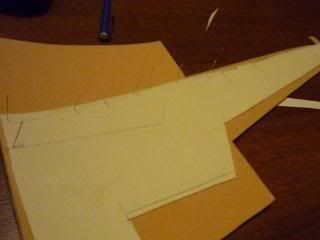
The diffusion fabric I used for this was incredibly hard to find… most of the US people who had attempted this costume managed to find shower curtains however it seems Australia doesn’t sell frosted shower curtains anywhere as homeware buyers HATE frosted shower curtains. Instead I ended up cutting up a laundry hamper I bought from a Hardware store, which only gave me around 90cm of material to work with for the entire costume ugh. I hope other people have better luck.
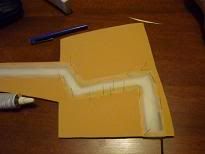
This was cut into the shape of the zigzag and once again carefully Kwik gripped around the edges onto my foam. Black duct tape then masked the edges.
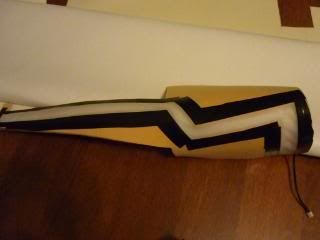
Most other costumers for this costume stop it there, using black eva skin foam as their base, however I wanted to be STREAMLINE LIKE A FISH so went the extra step of putting fabric on top, so everything was completely finished.
Black Lycra was chosen as the suit needed a “rubber texture” which other fabrics lacked. It was very clear that no cotton or leather was used in these costumes except for footwear in the film.

I traced the edges of the light zig zag, cut it out and then finished the edges by sewing this along the seams. The edge of this was carefully glued on top of the diffusion so it sat correctly. The rest of the eva foam was then carefully lined with glue also and the fabric patted down to attach itself. The edges of the fabric looped over around the edges. You only really have one go at this because the Kwik Grip dries quickly and once coagulated the finish ends up ugly and lumpy.
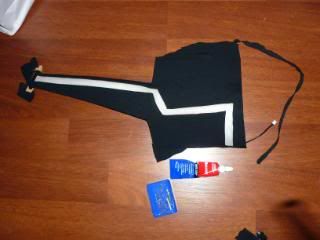
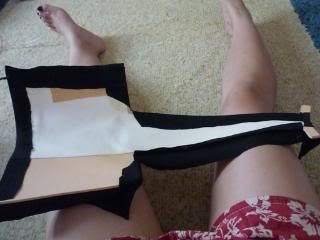
And then to connect it, the side pieces were hand sewn together. Make sure you leave enough lycra to spare in case you miscalculated and your arm is beefier than you thought. Mine were.
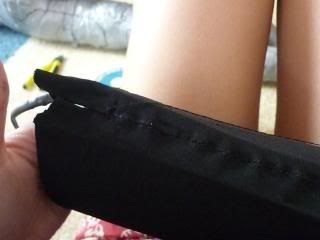
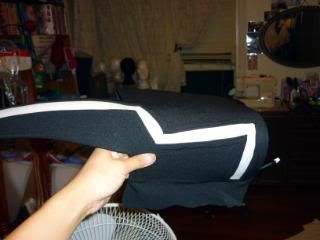
Rinse and repeat for the other arm.
LIGHT ON!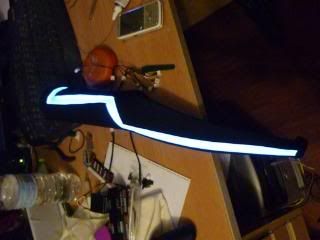
This method I thought was the best way to make it look like the light strips were actually a part of the suit rather than have them sitting on top (though funnily enough in the film, they are in fact, sitting on top, but not everyone can afford 10,000 dollar light tape sigh).
LEGGINGS
Materials:
$5 black spandex leggings
3 m of black Velcro
Black Lycra
Diffusion Fabric on a clothes Hamper from a Hardware store $12.99
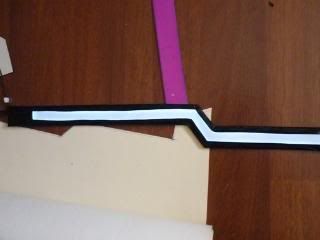
Using the duct tape dummy, I drew on with a marker where the light should run if it was to meet with the light of my boot.
This pattern was then traced onto the diffusion, black lycra and white leather. The white leather in this instance, I first sewed on black Velcro on the underside fully covering the strip.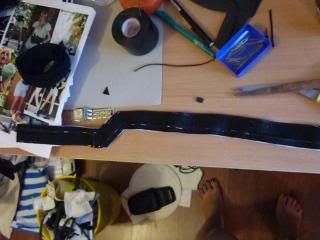
Then, with a similar process to the arms, I glued first the contact sheets containing the El wire to the white leather around the edges with Kwik Grip, and then on top glued the diffusion fabric.
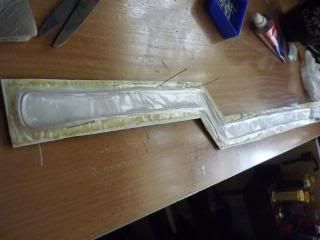
The black lycra I sewed around the inner ring of the light to finish the edges, and then carefully glued on top, wrapping the edges around the sides to the Velcro.
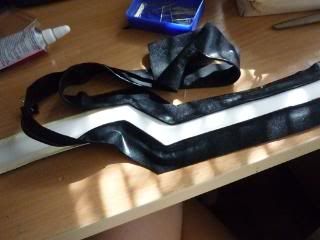
The other side of the Velcro was then attached to the leggings, allowing more freedom of movement, and so I could wash the leggings in the future if need be without damaging the EL.
THE BODICE
Materials
1m of white vinyl leather from Spotlight for $19.95p/m
Contact sheets $3 a roll
Diffusion Fabric on a clothes Hamper from a Hardware store $12.99
Kwik Grip Glue $7.95 x 3 bottles
Reflective Tape $21.95 p/4m
Black Duct tape
Black lycra from a Star Trek shirt $7 a roll
Black lycra 3m from Lincraft $29.95 p/m
Black Eva Skin foam from Reverse Garbage
Hot glue.
Using the pattern I so carefully drafted from my dummy, I then proceeded to cut it apart, with the zipper placed asymmetrically on the edge of the light so the back disc would be one piece instead of split in two with a centre zipper.
The pattern was laid on top of black eva skin foam, which was a thinner density than the arm armour since I wanted more mobility in the body. And carefully cut with some seam allowance along the lines of the dart seams, as I planned to put the bodice together to ensure it fitted before cutting the light strips to put on the EL.
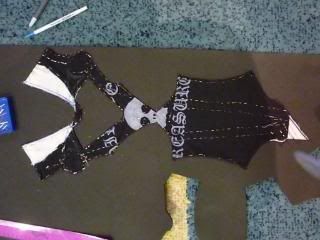
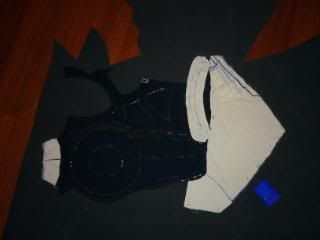
The middle section was cut separate to the boob cups, which were made separately as ovals from the foam and then glued together with the middle section. I wanted boob cups as I wanted a very hard look, and to make up for my complete lack of bust.
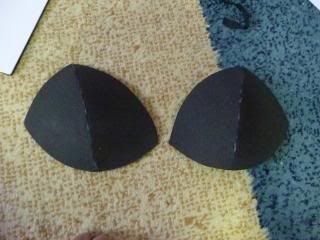
The pieces of foam was hot glued together since this method on this type of material is stronger and faster than Kwik grip, and meant I only had to hold the pieces together for a few seconds before moving to glue the next part together. The back was also reinforced with hot glue in case it separated due to stress.
BACK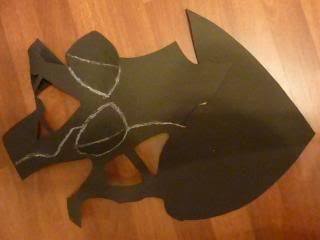
FRONT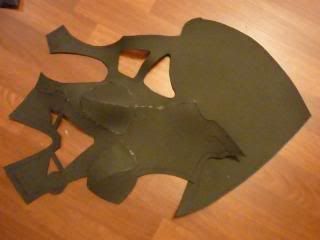
The neck and designs were cut out at the same time, and figuring out the collar. Once it was all glued together it was the moment of truth, I had to fit the bodice to my body, but discovered that I had under estimated how wide my shoulders were and how small my waist is compared to my considerable hips. A great way to fit eva skin is to literally use duct tape since that doesn’t damage the foam.
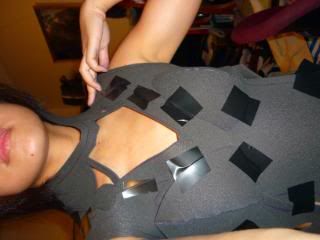
Adjustments were made by attaching more foam with hot glue painstakingly to the bodice. A good knowledge of how your body fits is essential to this part since most people don’t conform to the dressmaker form and have wider shoulders/hips/curves etc.
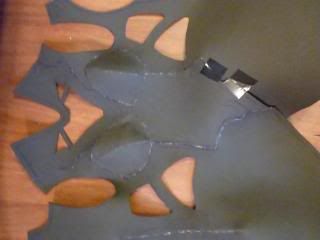
Once all the pieces were glued together and fitted, then I laid the contact sheets with my longest pieces of El wire and pinned them down so I could form a pattern of where exactly they sat on the bodice.
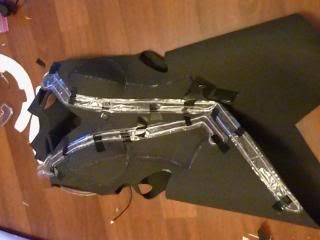
This was so I could literally cut it apart again for the light strips and make a second pattern. I cut apart one side, and Kwik gripped the EL strip onto that before attempting the other side.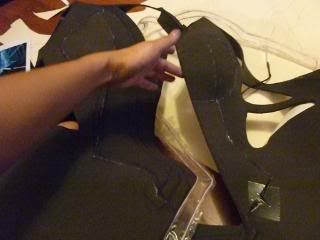
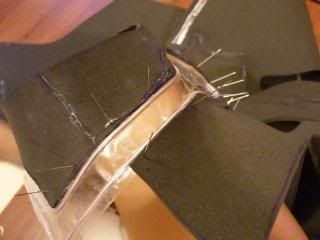
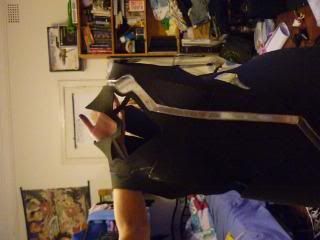
On the zipper side, I also added extra foam to the edges so the EL wire could sit nicely. Underneath once again I glued on the white leather, holding it together with the foam with two boxes full of pins. After that was dry then I carefully measured the limited amount of diffusion I had and glued those pieces on top.
BACK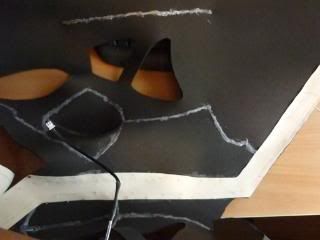
FRONT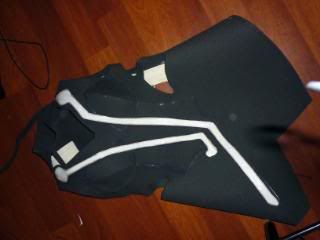
DIFFUSION: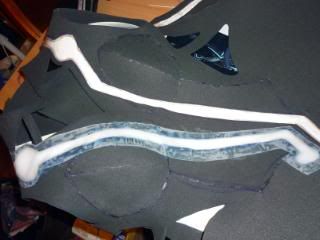
I had to then make the pattern for the material which would cover the entire bodice and cover the foam. Make sure you have lycra to spare. To make the pattern for these pieces, I hilariously cut apart three large plastic shopping bags and pinned them onto the bodice, folding for the tapered lines to entire that it fit my bodice piece exactly.
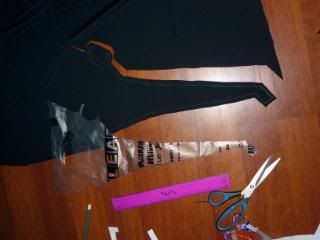
The circles were cut without seam allowance as it was too difficult to create perfect circles which were sewn around the edges. All the other seams however were finished by sewing around the edges where it would sit against the wire before being stuck on.
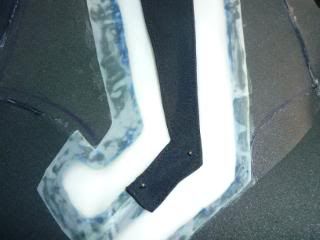
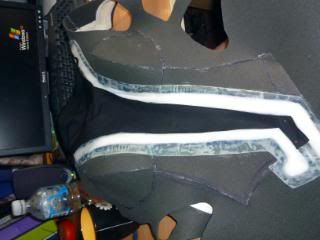
I would carefully then stretch the fabric across the foam and stick it down with Kwik Grip, as the fabric tended to stretch this was extremely difficult to keep straight and also once stuck down, it was hard to unpeel the fabric from the Kwik Grip and retain the same finish. You had one chance at this, make sure you allow for the ‘stretch of lycra’ as it will give you about an inch more than your measurements when you stretch it over the foam.
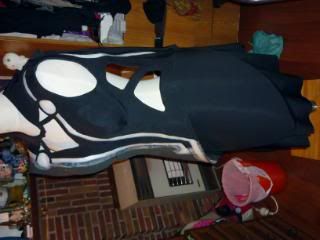
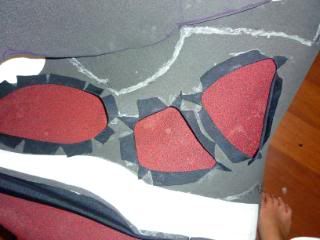
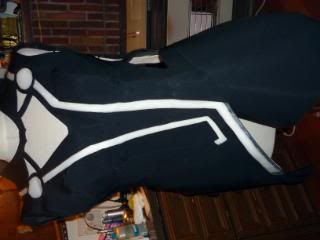
Also make sure your glue is tacky before attempting to rush and put it on straight away, it will bleed through the lycra that way.
The side pieces of light were done the same way as the other pieces, EL WIRE inside contact sheeting, backed by white leather and diffusion on top, covered by black lycra. These would then be attached by sewing these directly through the foam onto my bodice piece.
I held these together with bull clips as they were drying.
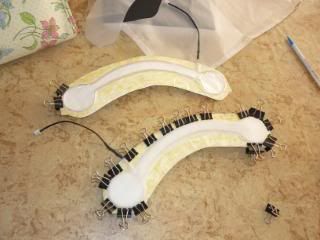
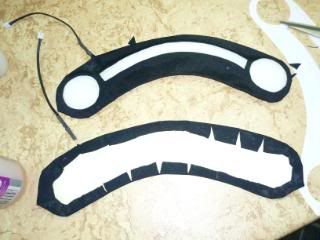
These were then kwik gripped carefully on, and the ends sewn on by hand through the eva skin foam so the sides didn’t lift off should there be any pressure on them.
I really wanted the HEX pattern of the fabric, a nearly impossible print since it was designed especially for the film.
I ended up commissioning a single run of the fabric for $45 for 1M of the pattern so I could do the inserts which fit in around the sides, sleeves and collar from Jason Reskin at
http://orpex.blogspot.com/p/hexagon-fabric.html
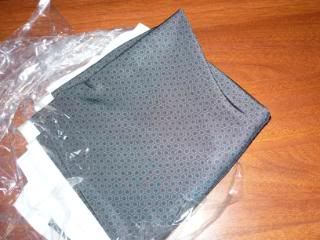
He’s also been making his own Tron build here: http://orpex.blogspot.com/ but I really recommend him as he was prompt and was super nice about the sell/buy process and got it to me within 4 days of me having to have the costume finished. I ended up kwik gripping the spandex hex print onto my costume. And also making a little under shirt with sleeves with this.
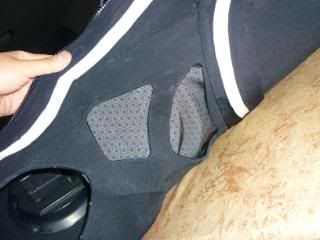
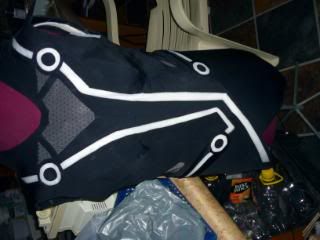
The last thing is reflective tape on the small pieces of light on the bodice, but FIRST the hub.
THE HUB AND DISC
Materials
Tron Disc $32.99
Black Lycra
Take Away container
Earth Magnets
Velcro
The back piece I left off so I could sew “The Hub” on top of it. The Deluxe Tron Identity disc was purchased from Ebay and lights up accordingly. It will be held in place by Earth magnets and Velcro.
We opened up the disc itself and placed in one earth magnet in the corners. With hindsight you should put at least 2-3 at each end for maximum strength, that is, 2 stacked on top of each other, and in the opposing corner, another two stacked. I kwik gripped it on, and them hot glued around it so it stayed in place. And put the disc back together again. On the hub then, you should attach at least 4 magnets stacked on top (8 total) to match these so you have no chance of it falling out.
Bought from: http://aussiemagnets.com.au/magnets/Rare-Earth-%28Neodymium%29/
The actual Hub -
We had the ingenious idea to modify this from the packaging which came with the Tron Disc as that was a perfect fit. Most others struggled to find something which actually supported the disc, but the packaging is perfect. It is also coincidentally EXACTLY the right shape for the Coolneon.com fish driver. I simply cut around the edges in a circle and spray painted it black. The outer circle was covered with the same lycra which I would attach to the back of my costume by glue and sewing around the edges. Then stretching out to meet with the edge of my EL wire.
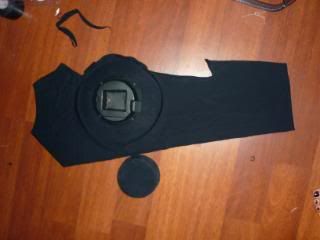
And then installed the asymmetrical zip on the side. I chose a zipper which zipped both down and up so I could get into the costume and theoretically someone else could unzip from the bottom and plug in all my wires without me having to go completely naked.
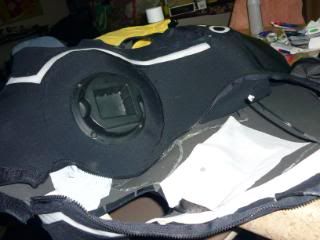
I would then cover the top with a plastic take away container you can get from any Chinese take away store and fabric on top of that in order to hide my driver, once again stretching my lycra out.
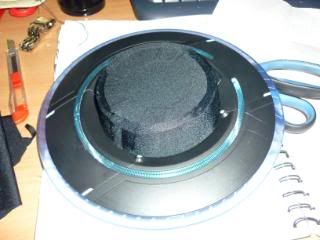
Inside the hub would be my Driver with the wire-side connectors extending inside my suit to my pieces of light.
Underneath this in the V of the back would sit my battery back. I couldn’t find a trapezoid box so I did the next best thing…the side of a Ski Yoghurt container lololol.
Ironically this is the perfect size for the 8 cage battery pack from cool neon (which is the long sort of battery pack). I cut out the sides, and then hotglued in Eva skin foam as the backing. On my bodice, I sewed in a piece of lycra, then covered the sky yoghurt with it’s own piece of lycra, and literally sewed the two seamlessly together. So my battery pack doesn’t bump around in its case I put in some left over mangy sofa foam for padding.
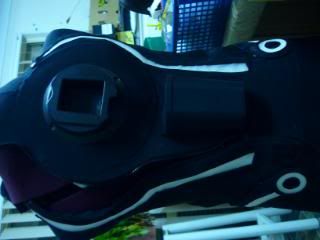
You would never guess that used to be a diary product container lol.
THE WIG:
Styled into the asymmetrical bob myself and purchased from Paddy’s Market for $30
Finally it being done:
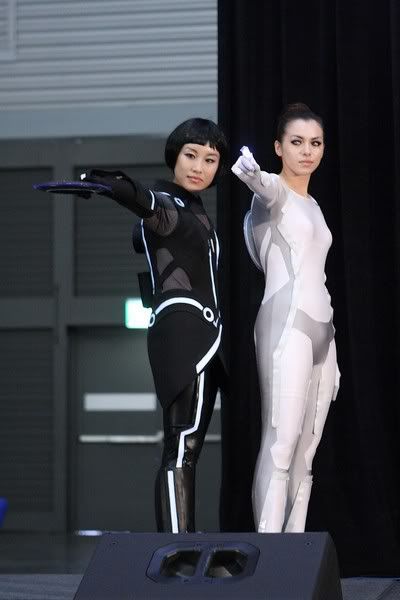
Credit Bubby at Smug Smug
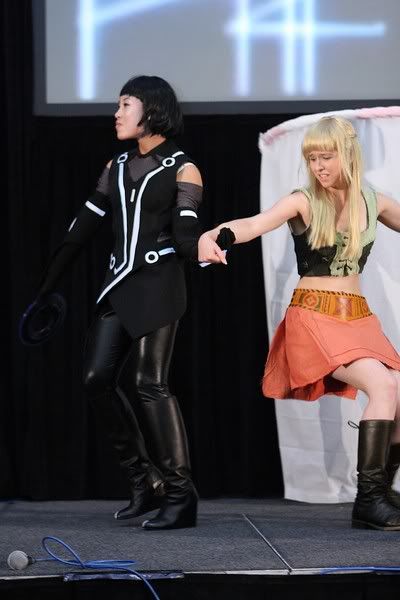
And of our awesome Xena x Tron crossover group:
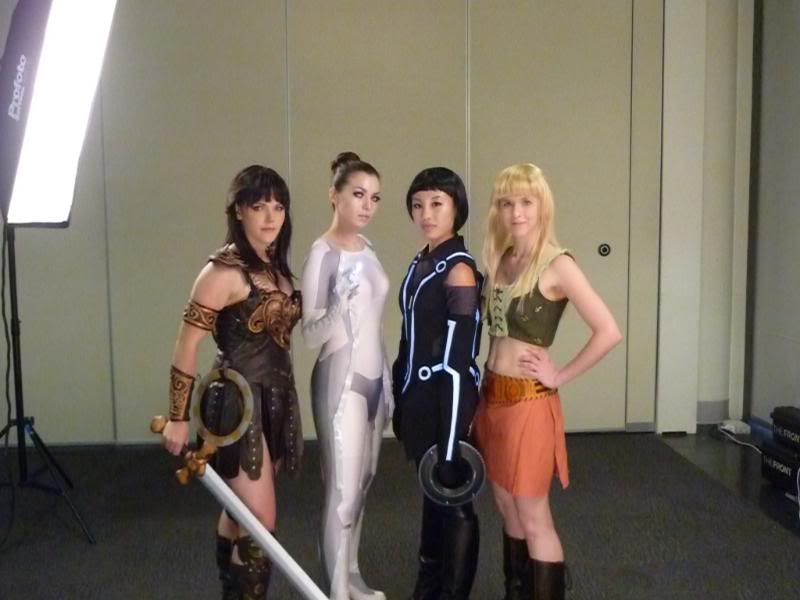
Thanks to
queencattabby, madamephoenix and the wife arlo_arleh and devoted boyfran t8_steve for their help on this costume.
Please check out our deviant arts at
http://alita-b-angel.deviantart.com
http://tailored-illusion.deviant.com
http://arlo-arleh.deviant.com
We won Best in Show!
For Armaggedon this year I undertook the arduous task of a Tron Legacy illuminated outfit for Quorra. This is one of those notoriously difficult costumes I think people can benefit from knowing how I went about the build since it was probably the most finicky of any costume I’ve done in terms of patterning, electronics and materials.
QUORRA

arlo_arleh is doing Siren Gem, and as usual she managed to pull a costume out of ass at the most minute and it looks fantastic as that girl is crazy photogenic.
The easy-way-out for Tron costumes of course is to use light reflective tape which when photographed with a flash they will glow bright white, making a perfectly easy costume, which is the method Arleh decided to use, mostly because of time constraints.
… of course I didn’t want to do this because I’m all about the challenge so I decided to attempt an EL wire costume, because I want to LIGHT UP.
After washing up after an 100+ page thread read here: http://www.therpf.com/f24/tron-legacy-costume-planning-88230/
I’ve decided to go the EL wire way as it was the cheapest (HAAAA IRONY) as opposed to EL Sheet or EL Tape.
THE PATTERN
Materials:
Duct Tape Dummy $25
Old shirt vest
Calico
First I need to create an exact pattern in order to determine how much wire I would need.
This took ages. But with the help of a duct tape dummy, created by making a perfect mould of your body through duct taping your entire body and then ‘casting it’ by stuffing it full of news paper. Costs about $25 to make in total so I would recommend it for all cosplayers.
Then I got a singlet tank top which fit me well and about two boxes of pins in order to start laying down what I wanted on my dummy.
Making it tighter by pinning down the darts and then drawing on with chalk the shapes I wanted.

Then meticulously over about three days I would ‘pin’ placement where all the lines went, all the lights, all the cut out pieces.


Then I added extra pieces of calico in order to lay down how the collar would work and the weird asymmetrical skirt Quorra has going on.

I had to pattern primarily as I wanted an asymmetrical zipper… a middle zipper would mean crossing light lines and my undoubtably heavy battery pack and driver wouldn’t have a stable service to stick to. So I decided to install a zipper just inside of the back ring of light.
Once my entire pattern was laid out, I could then figure out how much wire I needed.
The simplest way to do this was to use pieces of rope and rope around my pattern lines, pinning it down with pins.

This tells me exactly how much I needed as EL wire is ass-expensive. I needed around 37ft of wire. Feet since they’re from the US.
THE ELECTRONICS
The method I chose for wiring my costume is to ‘double-wire’ where both sides of the light strips will have light running on them in order to maximize ‘glow’. IE if it was a rectangle then all edges of the rectangle will have light.
This does significantly increase the amount of wire I need but the Annise and Eddieadryr, the pioneers of the technique at RPF have shown it produces the best result when diffused and refracted by a white backing. Check how in depth how they did it: http://www.therpf.com/f24/tron-legacy-costume-planning-88230/index42.html
I purchased my EL wire from Cool Neon.com. Whom I recommend despite their exorbitant shipping prices. COUPON CODE: JRS to get a 10 % discount folks!
I purchased:
- 40 ft of 2.6mm HighBright EL white wire for 1.30m Coolneon sells real lytec wire so they will be more flexible and last longer.
- 8 wire side connectors (they give you one spare attached to your bit of wire)
-3 x 45cm extension leads (18”) for arms and leg side bit.
- 1 x 75 cm extension lead for boot.
- A 2-45 ft fish driver 12 volt. This is the best driver if you also want to ‘test’ your pieces. The sound activated driver is 20-50ft meaning you cannot test your pieces unless you have 20ft of wire attached. It’s better to buy this as secondary driver for when you want to nskt nskt nskt later at raves or whatnot. The smaller fish driver also fits inside the hub better but more on this later.
- 8AA battery cage because this is better to pump your EL full of electricity. Anything less will mean less brightness.
- I also got an AC adaptor (but this had an American straight plug) but you won’t really need this since I found it tended to overload my wire making me panic and freak out. It might be good for photo shoots later though in a studio. Where you won’t move much. Otherwise save your money.
There is also the option of getting them to solder your points for you however it costs $4 per solder joint and since I needed at least 8 solder points this meant $32 which I can be saving so I didn’t purchase this… and HAHA attempted it myself. They will also cut you custom lengths (as long as they are whole numbers).
The shipping for this lot cost a whopping $80. Which is ludicrous. However, it did come within 5 days. You can pay only $25 for shipping also if you’re not in any hurry but arrives around 4 weeks… and unfortunately I only had 1 month to make the costume ugh.
So for a typical Quorra costume it cost me around $160 for the electronics alone.
Quorra also doesn’t have as MUCH light strips as some of the other Tron characters so a Sam or a Siren costume will be much more expensive.
As I had bought the wire unsoldered I then had to cut that 40ft of raw EL wire into the 8 varying lengths I needed.
To figure out the exact length of the 8 pieces I needed exact patterns of the light up elements in the suit as there was no allowance for mistake anywhere.
The pinning method of patterning on the dummy therefore allowed me to then press on top and pin on calico and lightly scrub pen over it and the pins would then create an impression of the lines I needed onto the calico. This also allowed for the bend and flex of the body so it contours with your boob and whatnot.

After that I had to redraw the lines clearer on the calico and calibrate them for straight edges. I would then trace this onto paper. One pattern piece as the complete whole, one for just the light strip, and one with the light strip cut out of the whole piece so make things easier later when you have to make several pieces.


Once they were all laid out. I could then cut the wire by measuring carefully around the edges of my pattern within the 7mm seam allowance of the edge of where it would be lit up. The wire eventually will be masked by fabric and only the reflected light shown.

The EL wire then had to be bent into the shapes I needed before I could solder them.
Since I had odd lengths, I had previously made the decision to solder the wire myself (despite not knowing how) with a Soldering Iron and tin lead and did so with a friend’s help.
The fish driver for the EL has no off switch and would only operate when connected to the battery pack.. However there must always be a length of El connected to the driver before attaching power source or the cables would fry. I was super nervous about this so it’s something to be extra careful of.
Soldering the wire: For each piece the EL had to be stripped at the tip, and copper tape wrapped just before the raw phosphorous coating, but in the process the angel hair wires which powered the wire had to remain undamaged.

These angel hair wires were then bent back, and soldered onto the copper tape with melted tin. I would scrape the phosphorous coating off the raw metal inside the wire so it was ready to be soldered onto the wire-side connector.


The long end would be soldered ontop of the angel hairs on the copper tape and the shorter end to the raw metal inside the wire.

Then I would test the wire by attaching this to the driver and battery pack and hopefully it would work perfectly. If it lit up I would then wrap the shrink-heat tube around the soldered joint and melt the tube around the soldered joint for protection with a heat gun.
Soldering these 8 pieces took around 3 nights of work since it was a learning process. The ends of the EL wire were then coated in hot glue to stop any moisture from entering the tubes.
To connect these lengths to my driver I had also purchased a y-splitter and 2 quad splitters so I could connect 8 pieces to the one output on the driver. Everything hopefully will be stored in the “HUB” on the back and the exterior battery pack.
In hindsight I should’ve gotten spare quad and y-splitters as these were fragile connections not meant for stress.
Also in hindsight you should wrap A LOT (at least an inch) of copper tape before soldering the angel hairs as the copper’s adhesive tended to stop being sticky after soldering and loosen the connection, causing it to short out.
The highbright EL is supposed to be the brightest there is. But I’ve found it works better when contrasted against a black masking… on a Siren costume the white wire doesn’t work as well, and LEDs would probably be a better choice, or EL tape.
Examples of the raw EL:

Lights off:

Lights on:

BOOTS:
Materials:
ZU leather boots for $100
1m of white vinyl leather from Spotlight for $19.95p/m
Contact sheets $3 a roll
Perspex diffusion sheet from reverse garbage
Reflective tape $21.95 p/4m
Black leather
Kwik Grip Glue $7.95
Black Duct tape
These were bought from ZUshoe.com.au for $100 (don’t think this is available anymore though) as they had the perfect wedge solid heel which was a rare find for Tron, sadly now destroyed (or made more awesome) by the light strip.

To attach my bent pieces of EL for this, I cut two exact pieces of transparent contact, the kind normally used in book covers and stuck then together with the EL side. This made sure that I retained the ‘pattern’ for my light strip and the EL would also not be allowed to move or be bent which caused the El stress and might make it short out.
I left the wire-side connector free so this can be plug and play when the costume is actually on me.

I then fitted it onto my duct tape dummy and matched the lines on the dummy to where the lines should end on the boot and marked them out with a texta on the dummy.
To enhance the brightness of the El, there had to be a white background to reflect the light off. Various tests showed that a mirrored backing didn’t spread the light enough. So I used white upholstery leather from Spotlight, a material known to be very tough, water resistant, thick but flexible and cut this as my backing behind my EL strip.
As the boot didn’t have bend or stretch with the contours of my body, I could use Perspex diffusion instead of fabric diffusion so on top of this. These layers were then duct taped around the edges of mask the edges.

To stick it onto the boot I then cut out an exact piece of leather which then masked around the edges of the light/duct tape and glued it on using Kwik Grip since contact cement allowed a certain amount of bend and flex. The top of the leather was then hand sewn onto the edge of the boot and the wire would then be hidden on the inside.


Reflective tape would then be added to the front and back of the heel for the light bits on there which were too small to put in with EL.
ARMS:
Materials
1m of white vinyl leather from Spotlight for $19.95p/m
Contact sheets $3 a roll
Diffusion Fabric on a clothes Hamper from a Hardware store $12.99
Kwik Grip Glue $7.95
Black Duct tape
Black lycra from a Star Trek shirt $7 a roll
Eva Skin foam from Reverse Garbage
To make the gloves I unpicked a pair of gloves for a tight glove pattern and then cut this onto a black lycra shirt I had left over from a Star Trek undershirt costume. This was mostly because I was low on lycra. The length of the gloves were extended to upper arm and then sewn together. Each glove takes around 2 hours work.to sew from scratch but it makes sure that the glove fabric matches the rest of the costume for flawless harmony.

For the glove armour, I used Eva Skin foam from a place called Reverse Garbage which I then cut in the shape of the EL wire which I had previously shaped into the zig zag I needed with contact sheeting stuck on both sides. At the same time I cut the pattern to my lycra which would go on top.


I would then glue the edges of the contact with Kwik Grip onto the edges of the foam carefully and then hold in place with pins.


Then on the back I would glue the white leather which I had also cut into the shape of the zig zag with Kwik Grip. The white leather CANNOT be glued on flat as the curve of your arm dictates that the leather needs to curve with the shape of your arm. So make sure you glue this as a bended shape rather than flat on the ground. I had to redo this one several times because of this f-up.

The diffusion fabric I used for this was incredibly hard to find… most of the US people who had attempted this costume managed to find shower curtains however it seems Australia doesn’t sell frosted shower curtains anywhere as homeware buyers HATE frosted shower curtains. Instead I ended up cutting up a laundry hamper I bought from a Hardware store, which only gave me around 90cm of material to work with for the entire costume ugh. I hope other people have better luck.

This was cut into the shape of the zigzag and once again carefully Kwik gripped around the edges onto my foam. Black duct tape then masked the edges.

Most other costumers for this costume stop it there, using black eva skin foam as their base, however I wanted to be STREAMLINE LIKE A FISH so went the extra step of putting fabric on top, so everything was completely finished.
Black Lycra was chosen as the suit needed a “rubber texture” which other fabrics lacked. It was very clear that no cotton or leather was used in these costumes except for footwear in the film.

I traced the edges of the light zig zag, cut it out and then finished the edges by sewing this along the seams. The edge of this was carefully glued on top of the diffusion so it sat correctly. The rest of the eva foam was then carefully lined with glue also and the fabric patted down to attach itself. The edges of the fabric looped over around the edges. You only really have one go at this because the Kwik Grip dries quickly and once coagulated the finish ends up ugly and lumpy.


And then to connect it, the side pieces were hand sewn together. Make sure you leave enough lycra to spare in case you miscalculated and your arm is beefier than you thought. Mine were.


Rinse and repeat for the other arm.
LIGHT ON!

This method I thought was the best way to make it look like the light strips were actually a part of the suit rather than have them sitting on top (though funnily enough in the film, they are in fact, sitting on top, but not everyone can afford 10,000 dollar light tape sigh).
LEGGINGS
Materials:
$5 black spandex leggings
3 m of black Velcro
Black Lycra
Diffusion Fabric on a clothes Hamper from a Hardware store $12.99
Using the duct tape dummy, I drew on with a marker where the light should run if it was to meet with the light of my boot.
This pattern was then traced onto the diffusion, black lycra and white leather. The white leather in this instance, I first sewed on black Velcro on the underside fully covering the strip.

Then, with a similar process to the arms, I glued first the contact sheets containing the El wire to the white leather around the edges with Kwik Grip, and then on top glued the diffusion fabric.

The black lycra I sewed around the inner ring of the light to finish the edges, and then carefully glued on top, wrapping the edges around the sides to the Velcro.

The other side of the Velcro was then attached to the leggings, allowing more freedom of movement, and so I could wash the leggings in the future if need be without damaging the EL.

THE BODICE
Materials
1m of white vinyl leather from Spotlight for $19.95p/m
Contact sheets $3 a roll
Diffusion Fabric on a clothes Hamper from a Hardware store $12.99
Kwik Grip Glue $7.95 x 3 bottles
Reflective Tape $21.95 p/4m
Black Duct tape
Black lycra from a Star Trek shirt $7 a roll
Black lycra 3m from Lincraft $29.95 p/m
Black Eva Skin foam from Reverse Garbage
Hot glue.
Using the pattern I so carefully drafted from my dummy, I then proceeded to cut it apart, with the zipper placed asymmetrically on the edge of the light so the back disc would be one piece instead of split in two with a centre zipper.
The pattern was laid on top of black eva skin foam, which was a thinner density than the arm armour since I wanted more mobility in the body. And carefully cut with some seam allowance along the lines of the dart seams, as I planned to put the bodice together to ensure it fitted before cutting the light strips to put on the EL.


The middle section was cut separate to the boob cups, which were made separately as ovals from the foam and then glued together with the middle section. I wanted boob cups as I wanted a very hard look, and to make up for my complete lack of bust.

The pieces of foam was hot glued together since this method on this type of material is stronger and faster than Kwik grip, and meant I only had to hold the pieces together for a few seconds before moving to glue the next part together. The back was also reinforced with hot glue in case it separated due to stress.
BACK

FRONT

The neck and designs were cut out at the same time, and figuring out the collar. Once it was all glued together it was the moment of truth, I had to fit the bodice to my body, but discovered that I had under estimated how wide my shoulders were and how small my waist is compared to my considerable hips. A great way to fit eva skin is to literally use duct tape since that doesn’t damage the foam.

Adjustments were made by attaching more foam with hot glue painstakingly to the bodice. A good knowledge of how your body fits is essential to this part since most people don’t conform to the dressmaker form and have wider shoulders/hips/curves etc.

Once all the pieces were glued together and fitted, then I laid the contact sheets with my longest pieces of El wire and pinned them down so I could form a pattern of where exactly they sat on the bodice.

This was so I could literally cut it apart again for the light strips and make a second pattern. I cut apart one side, and Kwik gripped the EL strip onto that before attempting the other side.


On the zipper side, I also added extra foam to the edges so the EL wire could sit nicely. Underneath once again I glued on the white leather, holding it together with the foam with two boxes full of pins. After that was dry then I carefully measured the limited amount of diffusion I had and glued those pieces on top.
BACK

FRONT

DIFFUSION:

I had to then make the pattern for the material which would cover the entire bodice and cover the foam. Make sure you have lycra to spare. To make the pattern for these pieces, I hilariously cut apart three large plastic shopping bags and pinned them onto the bodice, folding for the tapered lines to entire that it fit my bodice piece exactly.

The circles were cut without seam allowance as it was too difficult to create perfect circles which were sewn around the edges. All the other seams however were finished by sewing around the edges where it would sit against the wire before being stuck on.


I would carefully then stretch the fabric across the foam and stick it down with Kwik Grip, as the fabric tended to stretch this was extremely difficult to keep straight and also once stuck down, it was hard to unpeel the fabric from the Kwik Grip and retain the same finish. You had one chance at this, make sure you allow for the ‘stretch of lycra’ as it will give you about an inch more than your measurements when you stretch it over the foam.


Also make sure your glue is tacky before attempting to rush and put it on straight away, it will bleed through the lycra that way.
The side pieces of light were done the same way as the other pieces, EL WIRE inside contact sheeting, backed by white leather and diffusion on top, covered by black lycra. These would then be attached by sewing these directly through the foam onto my bodice piece.
I held these together with bull clips as they were drying.


These were then kwik gripped carefully on, and the ends sewn on by hand through the eva skin foam so the sides didn’t lift off should there be any pressure on them.
I really wanted the HEX pattern of the fabric, a nearly impossible print since it was designed especially for the film.
I ended up commissioning a single run of the fabric for $45 for 1M of the pattern so I could do the inserts which fit in around the sides, sleeves and collar from Jason Reskin at
http://orpex.blogspot.com/p/hexagon-fabric.html

He’s also been making his own Tron build here: http://orpex.blogspot.com/ but I really recommend him as he was prompt and was super nice about the sell/buy process and got it to me within 4 days of me having to have the costume finished. I ended up kwik gripping the spandex hex print onto my costume. And also making a little under shirt with sleeves with this.


The last thing is reflective tape on the small pieces of light on the bodice, but FIRST the hub.
THE HUB AND DISC
Materials
Tron Disc $32.99
Black Lycra
Take Away container
Earth Magnets
Velcro
The back piece I left off so I could sew “The Hub” on top of it. The Deluxe Tron Identity disc was purchased from Ebay and lights up accordingly. It will be held in place by Earth magnets and Velcro.
We opened up the disc itself and placed in one earth magnet in the corners. With hindsight you should put at least 2-3 at each end for maximum strength, that is, 2 stacked on top of each other, and in the opposing corner, another two stacked. I kwik gripped it on, and them hot glued around it so it stayed in place. And put the disc back together again. On the hub then, you should attach at least 4 magnets stacked on top (8 total) to match these so you have no chance of it falling out.
Bought from: http://aussiemagnets.com.au/magnets/Rare-Earth-%28Neodymium%29/
The actual Hub -
We had the ingenious idea to modify this from the packaging which came with the Tron Disc as that was a perfect fit. Most others struggled to find something which actually supported the disc, but the packaging is perfect. It is also coincidentally EXACTLY the right shape for the Coolneon.com fish driver. I simply cut around the edges in a circle and spray painted it black. The outer circle was covered with the same lycra which I would attach to the back of my costume by glue and sewing around the edges. Then stretching out to meet with the edge of my EL wire.

And then installed the asymmetrical zip on the side. I chose a zipper which zipped both down and up so I could get into the costume and theoretically someone else could unzip from the bottom and plug in all my wires without me having to go completely naked.

I would then cover the top with a plastic take away container you can get from any Chinese take away store and fabric on top of that in order to hide my driver, once again stretching my lycra out.

Inside the hub would be my Driver with the wire-side connectors extending inside my suit to my pieces of light.
Underneath this in the V of the back would sit my battery back. I couldn’t find a trapezoid box so I did the next best thing…the side of a Ski Yoghurt container lololol.
Ironically this is the perfect size for the 8 cage battery pack from cool neon (which is the long sort of battery pack). I cut out the sides, and then hotglued in Eva skin foam as the backing. On my bodice, I sewed in a piece of lycra, then covered the sky yoghurt with it’s own piece of lycra, and literally sewed the two seamlessly together. So my battery pack doesn’t bump around in its case I put in some left over mangy sofa foam for padding.

You would never guess that used to be a diary product container lol.
THE WIG:
Styled into the asymmetrical bob myself and purchased from Paddy’s Market for $30
Finally it being done:

Credit Bubby at Smug Smug

And of our awesome Xena x Tron crossover group:

Thanks to
queencattabby, madamephoenix and the wife arlo_arleh and devoted boyfran t8_steve for their help on this costume.
Please check out our deviant arts at
http://alita-b-angel.deviantart.com
http://tailored-illusion.deviant.com
http://arlo-arleh.deviant.com
We won Best in Show!