awmp
in
awmpdotnet
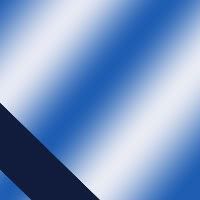
Tutorial: Coloring and shape BG
originally posted at awmp on 10/30/04
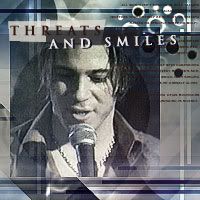
the making of 'threats and smiles'
so I made another Tutorial :) as several people asked about what I did to achieve this effect. I try to keep it simple. if you have problems to follow it, just ask... well, it turned out to be more like a walkthrough...
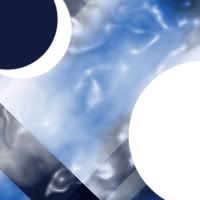
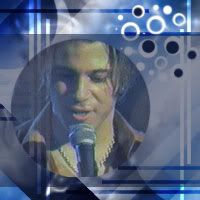
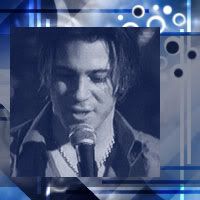
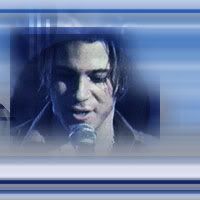
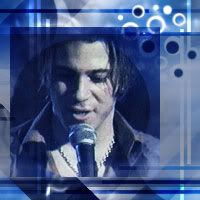
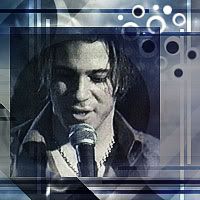
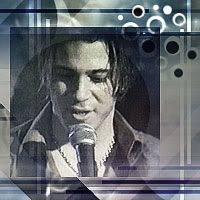
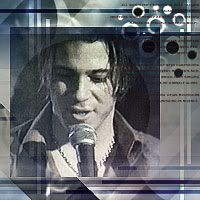
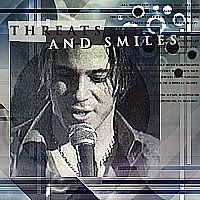
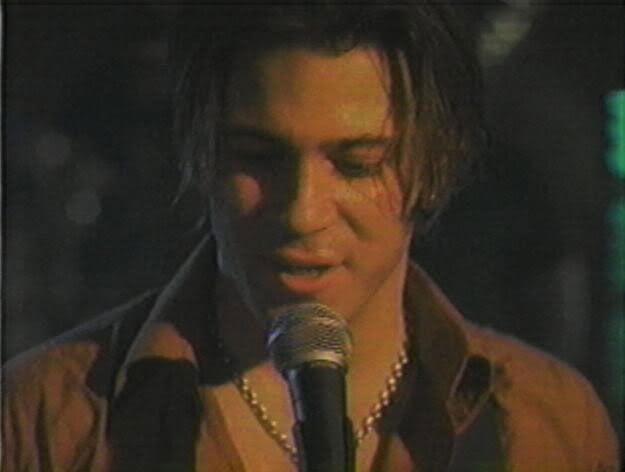
From this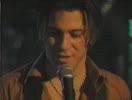
to this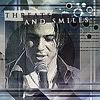
General Notes:
I used Photoshop 7.0
the quality of the pic was horrible
I like to work on a 200x200 canvas and resize it in the end. it's just a thing of me.
the words on the icon are from a cummings poem (ha, big surprise!)
you should be familiar with the standard features of Photoshop
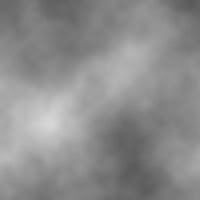
Step 01
- I made a new document sized 200x200 px, set the colors to black/white by hitting D
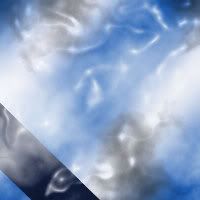
- used Filter-Render-Clouds
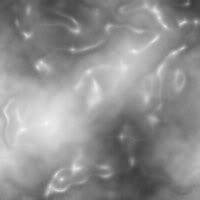
Step 02
- duplicated the clouds layer
- used Filter-Artistic-Plastic Wrap
- set the layer to Overlay mode
Step 03
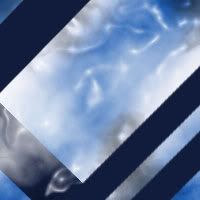
- made a new layer, used the steel blue gradient, that can be found in the metal defaults gradients from top left to right bottom
- with the Polygon Lasso I made a shape in the lower left corner and filled it with a dark blue (I used #111C3B)
- set the layer mode to Overlay
Step 04
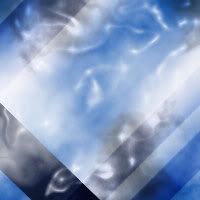
- on a new layer I added a few more shapes and filled it with the same blue
- set the layer mode to Soft Light
Step 05
- on a new layer I made some white and dark blue dots with a large hard round brush
- set the layer to Soft light mode

Step 06
- on a new layer I made some white and dark blue thin lines in different lengths
- I only made the lines towards the edges and only horizontal and vertical ones
- set the layer mode to Overlay
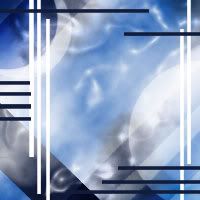
Step 07
- on a new layer I made some small dots with a hard round brush in different sizes in the upper right corner
- first the white dots, then slightly smaller dark blue dots and I erased some of it (again with a hard round brush)

Step 08
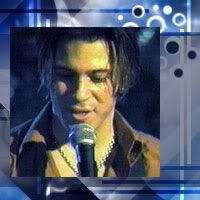
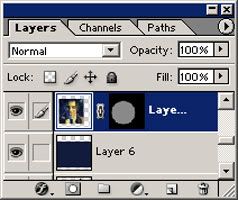
- on a new layer (in order to make Lindsay stand out a bit more) I added a dark blue rectangular and lowered the opacity to 50%


Step 09
- on the Lindsey pic I used Auto Levels and cropped it to a square of 150x150px
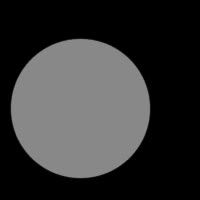
- added the pic to the composition and made a new layer mask for it
- the layer mask was a grey circle on a black BG to lower the opacity and make the pic circular
Step 10
- duplicated the Lindsay pic without the layer mask
- used Image-Adjustments-Gradient Map in the familiar white/dark blue combination
- set the layer to hard light mode
Step 11
- I hide the recent layers until it looked like step 07 again
- I used the single column marquee tool and merged copied the content of the selection (ctrl+shift+C)
- unhid the hidden layers and added the copied thing on top, I made a free transform (ctrl+t) and stretched the pixels to the whole width
- I erased some parts over Lindsey's pretty face
- set the layer mode to Soft Light

Step 12
- I copied the whole pic, added it to a new layer and sharpened it
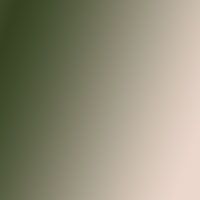
- on a new layer I added a color gradient from #EAD7CC to #374323
- set it to color and 50% opacity
Step 13
- on a new layer I added another color gradient from #EAD7CC to #374323
- set the layer mode to Soft Light

Step 14
- I added the whole poem in a tiny, tiny font (Bangle, all caps, fault bold, 3pt, right align)
Step 15-19
- I added text and some shapes (80% opacity) behind the text to make it more legible
Step 20
- I duplicated the whole pic with Duplicate Merged Layers Only on
- on the new canvas I duplicated the BG layer, sharpened it very much
- resized it to standard icon size 100x100 px

yippieh, done!
Questions? just ask :)
dedicated to the person who amused me this week with stealing my ideas without crediting and was pleased with the praising she got for it. I'm sure you can use this tut, too, in some way. and I know you are checking out my journal!
the making of 'threats and smiles'
so I made another Tutorial :) as several people asked about what I did to achieve this effect. I try to keep it simple. if you have problems to follow it, just ask... well, it turned out to be more like a walkthrough...
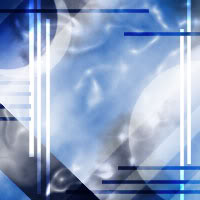
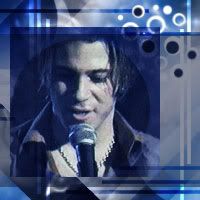
From this
to this
General Notes:
I used Photoshop 7.0
the quality of the pic was horrible
I like to work on a 200x200 canvas and resize it in the end. it's just a thing of me.
the words on the icon are from a cummings poem (ha, big surprise!)
you should be familiar with the standard features of Photoshop
Step 01
- I made a new document sized 200x200 px, set the colors to black/white by hitting D
- used Filter-Render-Clouds
Step 02
- duplicated the clouds layer
- used Filter-Artistic-Plastic Wrap
- set the layer to Overlay mode
Step 03
- made a new layer, used the steel blue gradient, that can be found in the metal defaults gradients from top left to right bottom
- with the Polygon Lasso I made a shape in the lower left corner and filled it with a dark blue (I used #111C3B)
- set the layer mode to Overlay
Step 04
- on a new layer I added a few more shapes and filled it with the same blue
- set the layer mode to Soft Light
Step 05
- on a new layer I made some white and dark blue dots with a large hard round brush
- set the layer to Soft light mode
Step 06
- on a new layer I made some white and dark blue thin lines in different lengths
- I only made the lines towards the edges and only horizontal and vertical ones
- set the layer mode to Overlay
Step 07
- on a new layer I made some small dots with a hard round brush in different sizes in the upper right corner
- first the white dots, then slightly smaller dark blue dots and I erased some of it (again with a hard round brush)
Step 08
- on a new layer (in order to make Lindsay stand out a bit more) I added a dark blue rectangular and lowered the opacity to 50%
Step 09
- on the Lindsey pic I used Auto Levels and cropped it to a square of 150x150px
- added the pic to the composition and made a new layer mask for it
- the layer mask was a grey circle on a black BG to lower the opacity and make the pic circular
Step 10
- duplicated the Lindsay pic without the layer mask
- used Image-Adjustments-Gradient Map in the familiar white/dark blue combination
- set the layer to hard light mode
Step 11
- I hide the recent layers until it looked like step 07 again
- I used the single column marquee tool and merged copied the content of the selection (ctrl+shift+C)
- unhid the hidden layers and added the copied thing on top, I made a free transform (ctrl+t) and stretched the pixels to the whole width
- I erased some parts over Lindsey's pretty face
- set the layer mode to Soft Light
Step 12
- I copied the whole pic, added it to a new layer and sharpened it
- on a new layer I added a color gradient from #EAD7CC to #374323
- set it to color and 50% opacity
Step 13
- on a new layer I added another color gradient from #EAD7CC to #374323
- set the layer mode to Soft Light
Step 14
- I added the whole poem in a tiny, tiny font (Bangle, all caps, fault bold, 3pt, right align)
Step 15-19
- I added text and some shapes (80% opacity) behind the text to make it more legible
Step 20
- I duplicated the whole pic with Duplicate Merged Layers Only on
- on the new canvas I duplicated the BG layer, sharpened it very much
- resized it to standard icon size 100x100 px
yippieh, done!
Questions? just ask :)
dedicated to the person who amused me this week with stealing my ideas without crediting and was pleased with the praising she got for it. I'm sure you can use this tut, too, in some way. and I know you are checking out my journal!