Tutorial #5
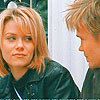
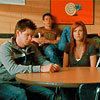
This is a tutorial of Haley and Lucas from One Tree Hill.
From this:
To this:
Program: Photoshop CS4
Translatable: No, selective coloring
Steps: 4
Difficultly: Easy
Step #1
Find a picture and resize, crop, sharpen, etc. I used this image from here.
I cropped it to 100x100 and I didn't sharpen it, but feel free to if your icon needs it.

Step #2
Duplicate your base (ctrl-J) and drag it to the top.
Adjust the Hue/Saturation for the image (ctrl-U) or Image>Adjustments>Hue/Saturation.
Set the Master Saturation to 30-60. For this icon I set mine at 60.
Set this layer to SCREEN, opacity 100%.

Step #3
Create a new Selective Coloring layer, Layer>New Adjustment Layer>Selective Color.
Use these settings:
Reds: -100/-10/+24/-9
Yellows: -100/+8/-16/0
Neutrals: +20/-6/-27/+7
Set this layer to NORMAL, opacity 100%.

Step #4
Create another Selective Coloring layer, Layer>New Adjustment Layer>Selective Color.
Use these settings:
Reds: -91/-6/+23/0
Yellows: -100/+10/-24/+3
Neutrals: +26/-11/+21/-6
Set his layer to NORMAL, opacity 100%.

And your done! Please feel free to comment if you like this tutorial. I would love some feedback!
Other examples:


From this:
To this:
Program: Photoshop CS4
Translatable: No, selective coloring
Steps: 4
Difficultly: Easy
Step #1
Find a picture and resize, crop, sharpen, etc. I used this image from here.
I cropped it to 100x100 and I didn't sharpen it, but feel free to if your icon needs it.
Step #2
Duplicate your base (ctrl-J) and drag it to the top.
Adjust the Hue/Saturation for the image (ctrl-U) or Image>Adjustments>Hue/Saturation.
Set the Master Saturation to 30-60. For this icon I set mine at 60.
Set this layer to SCREEN, opacity 100%.
Step #3
Create a new Selective Coloring layer, Layer>New Adjustment Layer>Selective Color.
Use these settings:
Reds: -100/-10/+24/-9
Yellows: -100/+8/-16/0
Neutrals: +20/-6/-27/+7
Set this layer to NORMAL, opacity 100%.
Step #4
Create another Selective Coloring layer, Layer>New Adjustment Layer>Selective Color.
Use these settings:
Reds: -91/-6/+23/0
Yellows: -100/+10/-24/+3
Neutrals: +26/-11/+21/-6
Set his layer to NORMAL, opacity 100%.
And your done! Please feel free to comment if you like this tutorial. I would love some feedback!
Other examples: