Tutorial #3
A tutorial for this icon effect, as requested by aquarian_abyss (sorry I took so long! ^^; I'll be getting the other two up during the next few days). I found that trying to do the icon again wouldn't work right for some reason and wouldn't work on lighter images, so it's not exactly the same effect, but close enough I hope. ^^; As always, please try not to remake the icon 100%, and experimentation on your part is highly encouraged! Have fun!
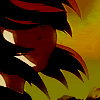
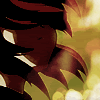
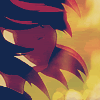
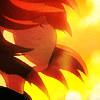
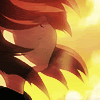
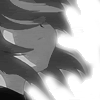
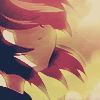
Today we are turning:
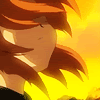
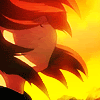
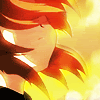
into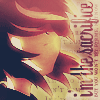
OR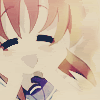
For Photoshop CS2, translatable (I think xD).
1. Duplicate your base and Desaturate it. Duplicate that layer 3 more times, so that you have a total of 4 desaturated layers of your base as well as your original untouched base. Set the first one to Linear Burn, and the last three to Soft Light.
>
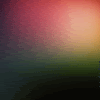
2. Set this texture by awmpdotnet(?) to Hard Light.
>
3. Duplicate your base, drag it untop, and set it to Soft Light.
>
4. New layer, fill it with a dark blue (I chose #1a263f) and set it to Exclusion.

>
5. New layer, fill it with a light brown (I chose #e4d5c1) and set it to Multiply.

>
6. Set this texture by 77words(?) to Lighten.
>
7. Duplicate your base, and set it to Hard Light. Duplicate it again, and now set it to Pin Light.
>
8. Set this same texture by awmpdotnet to Hard Light again.
>
9. Set a new layer, fill it with #000000 (black), and set it to Color at around 35% opacity.

>
10. Duplicate your base, and edit out the background (if your picture has one) by erasing it using whatever means you'd like (although I suggest you not do as sloppy a job as I did XD;). Now set it to Linear Dodge at 80% opacity.
>
11. Duplicate your layer, and Desaturate it. Now set it to Overlay at 80% opacity.
>
12. Duplicate your original extracted layer (the non-desaturated one), drag it untop, and set it to Pin Light at 80% opacity.
>
13. Set this texture by 77words to Overlay, and flip it horizontally.

>
14. New layer, fill it with a dark blue (I chose #14274d) and set it to Exclusion.

>
15. New layer, fill it with #000000 (black) and set it to Color at around 35% opacity.
>
Add your text, border, brushes, anything you'd like to it -- and done! If you have any questions feel free to ask, and I'd love to see your result if you tried it out!
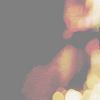
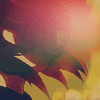
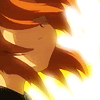
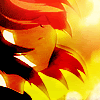
Heh...I really, really hate how this tut turned out, but hope someone finds it useful. *sigh* BTW, the effect really depends on your image. If you're using a lighter image, with a bit of tweaking your result should look something like this:
(I personally like this outcome better, so I suggest maybe trying it with lighter images first)
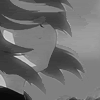
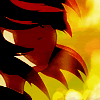
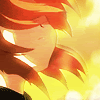
Today we are turning:
into
OR
For Photoshop CS2, translatable (I think xD).
1. Duplicate your base and Desaturate it. Duplicate that layer 3 more times, so that you have a total of 4 desaturated layers of your base as well as your original untouched base. Set the first one to Linear Burn, and the last three to Soft Light.
>
2. Set this texture by awmpdotnet(?) to Hard Light.
>
3. Duplicate your base, drag it untop, and set it to Soft Light.
>
4. New layer, fill it with a dark blue (I chose #1a263f) and set it to Exclusion.
>
5. New layer, fill it with a light brown (I chose #e4d5c1) and set it to Multiply.
>
6. Set this texture by 77words(?) to Lighten.
>
7. Duplicate your base, and set it to Hard Light. Duplicate it again, and now set it to Pin Light.
>
8. Set this same texture by awmpdotnet to Hard Light again.
>
9. Set a new layer, fill it with #000000 (black), and set it to Color at around 35% opacity.
>
10. Duplicate your base, and edit out the background (if your picture has one) by erasing it using whatever means you'd like (although I suggest you not do as sloppy a job as I did XD;). Now set it to Linear Dodge at 80% opacity.
>
11. Duplicate your layer, and Desaturate it. Now set it to Overlay at 80% opacity.
>
12. Duplicate your original extracted layer (the non-desaturated one), drag it untop, and set it to Pin Light at 80% opacity.
>
13. Set this texture by 77words to Overlay, and flip it horizontally.
>
14. New layer, fill it with a dark blue (I chose #14274d) and set it to Exclusion.
>
15. New layer, fill it with #000000 (black) and set it to Color at around 35% opacity.
>
Add your text, border, brushes, anything you'd like to it -- and done! If you have any questions feel free to ask, and I'd love to see your result if you tried it out!
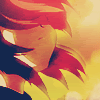
Heh...I really, really hate how this tut turned out, but hope someone finds it useful. *sigh* BTW, the effect really depends on your image. If you're using a lighter image, with a bit of tweaking your result should look something like this:
(I personally like this outcome better, so I suggest maybe trying it with lighter images first)