tutorial: tables
dolimir_k had a question about tables, so I made a tutorial about tables. Tables are a little confusing, at least to m e. It took me SO long to learn tables, and it's hard for me to explain it. But, I shall try my best!
Navigational Links
Basic Table Format
Rows
Columns
Table Width
Formatting a Column
Basic Table Format
Code:
The starts the table, the ends it.
The determines the row, ie, up and down, how many rows you have.
The determines the columns, ei left to right, how many columns you have.
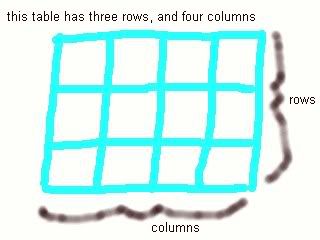
(it's easier to understand row versus column by looking at a pic, like here)
back to index
Rows
Usually what I use a table for with this is for when I want a picture on top, and I usually tweak the width. I'll cover that later. Really, if you're not tweaking the width, you don't really need to bother with a table for this.
Basically, what you want is one column, and at least two rows. If this were a regular webpage (lj code is slightly different, I'm gonna explain in website talk) I would code it like this.
Code:

image url here">
text in the entries or whatever it is you want underneath the picture>
Alright. That breaks down like this:
- starts the table
- is defining the start of your 1st row, 1st column. You only have one column, and you're going to have two rows in this particular case.
-
image url here"> is putting the banner in, in my case, the Rosenbaum pic.
- is defining the end of your first column of the first row, and the is defining the end of the first row.
- is defining the start of the second row.
- is defining the start of the first column of your second row.
- The next part is really just what you want below the picture, if you look at my layout right now, that would be the entries, the body of my journal.
- is defining the end of your first column of the second row, and the is defining the end of the second row.
- defines the end of the table
back to index
Columns
Alright, say you want to have a picture on the left side, and an explanation on the right side. That means you want two columns, and at least one row. Open this page and refer to it for examples of what I'm talking about.
Code:
URL OF YOUR IMAGE HERE">
text, text, text, text
Alright. That breaks down like this:
- starts the table
- is defining the start of your 1st row, 1st column. You're gonna have two columns, and one row in this particular case.
-
image url here"> is putting the picture in.
- is defining the end of your first column of the first row
- The second is defining the start of the second column of your first row.
- The next part is really just what you want to the right of the picture.
- is defining the end of your second column of the first row.
- is defining the end of the first row.
- defines the end of the table
back to index
Table Width
The most common way I format a table is it's width. If you don't determine it's width, it will format to the size of the page. However, if you want it to be centered under a picture (like my entries are on my journal layout) you'll want to determine the size.
For example, my picture is 600px wide. What you want is one column, and at least two rows. If this were a regular webpage (lj code is slightly different, I'm gonna explain in website talk) I would code it like this.
Code
image url here">
text in the entries or whatever it is you want underneath the picture>
Alright. That breaks down like this:
- starts the table. The width="600" defines how wide the table is going to be.
- is defining the start of your 1st row, 1st column. You only have one column, and you're going to have two rows in this particular case.
-
image url here"> is putting the banner in, in my case, the Rosenbaum pic.
- is defining the end of your first column of the first row, and the is defining the end of the first row.
- The second is defining the start of the first column of your second row. Again, in this particular case, you only have one column per row.
- The next part is really just what you want below the picture, if you look at my layout right now, that would be the entries, the body of my journal.
- is defining the end of your first column of the second row, and the is defining the end of the second row.
- defines the end of the table
back to index
Formatting a Column
This part? Is tricky to explain. You're gonna want to look at examples. Open this page and refer to it for examples of what I'm talking about. I'm sorry, it's confusing as hell and I'm not sure if I'm explaining it well with words. I've always been much better at doing than explaining. Which is odd, considering I'm making a fucking TUTORIAL to EXPLAIN something. LOL.
This is where you place your text/image within the column. You can place it in the center vertically (left to right) or the middle horizontally (up and down). Centering it vertically is pretty common, but horizonatally is usually when you have a tall picture, and you want the text on the right or the left to fall in the middle of it.
The only thing you're gonna format here is the , not anything else.
Formatting from left to right:
Notice: ALIGN is for left to right.
- left"> is going to put the text aligned left within the column
- center"> is going to center the text within the column
- right"> is going to align the text on the right within the column
Formatting from top to bottom:
Notice: VALIGN is for top to bottom.
- top"> is going to put the text at the top of the column
- middle"> is going to center the text within the column, going top to bottom
- bottom"> is going to put the text on the bottom of the column
Combining the two:
You can combine one align command with one valign command in any variation.
Examples:- left" valign="top"> puts the text aligned to the left within the column, starting at the top.
- center" valign="middle"> puts the text centered within the column, in the middle of the column.
- right" VALIGN="bottom"> puts the text aligned to the right, on the bottom of the column.
etc, etc, etc
back to index
Note: I have more to talk about, but I'm going out with my Mom for dinner, so I'll pick back up where I left off when I get back. Mainly I want to talk about borders and background colors for the table. Anyway, when I get back.
Navigational Links
Basic Table Format
Rows
Columns
Table Width
Formatting a Column
Basic Table Format
Code:
The starts the table, the ends it.
The determines the row, ie, up and down, how many rows you have.
The determines the columns, ei left to right, how many columns you have.
(it's easier to understand row versus column by looking at a pic, like here)
back to index
Rows
Usually what I use a table for with this is for when I want a picture on top, and I usually tweak the width. I'll cover that later. Really, if you're not tweaking the width, you don't really need to bother with a table for this.
Basically, what you want is one column, and at least two rows. If this were a regular webpage (lj code is slightly different, I'm gonna explain in website talk) I would code it like this.
Code:
image url here">
text in the entries or whatever it is you want underneath the picture>
Alright. That breaks down like this:
- starts the table
- is defining the start of your 1st row, 1st column. You only have one column, and you're going to have two rows in this particular case.
-
image url here"> is putting the banner in, in my case, the Rosenbaum pic.
- is defining the end of your first column of the first row, and the is defining the end of the first row.
- is defining the start of the second row.
- is defining the start of the first column of your second row.
- The next part is really just what you want below the picture, if you look at my layout right now, that would be the entries, the body of my journal.
- is defining the end of your first column of the second row, and the is defining the end of the second row.
- defines the end of the table
back to index
Columns
Alright, say you want to have a picture on the left side, and an explanation on the right side. That means you want two columns, and at least one row. Open this page and refer to it for examples of what I'm talking about.
Code:
URL OF YOUR IMAGE HERE">
text, text, text, text
Alright. That breaks down like this:
- starts the table
- is defining the start of your 1st row, 1st column. You're gonna have two columns, and one row in this particular case.
-
image url here"> is putting the picture in.
- is defining the end of your first column of the first row
- The second is defining the start of the second column of your first row.
- The next part is really just what you want to the right of the picture.
- is defining the end of your second column of the first row.
- is defining the end of the first row.
- defines the end of the table
back to index
Table Width
The most common way I format a table is it's width. If you don't determine it's width, it will format to the size of the page. However, if you want it to be centered under a picture (like my entries are on my journal layout) you'll want to determine the size.
For example, my picture is 600px wide. What you want is one column, and at least two rows. If this were a regular webpage (lj code is slightly different, I'm gonna explain in website talk) I would code it like this.
Code
image url here">
text in the entries or whatever it is you want underneath the picture>
Alright. That breaks down like this:
- starts the table. The width="600" defines how wide the table is going to be.
- is defining the start of your 1st row, 1st column. You only have one column, and you're going to have two rows in this particular case.
-
image url here"> is putting the banner in, in my case, the Rosenbaum pic.
- is defining the end of your first column of the first row, and the is defining the end of the first row.
- The second is defining the start of the first column of your second row. Again, in this particular case, you only have one column per row.
- The next part is really just what you want below the picture, if you look at my layout right now, that would be the entries, the body of my journal.
- is defining the end of your first column of the second row, and the is defining the end of the second row.
- defines the end of the table
back to index
Formatting a Column
This part? Is tricky to explain. You're gonna want to look at examples. Open this page and refer to it for examples of what I'm talking about. I'm sorry, it's confusing as hell and I'm not sure if I'm explaining it well with words. I've always been much better at doing than explaining. Which is odd, considering I'm making a fucking TUTORIAL to EXPLAIN something. LOL.
This is where you place your text/image within the column. You can place it in the center vertically (left to right) or the middle horizontally (up and down). Centering it vertically is pretty common, but horizonatally is usually when you have a tall picture, and you want the text on the right or the left to fall in the middle of it.
The only thing you're gonna format here is the , not anything else.
Formatting from left to right:
Notice: ALIGN is for left to right.
- left"> is going to put the text aligned left within the column
- center"> is going to center the text within the column
- right"> is going to align the text on the right within the column
Formatting from top to bottom:
Notice: VALIGN is for top to bottom.
- top"> is going to put the text at the top of the column
- middle"> is going to center the text within the column, going top to bottom
- bottom"> is going to put the text on the bottom of the column
Combining the two:
You can combine one align command with one valign command in any variation.
Examples:- left" valign="top"> puts the text aligned to the left within the column, starting at the top.
- center" valign="middle"> puts the text centered within the column, in the middle of the column.
- right" VALIGN="bottom"> puts the text aligned to the right, on the bottom of the column.
etc, etc, etc
back to index
Note: I have more to talk about, but I'm going out with my Mom for dinner, so I'll pick back up where I left off when I get back. Mainly I want to talk about borders and background colors for the table. Anyway, when I get back.