Okay. Want to know how I got my style to look like this? Here's a tutorial for tweaking Opal. pamelajoy made it, and I tweaked it, and now I show you how to tweak it from my code. I have a headache now, but... hopefully I explained it well enough that YOU won't have one? LOL. If you have any questions, ask away. If you can't get it to work, ask away. If you've tried and just can't get it, tell me what you want yours to be color coded as, and I'll see what I can do. You have to have tried though. I made it as easy as I could.
I have to tweak more, because active links are showing up as white, and it's hard to see what's a link that way. For now, I put parentheses around those things that are links. We'll see what i can't do about that.
set summary_items = 0; set page_recent_items = 15; set page_friends_items = 15; set show_entry_userpic = true; set view_entry_disabled = false; set text_nosubject = "(no subject)"; set lang_fmt_time_short = "%%month%% %%dayord%%, %%yyyy%% @ %%hh%%:%%min%%%%a%%m";
### Removes title ### function Page::lay_print_header () { var string title = $this->title(); """
### Gets rid of white background behind friends names on friends page ### function FriendsPage::lay_make_username (Entry e) { var Friend f = $.friends{$e.journal.username}; var string url = $e.poster->base_url(); """
function Page::print_entry (Entry e) { print """"""; var string time = $e.time->time_format(); var string date = $e.time->date_format(); var string security; if ($e.security != "") { $security = """ """width="$e.security_icon.width" height="$e.security_icon.height" """+"""alt="[$e.security]" />""";}
var UserLite name; var string pname; var bool show_name = ($.view == "friends" or $e.poster.username != $.journal.username or $.view == "entry") ? true : false; var bool show_pic = (defined $e.userpic and ($.view == "friends" or $*show_entry_userpic or $e.poster.username != $e.journal.username or $.view == "entry")) ? true : false;
$e.comments->print(); foreach var string key (["edit_entry","mem_add","tell_friend"]) { var Link link = $e->get_link($key); if ($link) { """ $link.caption """; } } """ Permalink
"""; }
### lets you see icon keywords on the comment view ### function EntryPage::print_comment(Comment c) { var string datetime; $datetime = $c.time->time_format(); var string parent; var string thread; if($c.parent_url != "") { $parent = """ $*text_comment_parent """; }
var string subjecticon; if (defined $c.subject_icon) { $subjecticon = """"""; }
var string ip; if ($c.metadata{"poster_ip"}) { $ip = """ """ + $c.metadata{"poster_ip"}; }
var string poster = defined $c.poster ? $c.poster->as_string() : "(Anonymous)"; var string pic; if (defined $c.userpic and $*comment_userpic_style != "off") { $pic = """
# some links for doing stuff to this comment foreach var string k ($c.link_keyseq) { var Link link = $c->get_link($k); if ($link) { """ $link.caption """; }
} """ $parent$thread
$c.subject
$c.text
"""; if ((size $c.replies) > 0 and $c.replies[0].full == false) { """
\n"""; $this->print_comments($c.replies);"
\n"; } """
""";
if ((size $c.replies) > 0 and $c.replies[0].full == true) { $this->print_comments($c.replies); } }
function Page::print_custom_head() { """
"""; }
I would paste it into Notepad or Microsoft Word, because you need something with a "find" and a "replace" feature. To find on Notepad, hit ctrl+F. To replace on Notepad, hit ctrl+R. To find & replace on Microsoft Word, hit ctrl+F... find is the first tab labeled "find", replace is the second labeled "replace."
Tweaking
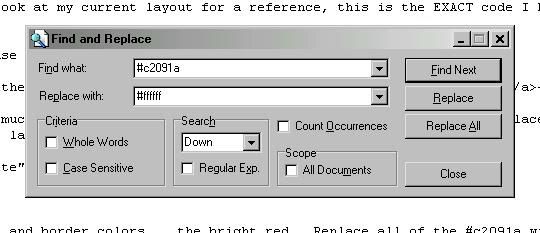
You can tweak before or after following pamelajoy's directions. Doesn't matter. You should feel free to look at my screenshot for a reference, this is the EXACT code I had in my box when I had this style.
I am using the hexidecimal color codes, which you can find (here)
USE THE REPLACING FEATURE FOR THIS, TRUST ME!!! IT'LL BE SOOOO MUCH EASIER.
This is what the replace feature looks like on notepad:
Put in the color it currently is in the "replace |__________|", put in the color you want to replace it with in the "with |_________|", and hit "replace all." Microsoft is the exact same, but looks slightly different.
#c2091a
My link colors and border colors... the bright red. Replace all of the #c2091a with whatever color you want in it's place. If you want hte link colors to be different from the border colors, change this:
### stylesheet ### function print_stylesheet() { """ a, a:active, a:visited, a:hover { color: #c2091a; cursor: help;
#440005
My background color for the entries... it's a very dark red... blood red. Replace all instances of that # with whatever color code you want.
#ffffff
That's plain old white. Everything that's white, replace that with whatever color you want it to be replaced with... font color, header color, etc.
#000000
That's black. Same as white, replace everything that's black with whatever color you want.
I have my font-size set at 10pt. If you want it bigger, set it bigger, smaller, set it smaller, etc... I have the boxes on the left set at a smaller size... If you want all the font sizes to be the same size, I'd do the "Find" feature (ctrl+f, the first tab) and change the ones you need to.
If you want individual colors different... ie, not so much of the same (I like mine more simplistic colorwise) I'm sure you can tweak it even more, but this should at least get you mostly in the right direction. I haven't fully explored what each individual command is just yet. I found this last night.
THIS:
var string YYY = """
Never express yourself more clearly than you are able to think.
-- Niels Bohr
"""; print_box("XXX", $YYY);
That is my side bar freetext (my quote), which you can tweak... just edit the shit that starts with the "Never express yourself..." and ends with "Niels Bohr"... repeat that for as many sidebars you want, and the title will be what's in the XXX of the "printbox("XXX", $YYY);" thing.
Note: Be sure to change the YYY parts, ie favorites1, favorites2... and in the "printbox("XXX", $YYY);" part, keep the $ sign.
Also,
function Page::lay_print_sidebar () {
var string favorites = """
Never express yourself more clearly than you are able to think.
5. Under "Create Style" type in a name for your style -- ie "Opalish." Click "Create."
6. Under "Style Layers" set the language to "English" and the "Layout" to "Opal". Click "Change."
7. Now under Layout select the one that says whatever you named it... in my case, "Opalish". Save Changes.
8. Go to (Customize), under "themes" select that style. It should be the very very last option, under a ---- dashed bar.
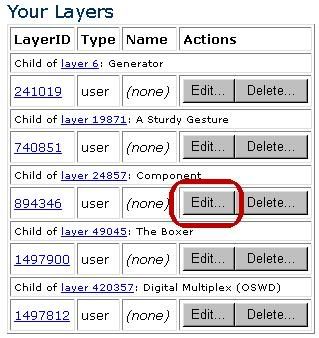
9. If you need to tweak, go to (Your Layers). Under the OPAL style, you should see whatever you've named it. I named mine opalish like she said. Tweak away in Notepad, Microsoft, or whatever, paste it in there-- make sure you delete what's already in there-- and hit compile. Should come up with no errors.
How to put a header picture on
The following Learned by asking my lovely friend michellek.
1. Select style of choice on your Manage->Customize->Style 2 page (here)
2. Tweak the colors using "edit custimizations" so they're the way you want them. Make sure you have the colors the right way, as well as the set up (what components where, etc)
3. Go to the advanced section of your layers over here.
4. Click "edit" for whatever style you have chosen in step 1, in this case: "Opal" style
5. Scroll down to the bottom of everything already in there and paste this in, making the correct changes:
function Page::print_custom_head() { """
"""; } All that need be changed is that in red. Replacing the url, and the height of the picture in pixels.
6. Hit "compile". Everything should come up "no errors"
