Birthday Cake of Awesomeness (TM)
Somehow it was decided that I would be making my sister a cake for her birthday which was on Sunday just gone. I wanted to make something suitably awesome and was discussing it with my mother; she suggested a cake she'd made in the past - a marbled cake made with two different colours of cake. That reminded me of the chequerboard cake which she'd also made and which I thought was higher on the awesomeness scale. I've seen it on Pinterest several times - I've seen both cakes on there actually - along with Fails when the cake didn't come out right at all. However, I had a secret weapon in my arsenal though: a recipe! My mother found the original recipe she'd used in an old cookbook from Woman's Weekly so I followed the instructions on there for how to assemble the cake. I'm sure you're dying to see how it turned out...
I had fun right from the start. I was getting the ingredients together on the Friday night so that I could get going as soon as possible on Saturday morning. Out of habit, I checked the flour and discovered that it was full of added protein (weevils) so I had to quickly nip out to Sainsbury's to get some more. I also picked up some pink fondant icing while I was there. On Saturday morning, I realised I'd forgotten to get the cocoa powder out of the cupboard. As I did so, I randomly decided to check the best before date and discovered it was out of date. By 6 months. So that meant another quick trip down to the corner shop!
I started by making just a bog-standard sponge cake, divided the mixture in half and added cocoa powder to one of them. I used two 6" cake tins, and baked them on Gas mark 4 for half an hour.
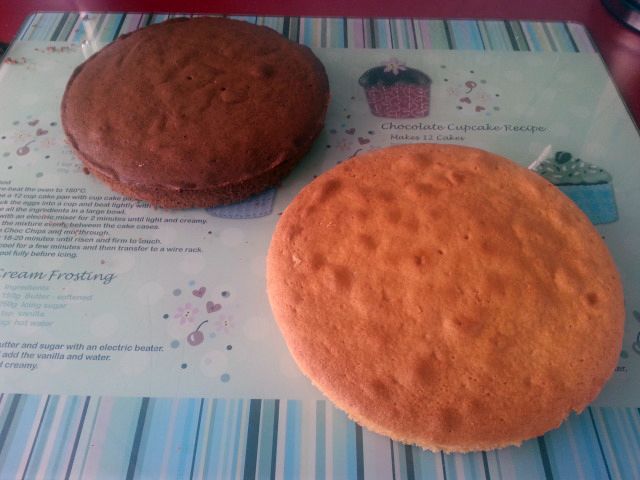
Two cakes! The plain cake was not twice the size of the chocolate cake although it does rather look like it in this photo. The bubbles on top of the plain cake are because my halves were rather wonky and I had to take some from that tin to even it out. I ended up with four little buns though so yay, bonus cake!
The next step was to cut each cake into 3 circles. From the Fails I've seen, it seems that if this bit isn't exactly right, it means the cake doesn't fit together properly. Most instructions say to mark the cakes to make sure they're cut in the same places. My trusty recipe book gave a much easier way to do it. Stack the cakes and cut them both together!
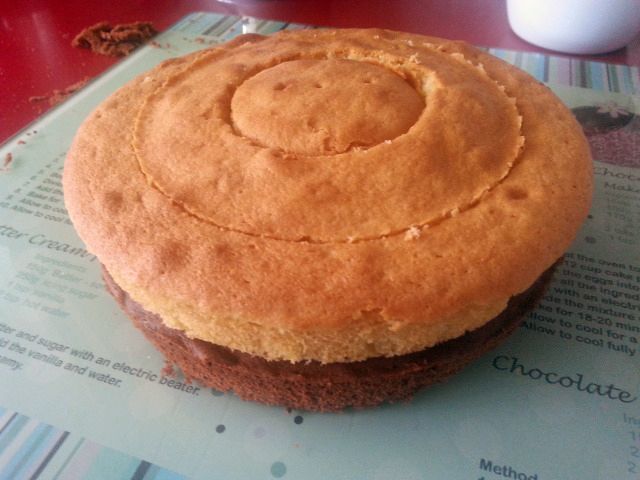
The hardest part was finding two suitably sized things to cut round! I didn't want the outer ring to be too thin because I thought that would make it liable to break. I used a long sharp knife (you can see it at the top of the photo below) and it was pretty easy.

So here's the cakes in three pieces. I discovered that to start off with I'd had the knife at a bit of an angle so it had cut the chocolate cake a little wonky but it was only minor. I dolloped out some strawberry jam into a little dish, beat it with a spoon to make it runny and used that to hold the sections of cake together.
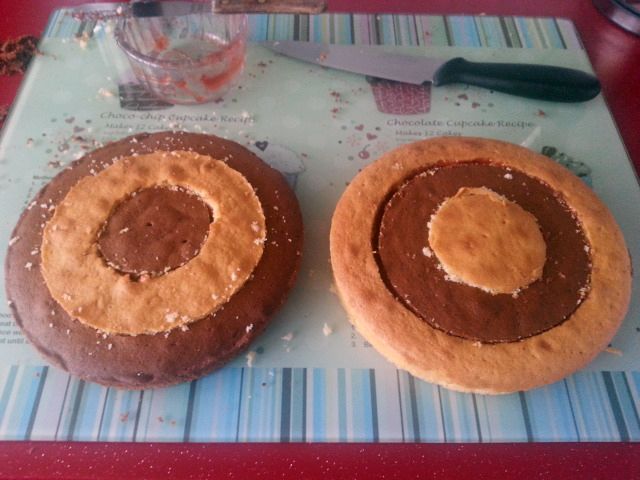
Result! You can see on the right hand cake where there's a gap between the outer and middle rings from holding the knife at an angle. Also the middle on that half stands a little proud but the middle on the other half is sunken in so it all works out! I spread more strawberry jam on the left half and buttercream on the right half before flipping the right half on top of the left with the aid of a fish slice. That little gap that I didn't think was anything minor actually turned out to be more problematic than I thought - it made the outer ring sink on one side so the top wasn't level at all. I had to turn the whole cake upside down and hoped that it would work out better that way.

Luckily it did! It had turned into a much bigger cake than I'd expected but doesn't it look yummy with that jam and buttercream in the middle? I had some buttercream left over so those four little bonus cakes now had a buttercream filling too ;)
The final step was to put the fondant on top and decorate the cake. I've not used fondant icing before and the packet had zero instructions on how to use it so that was fun. The first time I rolled it out, it got all stuck to the board so I had to roll it out again. And again. Third time lucky, I managed to get it off the board and onto the cake only to discover that it wasn't quite big enough. I had to cut off some overly long sections to even it out but that meant I had some leftovers to put on my little bonus cakes. Then it all started cracking round the edge of the cake and looked like the sides were just going to separate from the top! I finally managed to get it all decorated without it disintegrating.
Click for bigger pictures
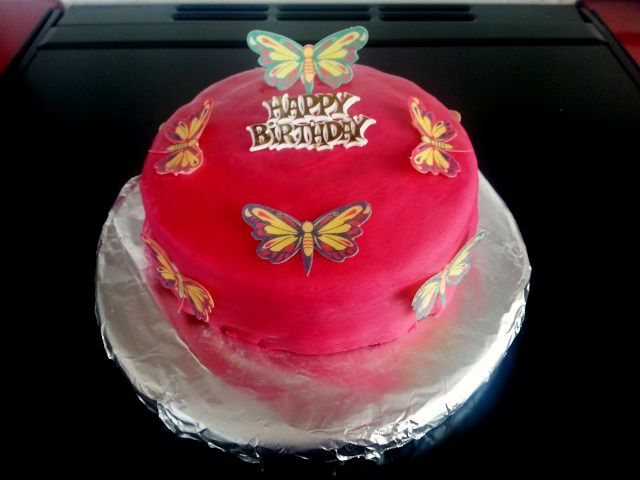
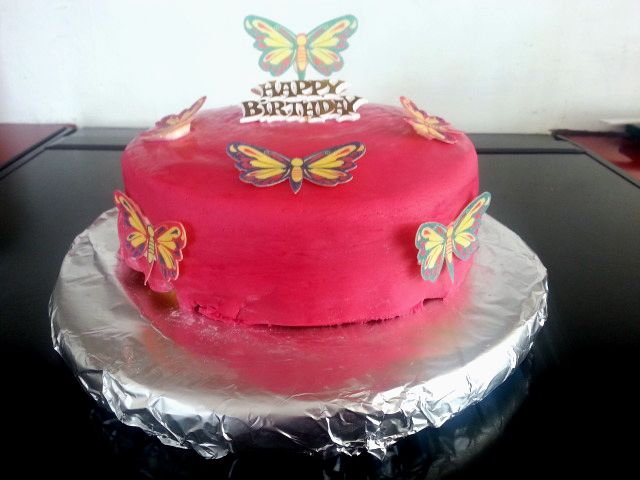
Ta-dah! Finished cake! There are five butterflies on the top (including the one sticking up) but the one at the back is hidden. There were 9 butterflies in the packet which is a bizarre amount so I fixed the last one on a cocktail stick with some icing and stuck it in the middle of the cake. It looks quite good but the moment of truth would come the following day when it was cut.
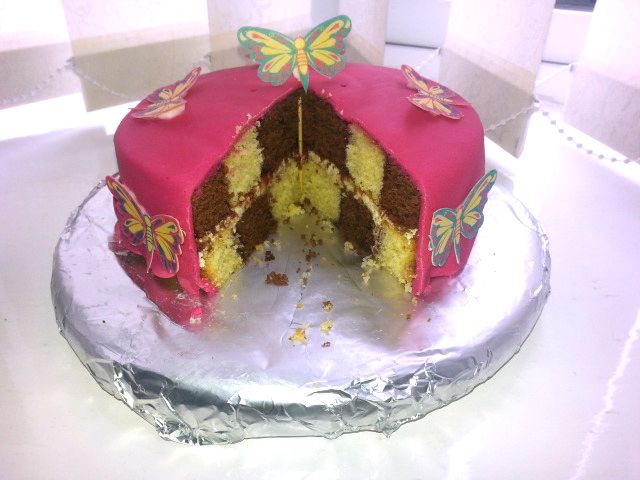
I presented the cake to Apple and she was very appreciative of the pink and the butterflies. Then she cut into it while I held my breath. I heard her go 'Oooh!' as she lifted a slice out and saw the middle.
Click for bigger picture
YAY! I think it's come out beautifully. Apple was very surprised. She said afterwards that when she was cutting into it she thought she could see chocolate cake at the top but she knows I don't like chocolate cake so she was confused. But when she lifted the slice out, she realised what I'd done. She was very impressed so I was well chuffed. So the Birthday Cake of Awesomeness™ was a resounding success! The hard part is going to be topping that next year!
I had fun right from the start. I was getting the ingredients together on the Friday night so that I could get going as soon as possible on Saturday morning. Out of habit, I checked the flour and discovered that it was full of added protein (weevils) so I had to quickly nip out to Sainsbury's to get some more. I also picked up some pink fondant icing while I was there. On Saturday morning, I realised I'd forgotten to get the cocoa powder out of the cupboard. As I did so, I randomly decided to check the best before date and discovered it was out of date. By 6 months. So that meant another quick trip down to the corner shop!
I started by making just a bog-standard sponge cake, divided the mixture in half and added cocoa powder to one of them. I used two 6" cake tins, and baked them on Gas mark 4 for half an hour.

Two cakes! The plain cake was not twice the size of the chocolate cake although it does rather look like it in this photo. The bubbles on top of the plain cake are because my halves were rather wonky and I had to take some from that tin to even it out. I ended up with four little buns though so yay, bonus cake!
The next step was to cut each cake into 3 circles. From the Fails I've seen, it seems that if this bit isn't exactly right, it means the cake doesn't fit together properly. Most instructions say to mark the cakes to make sure they're cut in the same places. My trusty recipe book gave a much easier way to do it. Stack the cakes and cut them both together!

The hardest part was finding two suitably sized things to cut round! I didn't want the outer ring to be too thin because I thought that would make it liable to break. I used a long sharp knife (you can see it at the top of the photo below) and it was pretty easy.

So here's the cakes in three pieces. I discovered that to start off with I'd had the knife at a bit of an angle so it had cut the chocolate cake a little wonky but it was only minor. I dolloped out some strawberry jam into a little dish, beat it with a spoon to make it runny and used that to hold the sections of cake together.

Result! You can see on the right hand cake where there's a gap between the outer and middle rings from holding the knife at an angle. Also the middle on that half stands a little proud but the middle on the other half is sunken in so it all works out! I spread more strawberry jam on the left half and buttercream on the right half before flipping the right half on top of the left with the aid of a fish slice. That little gap that I didn't think was anything minor actually turned out to be more problematic than I thought - it made the outer ring sink on one side so the top wasn't level at all. I had to turn the whole cake upside down and hoped that it would work out better that way.

Luckily it did! It had turned into a much bigger cake than I'd expected but doesn't it look yummy with that jam and buttercream in the middle? I had some buttercream left over so those four little bonus cakes now had a buttercream filling too ;)
The final step was to put the fondant on top and decorate the cake. I've not used fondant icing before and the packet had zero instructions on how to use it so that was fun. The first time I rolled it out, it got all stuck to the board so I had to roll it out again. And again. Third time lucky, I managed to get it off the board and onto the cake only to discover that it wasn't quite big enough. I had to cut off some overly long sections to even it out but that meant I had some leftovers to put on my little bonus cakes. Then it all started cracking round the edge of the cake and looked like the sides were just going to separate from the top! I finally managed to get it all decorated without it disintegrating.


Click for bigger pictures
Ta-dah! Finished cake! There are five butterflies on the top (including the one sticking up) but the one at the back is hidden. There were 9 butterflies in the packet which is a bizarre amount so I fixed the last one on a cocktail stick with some icing and stuck it in the middle of the cake. It looks quite good but the moment of truth would come the following day when it was cut.
I presented the cake to Apple and she was very appreciative of the pink and the butterflies. Then she cut into it while I held my breath. I heard her go 'Oooh!' as she lifted a slice out and saw the middle.

Click for bigger picture
YAY! I think it's come out beautifully. Apple was very surprised. She said afterwards that when she was cutting into it she thought she could see chocolate cake at the top but she knows I don't like chocolate cake so she was confused. But when she lifted the slice out, she realised what I'd done. She was very impressed so I was well chuffed. So the Birthday Cake of Awesomeness™ was a resounding success! The hard part is going to be topping that next year!