‘Custom’ Comments Page
SIMPLER, IMPROVED, AND WON’T MESS WITH YOUR BACKLINKS LIKE THE PREVIOUS CODE:
(If you tried using the previous code that was here, you won’t be able to use backlinks….or at least I wasn’t able to. If you’re not using backlinks, the old code should be fine. If you decide you want to use them, let me know and I will help you out.)
This should go without saying, but BACK YOUR TEMPLATE UP (click download template) in case this doesn’t work.
1. Click on ‘customize’ on your navbar, or ‘Layout’ on your dashboard.
2. Click on ‘Edit HTML’
3. Click the box which says ‘Expand Widget Templates’
4. Scroll all the way down till you see the following piece of code (mine is almost to my sidebar wrapper):
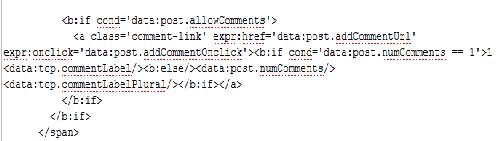
Make the following changes shown highlighted in this image:

5. Where your code says expr:href=’data:post.addCommentUrl’, change it to say expr:href=’data:post.url’.
6. Where your code says expr:onclick=’data:post.addCommentOnclick’, add title=’permanent link’ before the closing tag (the > symbol).
7. Click ‘preview’.
8. If your template still looks as it should, hit ’save template’.
9. Go to view blog, and click on your latest comment link. It should have your post and any comments to it.
Originally published at devilishsouthernbelle.net. You can comment here or there.