Compact Blogger Labels in Sidebar
I did it! I did it! My very own first hack. Only, it has probably been touched on in some other hack or design blog, so it may not really be mine. (But let me just state that in all my searches for blog label hacks, I never stumbled across this tip) Also, it’s not really a hack, because it didn’t require adding any javascript or anything fancy. So, it’s more of a ‘how-to’. But I’ll still be labeling it as a hack, AND a feature test for cross-reference purposes only.
DISCLAIMER: this MAY NOT work on all templates. If you try this, back your template up first, and hit preview to make sure it works for you before saving the changes.
Anyway, a bit of background: I had a HUGE, LONG list of labels. As you can imagine, they took up quite a bit of space in my sidebar.
I tried hacks to try and compact my list of labels.
This is a really good one for a label cloud. But it removed the number of posts for each label, and I wasn’t really sure if I wanted that. I also couldn’t figure out how to tweak the alignment to justify instead of center, so I ditched that one pretty quick. But if you like the look of zoom or technorati clouds, etc, then this hack will be a great one for you to try. It wasn’t too complicated and didn’t require a lot of messing around.
And I tried this one at one point, though it was at my beta test blog. I don’t think I actually had any posts labeled at the time, so it didn’t work (duh!). Anyway, I did get the icons to show up when all was said and done, so I am sure the hack would have worked if I had known what I was doing and actually labeled some posts. It’s also a LOT of code, or seemed like it to me. Still, this will be a great hack for those of you who want to give (yourself and) your readers the option of how to view your labeled posts. And for all I know, you MAY be able to remove the icons/options that you don’t want to use. Don’t take my word on that, though, because I don’t know for sure.
Both hacks will significantly free up space on your sidebar that would normally be taken up with the default list option.
I didn’t want to mess too much with code, and I wanted to keep the number of posts filed under each label…I only wanted them inline instead of in list form, so this is what I did:
1. I went to ‘customize’ on my nav bar. But you can also do this via the dashboard.
2. From there, I went to the ‘edit HTML’ option. It’s right below the template tab and right above the default ‘add and arrange page elements’ page.
3. Once on the ‘edit HTML’ page, I opted to back up my template. Then I clicked the box labeled ‘expand widget templates’.
(This is where it gets tricky. There’s a LOT of code to scroll through, and on my template, the widgets were not clearly separated by any white space.)
4. I scrolled down through all that HTML/code till I got to my ‘labels’ widget. This is what mine looked like, minus the red highlights (yours may not be in all caps like mine is):
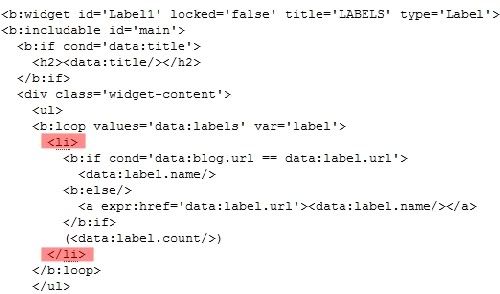
5. I removed the two pieces of code highlighted in red. (< li > and < /li > (without the spaces, of course)), previewed it to make sure it looked like I wanted it to, and, since it did, I pressed save template.
If you try this and it doesn’t, then abandon all changes by leaving your edit HTML page and clicking ‘OK’ when the popup screen asks if you are sure you want to navigate away from the page. Because if this didn’t work for you, I’m not sure what to do and I don’t want your template messed up!
Removing those two pieces of code took my labels list from this:
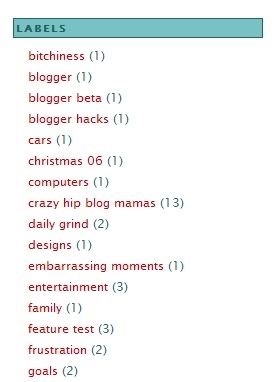
(This is actual sized, and probably not even half the amount of my labels)
….to this:

This is the actual size, too. Now I have more space, the text is justified like I wanted it, and I got to keep the number of posts with each label as well. No real ‘hack’ involved.
Originally published at devilishsouthernbelle.net. You can comment here or there.