awmp
in
awmpdotnet
some kind of style guide: pop art (part1 - basic elements I)
originally posted at awmp on 2005/05/05
pop art: style elements and basic techniques
so, my attempt to make pop art more, uhm, pop, kinda got too long for one post, so I cut it onto pieces. this first part will cover some common style elements and explain the techniques to achieve them. even though I'm talking about icons here, the techniques are very general...
I included icons I have used the styles for in each chapter.
starburst, retro dots, silhouettes, overcontrasted b/w images


and more...
General Notes:
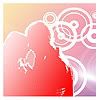
1) starburst
- the canvas should be bigger than icon size

- make some vertical color rectangulars (two or more colors)

- select the color area

- go to Edit - Define Pattern and give it a name

- fill the canvas with your new pattern (don't forget to deselect it before)
go to Edit - Fill... - Contents Use: Pattern - Select your new pattern


- Use Filter - Distort - Polar Coordinates - Rectangular to Polar

- crop it to icon size
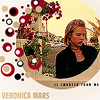
2) retro dots
- open a random pic

- desaturate it

- use Filter - Artistic - Cutout
I used these settings: no. of levels 8/edge simplicity 0/edge fidelity 2
this step is important to get thicker lines in the end

- use Levels (ctrl. + L) until only black and white is left
which means the sliders have to be at the same place on the bar... more to the left or more to the right depends on how dark/light the pic was

- make a selection with the single column marquee tool
chose an area with a balanced black and white content
- copy, paste and stretch it

- crop it to a square size
important to get a round result

- Use Filter - Distort - Polar Coordinates - Rectangular to Polar

- at this point you can select the white areas of the circles with the Magic Wand Tool, make a new layer, fill it with black, and define a brush (hiding the other layer of course)

- if you do this more than once and use the brushes you'll get a nice effect, that also works in different colors.

3) retro dots V2
- use the hard round default brush in different colors and sizes
- normally I use several layers (for each new color a new layer)
- use the eraser with the hard round brush tip to make some holes


4) silhouettes
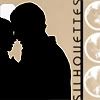
- use layer masks, that way you don't destroy your picture
- don't scale before, resize after you made the silhouettes, that way you don't have to work overly exact
- make a background layer and choose a suitable bg color, this will help you a lot to see if your silhouette looks good

- try the magnetic lasso if you want to, it often saves a lot of work, at least with a rough selection, that you can fill with black/white on the layer mask

- draw with black and white on the layer mask to hide and reveal the details you want to show up or not

- you will end up with something like this

- when you are satisfied, ctrl click on the layer mask to load the selection, make a new layer, fill it with a color

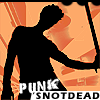
5) overcontrasted b/w images

(this icon is not sharable, I made it for indiana_jane_)
- desaturate it

- use levels, drag the left slider more to the right and the left one more to the right, use the middle slider to balance the pic more

- I often use the silhouette technique to cut out a part of the final image or I use a silhouette for the background and the overcontrasted image on top with different blending modes

- if you use a smart blur for instance your result will be smoother

sooo, if you combine everything you'll get too much ;)

coming up next: more basic elements, such as duotones, shapes, outlines, color halftone etc.
if there are any questions, feel free to ask :)
pop art: style elements and basic techniques
so, my attempt to make pop art more, uhm, pop, kinda got too long for one post, so I cut it onto pieces. this first part will cover some common style elements and explain the techniques to achieve them. even though I'm talking about icons here, the techniques are very general...
I included icons I have used the styles for in each chapter.
starburst, retro dots, silhouettes, overcontrasted b/w images
and more...
General Notes:
- I used Photoshop 7.0
- you should be familiar with the basic PS tools
1) starburst
- the canvas should be bigger than icon size
- make some vertical color rectangulars (two or more colors)
- select the color area
- go to Edit - Define Pattern and give it a name
- fill the canvas with your new pattern (don't forget to deselect it before)
go to Edit - Fill... - Contents Use: Pattern - Select your new pattern
- Use Filter - Distort - Polar Coordinates - Rectangular to Polar
- crop it to icon size
2) retro dots
- open a random pic
- desaturate it
- use Filter - Artistic - Cutout
I used these settings: no. of levels 8/edge simplicity 0/edge fidelity 2
this step is important to get thicker lines in the end
- use Levels (ctrl. + L) until only black and white is left
which means the sliders have to be at the same place on the bar... more to the left or more to the right depends on how dark/light the pic was
- make a selection with the single column marquee tool
chose an area with a balanced black and white content
- copy, paste and stretch it
- crop it to a square size
important to get a round result
- Use Filter - Distort - Polar Coordinates - Rectangular to Polar
- at this point you can select the white areas of the circles with the Magic Wand Tool, make a new layer, fill it with black, and define a brush (hiding the other layer of course)
- if you do this more than once and use the brushes you'll get a nice effect, that also works in different colors.
3) retro dots V2
- use the hard round default brush in different colors and sizes
- normally I use several layers (for each new color a new layer)
- use the eraser with the hard round brush tip to make some holes
4) silhouettes
- use layer masks, that way you don't destroy your picture
- don't scale before, resize after you made the silhouettes, that way you don't have to work overly exact
- make a background layer and choose a suitable bg color, this will help you a lot to see if your silhouette looks good
- try the magnetic lasso if you want to, it often saves a lot of work, at least with a rough selection, that you can fill with black/white on the layer mask
- draw with black and white on the layer mask to hide and reveal the details you want to show up or not
- you will end up with something like this
- when you are satisfied, ctrl click on the layer mask to load the selection, make a new layer, fill it with a color
5) overcontrasted b/w images
(this icon is not sharable, I made it for indiana_jane_)
- desaturate it
- use levels, drag the left slider more to the right and the left one more to the right, use the middle slider to balance the pic more
- I often use the silhouette technique to cut out a part of the final image or I use a silhouette for the background and the overcontrasted image on top with different blending modes
- if you use a smart blur for instance your result will be smoother
sooo, if you combine everything you'll get too much ;)
coming up next: more basic elements, such as duotones, shapes, outlines, color halftone etc.
if there are any questions, feel free to ask :)