Icon Tutorial #1
Yes yes, a tutorial, it's my first so bare with me. I hope it makes sense andI hope it works for all of you.
* Uses: Photoshop CS3
* Not transable (sorry!)
* Curves & SC
* Enjoy and be happy :D

TO: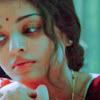
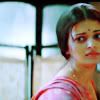
#1. Crop your base to 100x100
#2. I duplicated my capture of Aishwarya once and put the opacity to 100% Screen
#3. Added a yellow layer ( #fff468 - softlight 30%)
#4. A Hue/Sat. layer in the Master section saturation on +31
#5. A selective colour layer (1 of 2)
Reds: -100;0100;0
Yellows: -100;0;100;0
Cyans: -100;-100;100;0
Blues: -100;-100;-100;0
Neutrals: 19;0;-45;0
#6. Selective colour layer (2 of 2)
Reds: -100;0;100;0
Yellows: 100;0;-83;0
Cyans: 100;-100;-100;0
Blues: 100;-100;-100;-100
Neutrals -16;0;-22;0
Opacity on 50%
#7. A curves layer (1 of 2)
rgb: O: 198; I: 187
red: O:167; I: 156
green: O: 203; I:194
blue: O: 138; I: 162
#8. Added this texture by: unknown. (Do let me know)
Softlight - 100%
#9. A curves layer (2 of 2)
* RGB
- Point 1:
O: 187; I: 215
- Point 2:
O: 153; I: 192
- Point 3:
O: 90; I: 150
* Red
O: 164; I: 170
* Green
O: 171; I: 170
* Blue
O: 205; I: 209
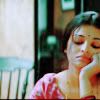
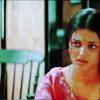
You can end here if you want to.
I added a extra curves layers because I found the image to greenish.
My settings - Green
O: 199; I: 210
With the same settings:
Rules:
- Credit would be very sweet.
- Comment, yes =D
- Feedback
- Would love to see some results.
- Friend the journal anytime for new updates. Love making friends.
- PSD
Screen Capture Credit
* Uses: Photoshop CS3
* Not transable (sorry!)
* Curves & SC
* Enjoy and be happy :D
TO:
#1. Crop your base to 100x100
#2. I duplicated my capture of Aishwarya once and put the opacity to 100% Screen
#3. Added a yellow layer ( #fff468 - softlight 30%)
#4. A Hue/Sat. layer in the Master section saturation on +31
#5. A selective colour layer (1 of 2)
Reds: -100;0100;0
Yellows: -100;0;100;0
Cyans: -100;-100;100;0
Blues: -100;-100;-100;0
Neutrals: 19;0;-45;0
#6. Selective colour layer (2 of 2)
Reds: -100;0;100;0
Yellows: 100;0;-83;0
Cyans: 100;-100;-100;0
Blues: 100;-100;-100;-100
Neutrals -16;0;-22;0
Opacity on 50%
#7. A curves layer (1 of 2)
rgb: O: 198; I: 187
red: O:167; I: 156
green: O: 203; I:194
blue: O: 138; I: 162
#8. Added this texture by: unknown. (Do let me know)
Softlight - 100%
#9. A curves layer (2 of 2)
* RGB
- Point 1:
O: 187; I: 215
- Point 2:
O: 153; I: 192
- Point 3:
O: 90; I: 150
* Red
O: 164; I: 170
* Green
O: 171; I: 170
* Blue
O: 205; I: 209
You can end here if you want to.
I added a extra curves layers because I found the image to greenish.
My settings - Green
O: 199; I: 210
With the same settings:
Rules:
- Credit would be very sweet.
- Comment, yes =D
- Feedback
- Would love to see some results.
- Friend the journal anytime for new updates. Love making friends.
- PSD
Screen Capture Credit