simple coloring tutorial in 5 steps
Go from to 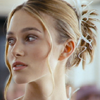
to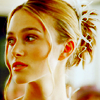
in 5 steps. (Adobe Photoshop 7)
This includes curves and selective colors, but I tried to make them as simple as possible. I posted screencaps of the curves and selective color windows so that you wouldn't get confused. This tutorial was meant to let people have an idea on what curves and selective colors do to screencaps. Don't run away when you read the word curves ok? :p
Step 1
I got this screencap (by
froda_baggins ) and cropped it to 100x100 pixels. (fyi, the cap is from Love Actually)
Result:
__________________________________________________________________________________
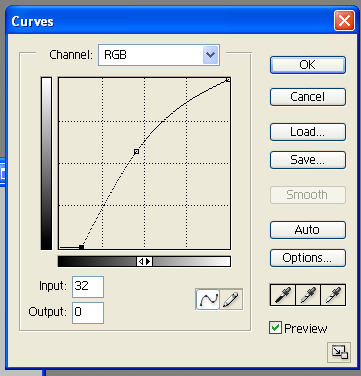
Step 2
Instead of using screen and softlight, I usually use curves to brighten images because I think the icons look better that way. "Say what? Curves?!?!?!" Don't worry, this is simple and easy to do. You will just click and type, I promise.
Go to Layer>> New Adjustment Layer >> Curves
Then the Curves window will appear.
In Channel: RGB:
Click somewhere in the middle of the line:
Type in the boxes:
Input: 115
Output: 145
Still in Channel: RGB:
Click at the lowermost point of the line:
Type in the boxes:
Input: 32
Output: 0
Then click OK.
Here are the screencaps of what your window will look like, so that you could see if you're doing the right thing.
a. The first click (in the middle of the line)

b. The second click (at the lowermost point)
Result: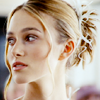
Better and brighter and shinier!
__________________________________________________________________________________
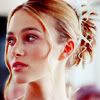
Step 3: I use selective colors because its easier to modify the colors of the icons that way. Its quite tiring sometimes to put loads and loads of color fill layers just to modify the colors of the icons. Plus, Im too lazy to think of what color fill layers to use. lol!
Go to Layer>> New Adjustment Layer >> Selective Color
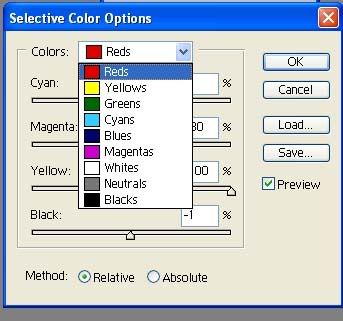
The Selective color window will appear.
Type in the following:
colors:
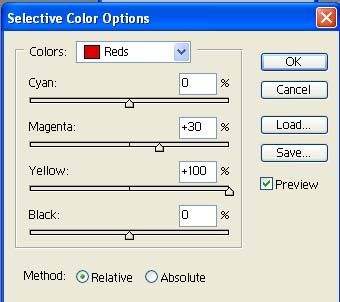
REDS:
Magenta: +30
Yellow: +100
leave the rest at 0
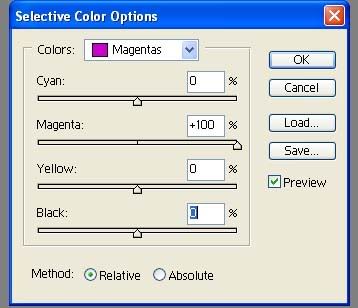
Then, in the colors drop down menu section, select Magentas: (where the heck is the colors drop down menu? CLICK HERE TO FIND OUT WHERE)
MAGENTAS
Magenta: +100
leave the rest at 0
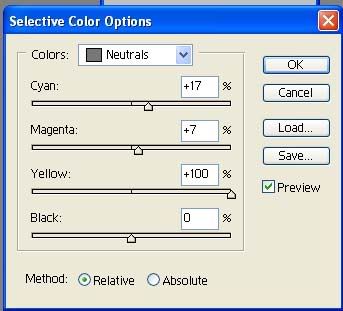
In the colors drop down menu, select Neutrals:
NEUTRALS:
Cyan: +17
Magenta: +7
Yellow: +100
leave the rest at 0
Then click OK.
Here are the screencaps of the Selective Color window: REDS | MAGENTAS | NEUTRALS
Result: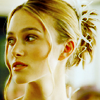
__________________________________________________________________________________
Step 4:
Go to Layer>> New Adjustment Layer >> Selective Color
Type in the following:
colors:
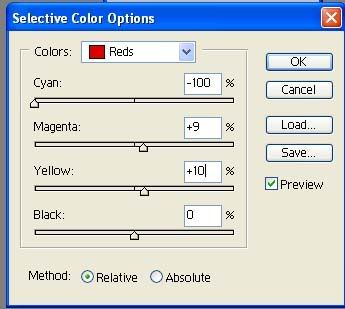
REDS:
Cyan: -100
Magenta: +9
Yellow: +10
NEUTRALS:
Cyan: +5
Magenta: +6
Yellow: +5
Then click OK.
Here are the screencaps of the Selective Color window: REDS | NEUTRALS
Result: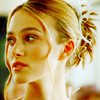
__________________________________________________________________________________
Step 5:
Add a new layer. Fill it with #F7E8FB set it to Color Burn, 100% opacity. Merge all the Layers (Layer >> Flatten image).
Result:
You're done! :) Its so easy right?
__________________________________________________________________________________
WORKING AROUND THE TUTORIAL:
You can experiment with the selective colors.. change the numbers and see what you come up with! And as for the Curves, you can change the Input/Output and see how the brightness of your icon change. You can also change the color of the Filled layer, add other color layers, change its opacity, etc.
Example:
A. See how the shadows lightened when I followed all the steps but modified the number in the second point of the curves RGB input in Step no. 2: (the changes I made are the ones in bold.)

In Channel: RGB:
Click somewhere in the middle of the line:
Type in the boxes:
Input: 115
Output: 145
Still in Channel: RGB: (Click HERE to check out the screencap of the Curves)
Click at the lowermost point of the line:
Type in the boxes:
Input: 12
Output: 0
B. See how the colors changed when I did all the steps but modified the Selective colors settings in Step 3: (the changes I made are the ones in bold.)
REDS:
Magenta: +30
Yellow: -25
MAGENTAS
Magenta: +100
NEUTRALS:
Cyan: +17
Magenta: +7
Yellow: +18
__________________________________________________________________________________
Other shiny reddish-yellowish icons made using this tutorial:
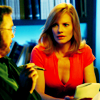
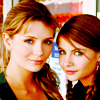
to
in 5 steps. (Adobe Photoshop 7)
This includes curves and selective colors, but I tried to make them as simple as possible. I posted screencaps of the curves and selective color windows so that you wouldn't get confused. This tutorial was meant to let people have an idea on what curves and selective colors do to screencaps. Don't run away when you read the word curves ok? :p
Step 1
I got this screencap (by
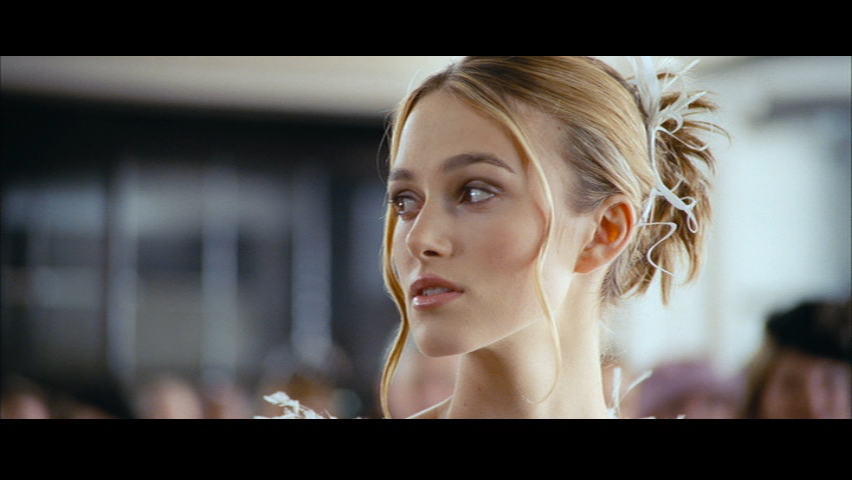
froda_baggins ) and cropped it to 100x100 pixels. (fyi, the cap is from Love Actually)
Result:
__________________________________________________________________________________
Step 2
Instead of using screen and softlight, I usually use curves to brighten images because I think the icons look better that way. "Say what? Curves?!?!?!" Don't worry, this is simple and easy to do. You will just click and type, I promise.
Go to Layer>> New Adjustment Layer >> Curves
Then the Curves window will appear.
In Channel: RGB:
Click somewhere in the middle of the line:
Type in the boxes:
Input: 115
Output: 145
Still in Channel: RGB:
Click at the lowermost point of the line:
Type in the boxes:
Input: 32
Output: 0
Then click OK.
Here are the screencaps of what your window will look like, so that you could see if you're doing the right thing.
a. The first click (in the middle of the line)
b. The second click (at the lowermost point)
Result:
Better and brighter and shinier!
__________________________________________________________________________________
Step 3: I use selective colors because its easier to modify the colors of the icons that way. Its quite tiring sometimes to put loads and loads of color fill layers just to modify the colors of the icons. Plus, Im too lazy to think of what color fill layers to use. lol!
Go to Layer>> New Adjustment Layer >> Selective Color
The Selective color window will appear.
Type in the following:
colors:
REDS:
Magenta: +30
Yellow: +100
leave the rest at 0
Then, in the colors drop down menu section, select Magentas: (where the heck is the colors drop down menu? CLICK HERE TO FIND OUT WHERE)
MAGENTAS
Magenta: +100
leave the rest at 0
In the colors drop down menu, select Neutrals:
NEUTRALS:
Cyan: +17
Magenta: +7
Yellow: +100
leave the rest at 0
Then click OK.
Here are the screencaps of the Selective Color window: REDS | MAGENTAS | NEUTRALS
Result:
__________________________________________________________________________________
Step 4:
Go to Layer>> New Adjustment Layer >> Selective Color
Type in the following:
colors:
REDS:
Cyan: -100
Magenta: +9
Yellow: +10
NEUTRALS:
Cyan: +5
Magenta: +6
Yellow: +5
Then click OK.
Here are the screencaps of the Selective Color window: REDS | NEUTRALS
Result:
__________________________________________________________________________________
Step 5:
Add a new layer. Fill it with #F7E8FB set it to Color Burn, 100% opacity. Merge all the Layers (Layer >> Flatten image).
Result:
You're done! :) Its so easy right?
__________________________________________________________________________________
WORKING AROUND THE TUTORIAL:
You can experiment with the selective colors.. change the numbers and see what you come up with! And as for the Curves, you can change the Input/Output and see how the brightness of your icon change. You can also change the color of the Filled layer, add other color layers, change its opacity, etc.
Example:
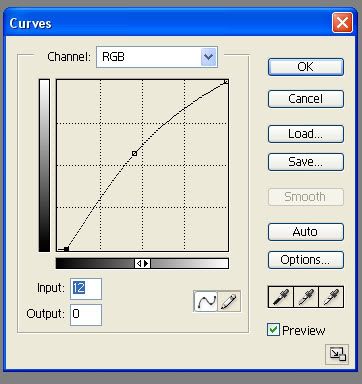
A. See how the shadows lightened when I followed all the steps but modified the number in the second point of the curves RGB input in Step no. 2: (the changes I made are the ones in bold.)
In Channel: RGB:
Click somewhere in the middle of the line:
Type in the boxes:
Input: 115
Output: 145
Still in Channel: RGB: (Click HERE to check out the screencap of the Curves)
Click at the lowermost point of the line:
Type in the boxes:
Input: 12
Output: 0
B. See how the colors changed when I did all the steps but modified the Selective colors settings in Step 3: (the changes I made are the ones in bold.)
REDS:
Magenta: +30
Yellow: -25
MAGENTAS
Magenta: +100
NEUTRALS:
Cyan: +17
Magenta: +7
Yellow: +18
__________________________________________________________________________________
Other shiny reddish-yellowish icons made using this tutorial: