Rupert Grint (as Ronnie) Tutorial
We are going from 
to
using Photoshop CS.
001. Open your picture. Resize/Crop it.
002. Go to Layer >> New Adjustment Layer >> Color Balance.
002.1 -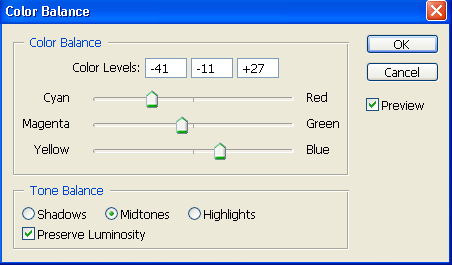

>>
003. Go to Layer >> New Adjustment Layer >> Hue/Saturation
003.1 -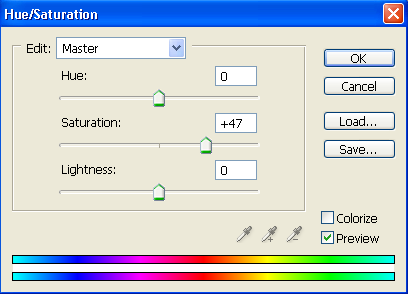
003.3 -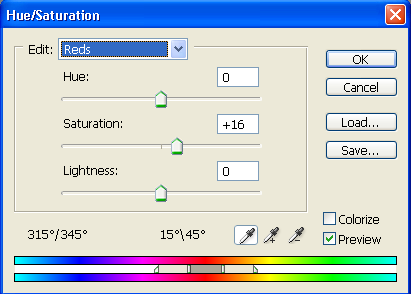

>>
004. Paste this layer. Blend Mode: Soft Light. Opacity: 100%.

+ (
)=
005. Go to Layer >> New Adjustment Layer >> Seletive Colours.
005.1-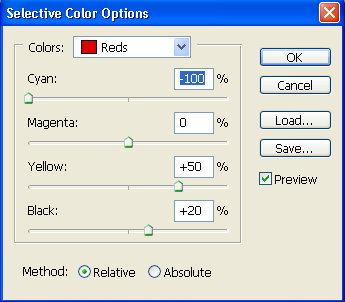
005.2-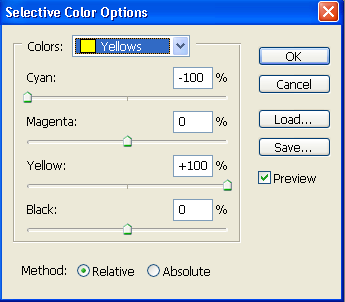
005.3-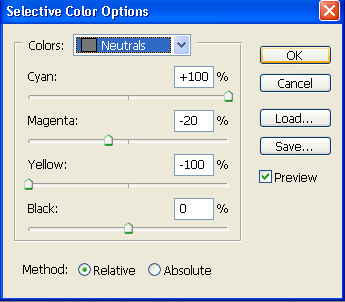

>>
006. Go to Layer >> New Adjustment Layer >> Seletive Colours.
006.1-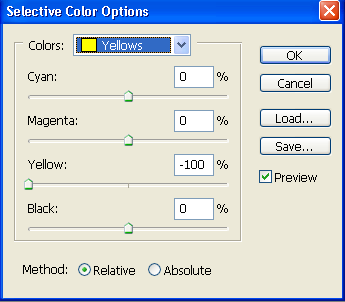
006.2-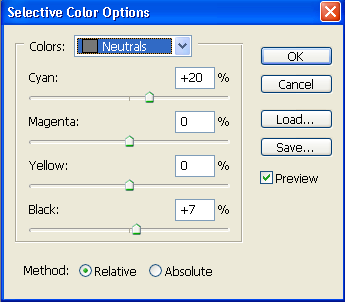

>>
007. Merge all layers. Add textures/brushes/text if you want to.
Other icons made with the same tecnique.
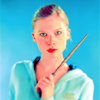


:: I would love to hear comments about this tutorial.
:: Feel free to ask me anything in case of not understand something.
:: Fell free to friend me.
:: I want to change my journal layout, but I am having some dificultsso If you have knowlegde in overrides and want to help me, please let me know.
:: Sorry my poor crop, but I'm tired.

to

using Photoshop CS.
001. Open your picture. Resize/Crop it.
002. Go to Layer >> New Adjustment Layer >> Color Balance.
002.1 -


>>

003. Go to Layer >> New Adjustment Layer >> Hue/Saturation
003.1 -

003.3 -


>>

004. Paste this layer. Blend Mode: Soft Light. Opacity: 100%.

+ (

)=

005. Go to Layer >> New Adjustment Layer >> Seletive Colours.
005.1-

005.2-

005.3-


>>

006. Go to Layer >> New Adjustment Layer >> Seletive Colours.
006.1-

006.2-


>>

007. Merge all layers. Add textures/brushes/text if you want to.
Other icons made with the same tecnique.


:: I would love to hear comments about this tutorial.
:: Feel free to ask me anything in case of not understand something.
:: Fell free to friend me.
:: I want to change my journal layout, but I am having some dificultsso If you have knowlegde in overrides and want to help me, please let me know.
:: Sorry my poor crop, but I'm tired.