tutorial 9:Cho in purple tone
Hello, guys, it's time for another tutoXDDD
This tuto is a little different, cause there are TWO different version for different program user: one is for PS user, and the another one without Selective Color layer is for other user, just like alohamora_icons request^__^
Before we get start our tuto, there are two things I have to tell you:
First, just like I've said, without SC Layer means I have to use many many MANY other different layers to achieve the similar color of the original one. So, I have to admit that it's complicatedXDD. If you think complicated is ok, then you are really welcome to learn it^__^
Second, I am really appreciate the people comment here or even friending me, so I've decided I will do some Friends Only tutos for my friends^__^.
Now, let's start our tuto^__^
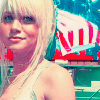
we will go from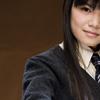
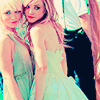
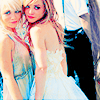
to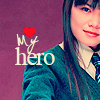
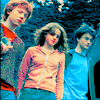
or
request by alohamora_icons, betaalwayswins, and reita_lover
made in PSCS
Rules and Notes:
1. If you like this tuto, please comment, cause your comment is my biggest power~~
2. If you like my works, you are really welcome to friend me^__^
3. request a tutorial? here, please(currently not accept new request, sorry!)
other similar icons:
A. with SC Layer
B. without SC Layer
A. with Selective Color Layer:11 steps
Results
Steps
1. pick one of your picture, and crop it into icon size. Here I choose a Cho's photoshoot of HP:OOTP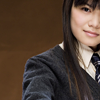
2. duplicate the base once, set it to Screen, with Opacity 20%
3. create a Hue/Saturation Layer:Master(0, 54, 0)
4. create a Selective Color Layer:
Reds(-31, 29, 29, 0)
Yellows(-100, 15, -100, 0)
Cyans(100, 0, -100, 0)
Blues(100, 0, 0, 0)
Whites(-100, -14, 51, 9)
Neutrals(40, -21, -7, 0)
5. create a Hue/Saturation Layer:
Master(0, 20, 0)
Yellows(0, -25, 0)
Cyans(-4, 17, 0)
6. create a Curves Layer:
RGB(two nodes:156, 175 and 74, 106)
Green(two nodes:181, 196 and 100, 97)
Blue(one node:140, 131)
PS. you can download the Curves Layer file here
7. create a new layer, fill it with #C7E2FE, and sete it to Color Burn
8. create a new layer, fill it with #98BFFE,and set it to Soft Light, with Opacity 25%
9. create a new layer, fill it with #FEC8E4,and set it to Soft Light, with Opacity 30%
10. create a new layer, fill it with #030E22,and set it to Exclusion
11. create a Selective Color Layer:Whites(90, 63, 21, 0)
Finish~ Or you can add some texts, brushes, textures etc.
Here I duplicate the base once, and Sharpen it once.
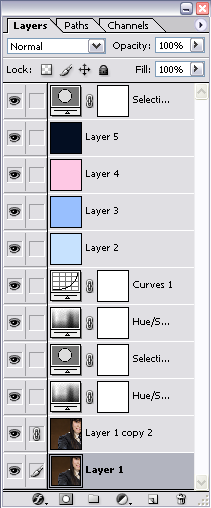
PS. you can see the all layers image here
B. without Selective Color Layer:17 steps
Results
Steps
1. pick one of your picture, and crop it into icon size. Here I choose a Cho's photoshoot of HP:OOTP
2. create a new layer, fill it with #EEA1FE, and set it to Soft Light, with Opacity 65%
3. create a new layer, fill it with #FFB2DC, and set it to Soft Light, with Opacity 50%
Use Eraser Tool in Soft Round, erase the color on Cho's face, hair, and collar.
4. create a new layer, fill it with #FEDBB8, and set it to Multiply
duplicate it once, set the Opacity to 40%, then use the Eraser Tool erase the color on Cho's clothes
5. create a new layer, fill it with #4DFFF0, and set it to Soft Light, with Opacity 70%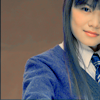
6. create a Hue/Saturation Layer:
Master(0, 72, 0)
Reds(2, -34, -5)
Yellows(0, -100, 0)
Greens(0, -100, 0)
Cyans(7, -69, 0)
Magentas(0, 0, 100)
7. create a Curves Layer:
RGB(two nodes:147, 147 and 97, 87)
Red(two nodes:162, 158 and 114, 83)
Green(two nodes:156, 146 and 99, 76)
Blue(one node:103, 135)
TIP:What is a node? And how to change it?
8. create a Hue/Saturation Layer:
Reds(0, 8, 0)
Yellows (0, 100, 0)
Cyans (9, 70, 0)
Blues(-25, 0, 0)
9. duplicate the Multiply layer(in step 4)once again, drag it to top, and set it to Color Burn, with Opacity 30%
10. create a new layer, fill it with #020F1A, and change it into Exclusion, with Opacity 45%
11. create a Levels Layer:
RGB(0, 0.74, 230)
Red(0, 0.80, 255)
Green (0, 1.02, 255)
Blue(0, 0.80, 255)
Set it to Soft Light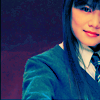
12. create a Curves Layer:
RGB(one node:159, 156)
Blue(two nodes:178, 135 and 93, 114)
13. create a Color Balance Layer:(8, 31, -14)
14. create a Color Balance Layer:(9, -18, -32)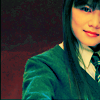
15. create a new layer, fill it with #FDE9AC, and set it into Color Burn, with Opacity 30%
Use the Eraser Tool erase the color on Cho's face
16. create a new layer, fill it with #FE9AF1, and set it into Soft Light
duplicate this color layer TWICE:
Set the first one to Mutiply, with Opacity 10%. Eraze the color EXCEPT Cho's face
Set the second one to Soft Light, with Opacity 20%. Eraze the color on Cho's clothes
17. create a new layer, use the Soft Round brush with the color #FEB88D, color Cho's face.
Set it to Color Burn, with Opacity 10%
Finish(FINALLYXDD)!!! You can finish it here, or add some texts, brushes, textures etc.
Here I duplicate the base once, and Sharpen it once.
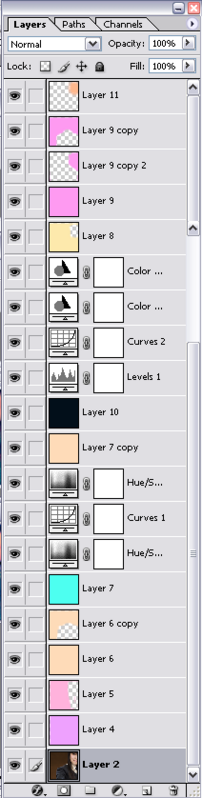
PS. you can see the all layers image here
PS. You can see other similar icons(similar with SC Layer)here
This tuto is a little different, cause there are TWO different version for different program user: one is for PS user, and the another one without Selective Color layer is for other user, just like alohamora_icons request^__^
Before we get start our tuto, there are two things I have to tell you:
First, just like I've said, without SC Layer means I have to use many many MANY other different layers to achieve the similar color of the original one. So, I have to admit that it's complicatedXDD. If you think complicated is ok, then you are really welcome to learn it^__^
Second, I am really appreciate the people comment here or even friending me, so I've decided I will do some Friends Only tutos for my friends^__^.
Now, let's start our tuto^__^
we will go from
to
or
request by alohamora_icons, betaalwayswins, and reita_lover
made in PSCS
Rules and Notes:
1. If you like this tuto, please comment, cause your comment is my biggest power~~
2. If you like my works, you are really welcome to friend me^__^
3. request a tutorial? here, please(currently not accept new request, sorry!)
other similar icons:
A. with SC Layer
B. without SC Layer
A. with Selective Color Layer:11 steps
Results
Steps
1. pick one of your picture, and crop it into icon size. Here I choose a Cho's photoshoot of HP:OOTP
2. duplicate the base once, set it to Screen, with Opacity 20%
3. create a Hue/Saturation Layer:Master(0, 54, 0)
4. create a Selective Color Layer:
Reds(-31, 29, 29, 0)
Yellows(-100, 15, -100, 0)
Cyans(100, 0, -100, 0)
Blues(100, 0, 0, 0)
Whites(-100, -14, 51, 9)
Neutrals(40, -21, -7, 0)
5. create a Hue/Saturation Layer:
Master(0, 20, 0)
Yellows(0, -25, 0)
Cyans(-4, 17, 0)
6. create a Curves Layer:
RGB(two nodes:156, 175 and 74, 106)
Green(two nodes:181, 196 and 100, 97)
Blue(one node:140, 131)
PS. you can download the Curves Layer file here
7. create a new layer, fill it with #C7E2FE, and sete it to Color Burn
8. create a new layer, fill it with #98BFFE,and set it to Soft Light, with Opacity 25%
9. create a new layer, fill it with #FEC8E4,and set it to Soft Light, with Opacity 30%
10. create a new layer, fill it with #030E22,and set it to Exclusion
11. create a Selective Color Layer:Whites(90, 63, 21, 0)
Finish~ Or you can add some texts, brushes, textures etc.
Here I duplicate the base once, and Sharpen it once.
PS. you can see the all layers image here
B. without Selective Color Layer:17 steps
Results
Steps
1. pick one of your picture, and crop it into icon size. Here I choose a Cho's photoshoot of HP:OOTP
2. create a new layer, fill it with #EEA1FE, and set it to Soft Light, with Opacity 65%
3. create a new layer, fill it with #FFB2DC, and set it to Soft Light, with Opacity 50%
Use Eraser Tool in Soft Round, erase the color on Cho's face, hair, and collar.
4. create a new layer, fill it with #FEDBB8, and set it to Multiply
duplicate it once, set the Opacity to 40%, then use the Eraser Tool erase the color on Cho's clothes
5. create a new layer, fill it with #4DFFF0, and set it to Soft Light, with Opacity 70%
6. create a Hue/Saturation Layer:
Master(0, 72, 0)
Reds(2, -34, -5)
Yellows(0, -100, 0)
Greens(0, -100, 0)
Cyans(7, -69, 0)
Magentas(0, 0, 100)
7. create a Curves Layer:
RGB(two nodes:147, 147 and 97, 87)
Red(two nodes:162, 158 and 114, 83)
Green(two nodes:156, 146 and 99, 76)
Blue(one node:103, 135)
TIP:What is a node? And how to change it?
8. create a Hue/Saturation Layer:
Reds(0, 8, 0)
Yellows (0, 100, 0)
Cyans (9, 70, 0)
Blues(-25, 0, 0)
9. duplicate the Multiply layer(in step 4)once again, drag it to top, and set it to Color Burn, with Opacity 30%
10. create a new layer, fill it with #020F1A, and change it into Exclusion, with Opacity 45%
11. create a Levels Layer:
RGB(0, 0.74, 230)
Red(0, 0.80, 255)
Green (0, 1.02, 255)
Blue(0, 0.80, 255)
Set it to Soft Light
12. create a Curves Layer:
RGB(one node:159, 156)
Blue(two nodes:178, 135 and 93, 114)
13. create a Color Balance Layer:(8, 31, -14)
14. create a Color Balance Layer:(9, -18, -32)
15. create a new layer, fill it with #FDE9AC, and set it into Color Burn, with Opacity 30%
Use the Eraser Tool erase the color on Cho's face
16. create a new layer, fill it with #FE9AF1, and set it into Soft Light
duplicate this color layer TWICE:
Set the first one to Mutiply, with Opacity 10%. Eraze the color EXCEPT Cho's face
Set the second one to Soft Light, with Opacity 20%. Eraze the color on Cho's clothes
17. create a new layer, use the Soft Round brush with the color #FEB88D, color Cho's face.
Set it to Color Burn, with Opacity 10%
Finish(FINALLYXDD)!!! You can finish it here, or add some texts, brushes, textures etc.
Here I duplicate the base once, and Sharpen it once.
PS. you can see the all layers image here
PS. You can see other similar icons(similar with SC Layer)here