Tutorial #2
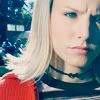
Go from:

to
using Adobe Photoshop CS2.
1) crop your base to LJ Standards: 100x100 pixels.
2) duplicate base and set to screen.

3) new layer and fill with #071426. set to exclusion

=
4) new layer and fill with #794998. set to soft light

=
5) new layer and fill with #59eff1. set to color burn. opacity remains 100%, but fill to 85%.
**NOTE** depending on the picture, sometimes the FILL @ 100% might be too blue-ish. adjust to maybe 85% and it will make a HUGE diffence. other times, 100% is okay.

=
6) new layer and fill with #f8e8d6, set to overlay, opacity and fill to 50%

=
7) new layer and fill with the same colour (#f8e8d6), set to color burn, opacity and fill to 75%.
=
voila!
if you want, you can flatten image, duplicate the base and set it to soft light. set opacity and fill to 50%.

remember, feel free to adjust opacity and fills and the variations of colours! =)
other icons made with this colouring and/or adjustments..


to
using Adobe Photoshop CS2.
1) crop your base to LJ Standards: 100x100 pixels.
2) duplicate base and set to screen.
3) new layer and fill with #071426. set to exclusion
=
4) new layer and fill with #794998. set to soft light
=
5) new layer and fill with #59eff1. set to color burn. opacity remains 100%, but fill to 85%.
**NOTE** depending on the picture, sometimes the FILL @ 100% might be too blue-ish. adjust to maybe 85% and it will make a HUGE diffence. other times, 100% is okay.
=
6) new layer and fill with #f8e8d6, set to overlay, opacity and fill to 50%
=
7) new layer and fill with the same colour (#f8e8d6), set to color burn, opacity and fill to 75%.
=
voila!
if you want, you can flatten image, duplicate the base and set it to soft light. set opacity and fill to 50%.
remember, feel free to adjust opacity and fills and the variations of colours! =)
other icons made with this colouring and/or adjustments..