Tutorial # 05 - Snow Drop (PSP7+)
I actually wrote this almost a month ago, but I didn't post it because I used this method on an icon I had submitted to an icontest. But since winners have been announced (2 weeks ago I might add), I can now post this tutorial!
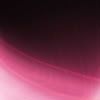
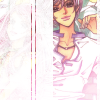
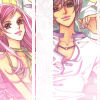
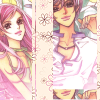
Before
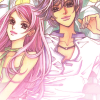
After
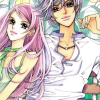
STEP 01: Find your image and crop it.
STEP 02: Second thing you'll do is add this gardient made by m1ch1ru. Set it to Lighten @ 60%.
~~>
STEP 03: Duplicate the base, drag it to the top and set it to Multiply @ 50%.
~~>
STEP 04: Add this light texture by colorfilter next. Screen @ 100%. For this step I went to Image > Mirror.
~~>
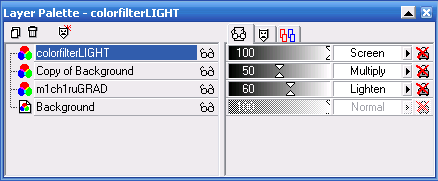
This is what your layers should look like right now:
After those steps I flattened my layers to make it easier for me to do this tutorial, but you don't have to.
STEP 05: Paste this mask brush by unmasked_icons as a new layer. After that, go to Colors > Negative Image, and then set it to Screen @ 100%.
~~>
STEP 06: Duplicate the base, and drag it to the top. Now, obviously this part will change for each icon made using this tutorial, but for mine I deleted the guy out of the duplicate, leaving the girl. Place it how you like over the mask. Note: I did mirror the duplicate.
~~>
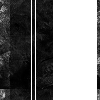
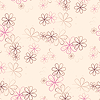
STEP 07: Next you use this pattern made by 77words. Erase the parts that cover the actual image, leaving the rest covering the white spots.
~~>
STEP 08 Copy some part of the icon and bring it to the bottom of the icon. I used the boy's mouth. The lower the opacity of that copied layer (mouth) however much you want. I set mine at 60%.
~~>
~~>
STEP 09: Flatten all your layers if you haven't already done so, and mirror the entire icon. I'm doing this just because it looks better this way with the text.
~~>
STEP 10: Add text! I used a text brush by tsukicon.
Please please, don't follow this exactly. Definitely experiment, and show me your creations!
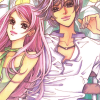
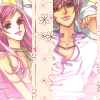
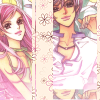
Before
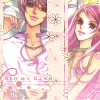
After
STEP 01: Find your image and crop it.
STEP 02: Second thing you'll do is add this gardient made by m1ch1ru. Set it to Lighten @ 60%.
~~>
STEP 03: Duplicate the base, drag it to the top and set it to Multiply @ 50%.
~~>
STEP 04: Add this light texture by colorfilter next. Screen @ 100%. For this step I went to Image > Mirror.
~~>
This is what your layers should look like right now:
After those steps I flattened my layers to make it easier for me to do this tutorial, but you don't have to.
STEP 05: Paste this mask brush by unmasked_icons as a new layer. After that, go to Colors > Negative Image, and then set it to Screen @ 100%.
~~>
STEP 06: Duplicate the base, and drag it to the top. Now, obviously this part will change for each icon made using this tutorial, but for mine I deleted the guy out of the duplicate, leaving the girl. Place it how you like over the mask. Note: I did mirror the duplicate.
~~>
STEP 07: Next you use this pattern made by 77words. Erase the parts that cover the actual image, leaving the rest covering the white spots.
~~>
STEP 08 Copy some part of the icon and bring it to the bottom of the icon. I used the boy's mouth. The lower the opacity of that copied layer (mouth) however much you want. I set mine at 60%.
~~>
~~>
STEP 09: Flatten all your layers if you haven't already done so, and mirror the entire icon. I'm doing this just because it looks better this way with the text.
~~>
STEP 10: Add text! I used a text brush by tsukicon.
Please please, don't follow this exactly. Definitely experiment, and show me your creations!