Tutorial 5 - Exclusion Textures
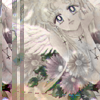
We are going from 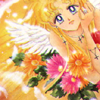
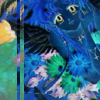
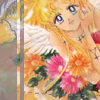
to
Needed: Familiarity with Photoshop CS
This was actually for a senshi_awards and the theme was Religion :)
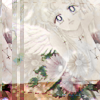
First: Crop your image to 100x100 pixels.
Second: Adjust your coloring to your liking.
What I do: Image>Adjustments>Auto Color then Image>Adjustments>Auto Contrast
Third I took
all these textures from colorfilter Paste it over the base and Set Opacity to Exclusion
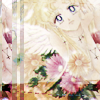
Fourth: Make sure your Exclusion Layer is selected go to Layer>Duplicate Layer... Hit Okay
There's that border and coloring.
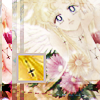
Fifth: This may be a bit tricky Click your Selection Tool Fixed Size Width 10 Height 100. Select a part of the icon you want to be the focus. I chose the arm with cross dangling down. Copy (Ctrl+C) then Paste (Ctrl+V) as a New Layer over the three previous layers. Then drag it to the borders having it 2-3 pixels away from the edge.
I don't remember the coloring for this section :( I know I played with the settings in Image>Adjustments>Hue/Saturation. Fiddle around till you get the coloring you want. I went for darker because the base coloring was a bit bright.
Sixth: Add
over the four layers. Set it to Saturation
Seventh: Duplicate the Saturated layer and Set it to Overlay.
Eighth: Layer>New...>Layer Hit Okay. Ctrl+Alt+Shift+E to stamp that whole icon into that new layer (Be sure the new layer is selected!) Set to Soft Light
Ninth: Ctrl+Click your original 10x100 layer in the Layers Palette. Layer>Duplicate Layer, Drag it over your Soft Light Layer, Set to Hard Light
Tenth: Duplicate your new Hardlight Layer Set it to Soft Light. Go to Filter>Blur>Gaussian Blur> Radius 4.5

It gives that 10x100 a glowy feel :)
Set Eleven is a whole new image!
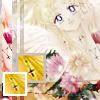
Eleventh: I went back to the original image and Selected a part of the cross on neck so that it can be a focus. I cropped and resized it to 28x28. Set the background color to D0BFB2. This is the color setting. How you know you're using the background color.Sharpen it Once go to Edit>Fade Sharpen 60%. Next go to Image>Canvas Size Set it to width 30 pixels and height 30 pixels. This gives the little square a 2 pixel border like so
Twelfth: Paste that New Image onto the icon you were working on Drag it to the corner of your icon like so:
Repeat Step 11 with the same image EXCEPT! Make the Image size 20x20pixels. When you get to the canvas size Set it to 24x24pixels, Background color FFFFFF.
Paste that Over your 30x30pixels and drag it so that it's overlapping the 30x30 a bit.

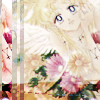
Thirteenth: Layer>Flatten Image File>Save As..> Name it what you want and save as eight .jpg or .png. ^.^ I usually save my icons as .png for better color quality :D
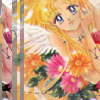
vs.
I see a difference but I don't know about others. Icon is up for grabs with proper credit. By the way, I had 11 layers in my layers palette just in case you wanted to know :)
Comments make me happy.
If you don't understand something please don't hesitate to ask.
You might be asking a question someone else might have.
I would love to see what you have done.
Please don't follow exactly.
This was more of a guideline on what you can do with colorfilter's textures :)
Be sure to play with it ^.^
to
Needed: Familiarity with Photoshop CS
This was actually for a senshi_awards and the theme was Religion :)
First: Crop your image to 100x100 pixels.
Second: Adjust your coloring to your liking.
What I do: Image>Adjustments>Auto Color then Image>Adjustments>Auto Contrast
Third I took
all these textures from colorfilter Paste it over the base and Set Opacity to Exclusion
Fourth: Make sure your Exclusion Layer is selected go to Layer>Duplicate Layer... Hit Okay
There's that border and coloring.
Fifth: This may be a bit tricky Click your Selection Tool Fixed Size Width 10 Height 100. Select a part of the icon you want to be the focus. I chose the arm with cross dangling down. Copy (Ctrl+C) then Paste (Ctrl+V) as a New Layer over the three previous layers. Then drag it to the borders having it 2-3 pixels away from the edge.
I don't remember the coloring for this section :( I know I played with the settings in Image>Adjustments>Hue/Saturation. Fiddle around till you get the coloring you want. I went for darker because the base coloring was a bit bright.
Sixth: Add
over the four layers. Set it to Saturation
Seventh: Duplicate the Saturated layer and Set it to Overlay.
Eighth: Layer>New...>Layer Hit Okay. Ctrl+Alt+Shift+E to stamp that whole icon into that new layer (Be sure the new layer is selected!) Set to Soft Light
Ninth: Ctrl+Click your original 10x100 layer in the Layers Palette. Layer>Duplicate Layer, Drag it over your Soft Light Layer, Set to Hard Light
Tenth: Duplicate your new Hardlight Layer Set it to Soft Light. Go to Filter>Blur>Gaussian Blur> Radius 4.5
It gives that 10x100 a glowy feel :)
Set Eleven is a whole new image!
Eleventh: I went back to the original image and Selected a part of the cross on neck so that it can be a focus. I cropped and resized it to 28x28. Set the background color to D0BFB2. This is the color setting. How you know you're using the background color.Sharpen it Once go to Edit>Fade Sharpen 60%. Next go to Image>Canvas Size Set it to width 30 pixels and height 30 pixels. This gives the little square a 2 pixel border like so
Twelfth: Paste that New Image onto the icon you were working on Drag it to the corner of your icon like so:
Repeat Step 11 with the same image EXCEPT! Make the Image size 20x20pixels. When you get to the canvas size Set it to 24x24pixels, Background color FFFFFF.
Paste that Over your 30x30pixels and drag it so that it's overlapping the 30x30 a bit.
Thirteenth: Layer>Flatten Image File>Save As..> Name it what you want and save as eight .jpg or .png. ^.^ I usually save my icons as .png for better color quality :D
vs.
I see a difference but I don't know about others. Icon is up for grabs with proper credit. By the way, I had 11 layers in my layers palette just in case you wanted to know :)
Comments make me happy.
If you don't understand something please don't hesitate to ask.
You might be asking a question someone else might have.
I would love to see what you have done.
Please don't follow exactly.
This was more of a guideline on what you can do with colorfilter's textures :)
Be sure to play with it ^.^