Tutorial 4 Light Image Coloring
This tutorial is using Photoshop 7. I believe it's transferable :) This tutorial I found works best for the effect with light backgrounded caps. Using it on dark caps gets this effect, just to warn you now.
We'll be going from this to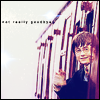
Note: I didn't save the .psd so the tutorial image may not be the exact crop, but the coloring is more important. ^.^
So I started out with this image. (cap by dj43)

Cropped
If you want to know how I crop click here It's the first part ^.^

Auto Color
Image>Adjustments>Auto Color

Auto Levels
Image>Adjustments>Auto Levels

(it's slightly lighter if you can't tell)
Image Resizing
Image>Image Size...

You get:

Sharpening
Filter>Sharpen>Sharpen

Duplicate your background layer.
Set the Duplicated Layer on Blend Mode: Screen
![]()
Duplicate your background layer again.
Drag that on top of the screen layer.
Set the second Layer on Blend Mode: Softlight

Merge Image
Layers>Merge Visible
Duplicate the merged image.
Filter>Blur>Gaussian Blur
Set: 3 pixels
Duplicate Background Image Again
Drag it on top of your Gaussian Blur Image
Blend Mode: Hard Light

Now there's our base.
Coloring
Paste:

Over the three layers
Blend Mode: Exclusion

Paste:

Over the exclusion layer
Blend Mode: Soft Light

Paste:

Over the Soft Light Layer
Blend Mode: Color
Opacity: 40%

Paste:

Over the Color Layer
Blend Mode: Multiply
Opacity: 50%

Paste:
Over the Multiply Layer
Blend Mode: Exclusion
Opacity: 50%

Back to your Base Layer and Duplicate it.
Drag it on top of all the other layers
Blend Mode: Lighten
Opacity: 80%

I got
from myrasis
Paste it on top
Blend Mode: Screen

Merge your Layers
Layers>Merge Visible
Border
New Layer (Ctrl+Shift+N)
Bucket Tool
Fill: Foreground
Color: 000000
Eraser Tool
You'll have to create a 98x98 pixel brush or just use this one:
To make it a new brush Select All (Ctrl+A) Edit>Define Brush
Eraser the middle of the black layer.
You should have this:

Merge Visible
Layer>Merge Visible
Text as always, optional.
Font: Arial
Type: Bold
Size: 3 pt
Leading: (Auto)
Tracking: 400%

Text used: not really goodbye
Flatten Image
Layer>Flatten Image

And you're done! ^.^
File>Save As
Save your file however you like, I prefer .png because it keeps the coloring.
Icon 1:
Icon 2:
I think they're pretty close :)
Icon is up for grabs with proper credit. I'd love to see what you all do ^.^
We'll be going from this to
Note: I didn't save the .psd so the tutorial image may not be the exact crop, but the coloring is more important. ^.^
So I started out with this image. (cap by dj43)
Cropped
If you want to know how I crop click here It's the first part ^.^
Auto Color
Image>Adjustments>Auto Color
Auto Levels
Image>Adjustments>Auto Levels
(it's slightly lighter if you can't tell)
Image Resizing
Image>Image Size...
You get:
Sharpening
Filter>Sharpen>Sharpen
Duplicate your background layer.
Set the Duplicated Layer on Blend Mode: Screen
Duplicate your background layer again.
Drag that on top of the screen layer.
Set the second Layer on Blend Mode: Softlight
Merge Image
Layers>Merge Visible
Duplicate the merged image.
Filter>Blur>Gaussian Blur
Set: 3 pixels
Duplicate Background Image Again
Drag it on top of your Gaussian Blur Image
Blend Mode: Hard Light
Now there's our base.
Coloring
Paste:
Over the three layers
Blend Mode: Exclusion
Paste:
Over the exclusion layer
Blend Mode: Soft Light
Paste:
Over the Soft Light Layer
Blend Mode: Color
Opacity: 40%
Paste:
Over the Color Layer
Blend Mode: Multiply
Opacity: 50%
Paste:
Over the Multiply Layer
Blend Mode: Exclusion
Opacity: 50%
Back to your Base Layer and Duplicate it.
Drag it on top of all the other layers
Blend Mode: Lighten
Opacity: 80%
I got
from myrasis
Paste it on top
Blend Mode: Screen
Merge your Layers
Layers>Merge Visible
Border
New Layer (Ctrl+Shift+N)
Bucket Tool
Fill: Foreground
Color: 000000
Eraser Tool
You'll have to create a 98x98 pixel brush or just use this one:
To make it a new brush Select All (Ctrl+A) Edit>Define Brush
Eraser the middle of the black layer.
You should have this:
Merge Visible
Layer>Merge Visible
Text as always, optional.
Font: Arial
Type: Bold
Size: 3 pt
Leading: (Auto)
Tracking: 400%
Text used: not really goodbye
Flatten Image
Layer>Flatten Image
And you're done! ^.^
File>Save As
Save your file however you like, I prefer .png because it keeps the coloring.
Icon 1:
Icon 2:
I think they're pretty close :)
Icon is up for grabs with proper credit. I'd love to see what you all do ^.^