Icon Tutorial Seven
Someone wanted me to know how I made this icon, but since it's been so long I decided to make a new one using the same steps. It's very simple ^_^
Go from

to
using Photoshop CS v.2
Start: Find an image with a good amount of background behind your subject. Crop and resize to a 100x100 base and touch up like you normally do.
Second: Duplicate your base layer and set it to Soft Light, this give your subject some more contrast. (This can be skipped if you feel there's enough already) Merge your layers.

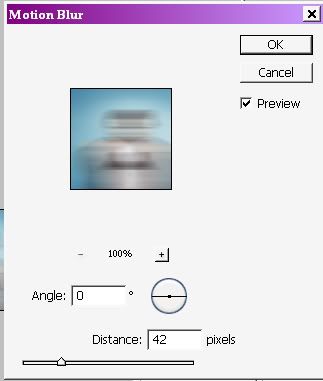
Third: Duplicate your base again. Go to Filter>Blur>Motion Blur Angle 0 degrees 42 pixels
Move the layer over to the right of your subject.

Fourth: Repeat Step 2 and 3, but instead of moving to the right, move to the left just a bit.

Fifth: Duplicate your base layer and delete the background moving it to the top.
Like so:

Paste it on top of the blurred layers.

Sixth: Using a soft round brush with your eraser tool, delete the parts on both blurred layers that you don't want to see.
Like so:

Seventh: Add text, I used cursif and place it to the side of the icon rotating it at a 90 degree clockwise angle in FFFFFF

Finish: If you want the 1 pixel border.
New Layer
Fill it with black.
Take a 98 pixel square brush.
Erase the middle so that you get this:

No Border:
Merge all your layers and save!
You're done! ^_^
Please do not follow exactly, experiment with texts and textures :)
I love comments and to see what you have done.
Please do not hesitate to ask questions!
Go from
to
using Photoshop CS v.2
Start: Find an image with a good amount of background behind your subject. Crop and resize to a 100x100 base and touch up like you normally do.
Second: Duplicate your base layer and set it to Soft Light, this give your subject some more contrast. (This can be skipped if you feel there's enough already) Merge your layers.
Third: Duplicate your base again. Go to Filter>Blur>Motion Blur Angle 0 degrees 42 pixels
Move the layer over to the right of your subject.
Fourth: Repeat Step 2 and 3, but instead of moving to the right, move to the left just a bit.
Fifth: Duplicate your base layer and delete the background moving it to the top.
Like so:
Paste it on top of the blurred layers.
Sixth: Using a soft round brush with your eraser tool, delete the parts on both blurred layers that you don't want to see.
Like so:
Seventh: Add text, I used cursif and place it to the side of the icon rotating it at a 90 degree clockwise angle in FFFFFF
Finish: If you want the 1 pixel border.
New Layer
Fill it with black.
Take a 98 pixel square brush.
Erase the middle so that you get this:
No Border:
Merge all your layers and save!
You're done! ^_^
Please do not follow exactly, experiment with texts and textures :)
I love comments and to see what you have done.
Please do not hesitate to ask questions!