#101 - Ask the Maker post
A few people asked me about a blending/background/composition tutorial (yayyyy!) so here I am with the guide/tutorial :) I decided to make it in 3 different guides, for not mixing eveything in one, to make everything clear.

So, firstly, there are many tools for cutting the image like magic wand, lasso tool, but I used to learn on something different. It is the better way I can undo the selection with no integration in history, just by tools. Actually I don't know how is it called but I think it's the best way to select the area on icon.
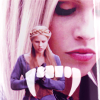
As an example will be this Elena icon:

So, let's start with cropping, the original picture and 500x500 crop(to make better quality of view, I usually resize the picture to 500x500px to make better edges of icon):

->
And now, the magic!

Click the Quick Mask Mode and the Eraser tool and start 'painting' the thing you want in front of an icon, here: Elena. Start with bigger size of eraser tool and the change the size into smaller to work with details (e.q. hair or clothes). I often make 2-3 pixels out of body, to make shadows, but in this case, I just make only her body, with no added pixels of the previous background. The result should look like this:

If you made somewhere a mistake - you went too far with tool, you can easily change it by pressing this:

- it changes the palettes shown on left and down. Be sure that the colors are black and white! Otherwise there can be shadows of colors.
In the next step, you're clicking the Quick Mask Mode again. Then, click with right mouse button and do Select Inverse, again click RMB and click Laver via Copy. And that's almost everything!
Next, you just resize the icon, do coloring you want and put the solid color between the original full layer and the copied one, and now, between the copied layer and the solid color you put Black and White Gradient and then make it Soft Light:

Now icon looks a bit boring so I just added horisontal lines - you rotate the icon 180 degrees, copy the whole icon, rotate it again by 180 degrees and paste it. Then you only move it to the left and right egdes and, VOILA! :)
For this type of background:

the following steps are the same as I've said before, I just also add some grunge textures, to make icon more interesting, the textures I love to use are (I don't know the makers, forgive me!) :


I set them to screen, and the icon is done!
Also the type "Body on face" icon like these:


I personally love to make!
The thing is, you have to have smaller body like for negative space icon, and (e.g.) close crop icon. Then you just merge them into one picture :) Simple! If you have any further questions, comment to this post :)
I was honoured that someone asked me about composition tutorial, I don't have an experience with guides but I hope you'll understand everything :)
Composition, well, this is the theme that everyone would love to talk for hours, there's as many possibilities for make an icon as many makers/pictures/moods on LJ. I'll try to explain by the examples given by calrissian18 :)


At first I must say, I need a theme given to make an icon, I suck sat making icons just for me. I use(d) to make icons for challenge or round or lims or anything. I need a picture/theme/something I can work with. So when I have this, I try to make an icon with a history in it, so e.g. complex icon contain few characters, storyline, etc.
When I have simple icon, I do my very best to make it still interesting (so that's why I make many borderlinesand the edges of sides of an icon xd), sometimes I add text, some textures.
Obviously, you must use your creativity. Blocking, adding textures, coloring are the most important things you have to try to use. Every icon has their own need, everytime you make an icon you have different vision of it's final look. You just need to practise, sometimes it's good to ask someone to tell you what the person would change in icon.
If I didn't explain everything well, you wanted to know something more, just comment :) This is one of my first guides and I don't know if I told everything well :):)
So, firstly, there are many tools for cutting the image like magic wand, lasso tool, but I used to learn on something different. It is the better way I can undo the selection with no integration in history, just by tools. Actually I don't know how is it called but I think it's the best way to select the area on icon.
As an example will be this Elena icon:
So, let's start with cropping, the original picture and 500x500 crop(to make better quality of view, I usually resize the picture to 500x500px to make better edges of icon):
->
And now, the magic!
Click the Quick Mask Mode and the Eraser tool and start 'painting' the thing you want in front of an icon, here: Elena. Start with bigger size of eraser tool and the change the size into smaller to work with details (e.q. hair or clothes). I often make 2-3 pixels out of body, to make shadows, but in this case, I just make only her body, with no added pixels of the previous background. The result should look like this:
If you made somewhere a mistake - you went too far with tool, you can easily change it by pressing this:
- it changes the palettes shown on left and down. Be sure that the colors are black and white! Otherwise there can be shadows of colors.
In the next step, you're clicking the Quick Mask Mode again. Then, click with right mouse button and do Select Inverse, again click RMB and click Laver via Copy. And that's almost everything!
Next, you just resize the icon, do coloring you want and put the solid color between the original full layer and the copied one, and now, between the copied layer and the solid color you put Black and White Gradient and then make it Soft Light:
Now icon looks a bit boring so I just added horisontal lines - you rotate the icon 180 degrees, copy the whole icon, rotate it again by 180 degrees and paste it. Then you only move it to the left and right egdes and, VOILA! :)
For this type of background:
the following steps are the same as I've said before, I just also add some grunge textures, to make icon more interesting, the textures I love to use are (I don't know the makers, forgive me!) :
I set them to screen, and the icon is done!
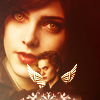
Also the type "Body on face" icon like these:
I personally love to make!
The thing is, you have to have smaller body like for negative space icon, and (e.g.) close crop icon. Then you just merge them into one picture :) Simple! If you have any further questions, comment to this post :)
I was honoured that someone asked me about composition tutorial, I don't have an experience with guides but I hope you'll understand everything :)
Composition, well, this is the theme that everyone would love to talk for hours, there's as many possibilities for make an icon as many makers/pictures/moods on LJ. I'll try to explain by the examples given by calrissian18 :)
At first I must say, I need a theme given to make an icon, I suck sat making icons just for me. I use(d) to make icons for challenge or round or lims or anything. I need a picture/theme/something I can work with. So when I have this, I try to make an icon with a history in it, so e.g. complex icon contain few characters, storyline, etc.
When I have simple icon, I do my very best to make it still interesting (so that's why I make many borderlinesand the edges of sides of an icon xd), sometimes I add text, some textures.
Obviously, you must use your creativity. Blocking, adding textures, coloring are the most important things you have to try to use. Every icon has their own need, everytime you make an icon you have different vision of it's final look. You just need to practise, sometimes it's good to ask someone to tell you what the person would change in icon.
If I didn't explain everything well, you wanted to know something more, just comment :) This is one of my first guides and I don't know if I told everything well :):)