Steampunk Pirate Dress, the underskirt

I cut and ironed ten yards of fabric - 5 of the embroidered taffeta, and five of silk. Then I sewed my panels of silk together for the lining, serged all my edges, and attached the lining to the taffeta. This took approximately three hours in all. Then I started the complicated stuff, sewing my skirt together and attaching the placket, to which I added buttons and button holes.
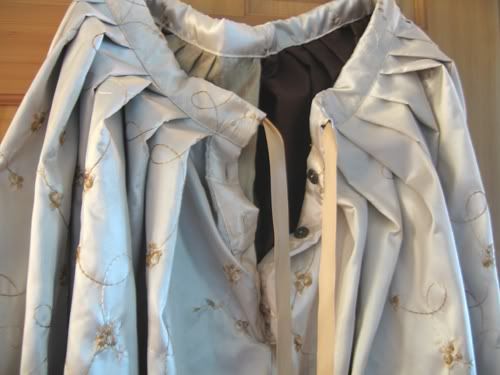
What's a placket, you ask? Well, that's the thing you see in the above photo with buttons and button holes. A placket serves a couple of purposes in a skirt. One, it makes it easier to pull a skirt on over your head, but still have a waistband that fits your waist. Since this is a drawstring skirt, that wasn't so much an issue. But I used one anyway, as that allowed me to use a slightly smaller waistband (about 36") and still make this skirt wearable for someone with a larger bust, hips and waist. Maybe not all the buttons in the back will button, but that doesn't matter, since it will all be covered by an overskirt anyway. My goal here was the make the skirt wearable for as many people as possible, since I'm planning on selling the ensemble.
A slight aside here - you can see the skirt lining in the photo above is two colors. I used alternating panels of the silk I'm using for the rest of the gown. Dark brown and gold. Silk on the inside is comfortable, lightweight, and since I was going to have a couple yards of each left over, it seemed a waste not to use them. Something you can't see in the photo is the two loops of ribbon I sewing to the inside of the skirt with the waistband - those loops are on a hangar, which is hanging from the top of a door in that photo. That means this skirt can be stored with either a traditional skirt hanger, or a regular hanger via the hoops.

The buttons are metal, by the way. The other purpose for a placket is strength. It adds strength to the back seam where it ends, right where the placket starts. That means as you pull the skirt on and off over time, that seam won't wear and start to unravel.
Attaching the placket and making the buttonholes took a lot longer than it should have, since I messed up one of the button holes and had to seam rip the entire thing and redo it. So, about five hours of work, but I'm only counting the two that actually worked out. :) Everyone keeping track? We're up to five hours.
With the placket done, I was able to do the pleats. You can see a picture of them in progress up top, as well as the serged top edge. Pleast done, I finally cut and attached the waistband. Skirt finished! That was another three hours or so, from the start of the pleats to stringing the drawstring. Start to finish: eight hours.

Here's a side view, with a blurry flash of Julius going by. He loves fabric. :)
Back view:

And sadly, my front view shot turned out a tad blurry. As you can see in these photos, the skirt is waaaaaay too long for me. I'll hem it to length for whoever buys the gown.

I made this over the course of a week. I was busy doing other things throughout, but one solid day of work, basically, went into this. I'm really pleased with the result. I think it's beautiful, and will only be more so once I finish the overskirt. :)