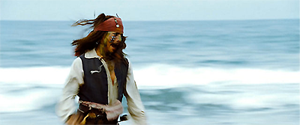
Tutorial: blue coloring Jack Sparrow
Yay another tutorial! Done in Photoshop. This uses textures so feel free to use the ones I provided or others you find. I got mine from gender. You can find where I got all of my other textures in the Resources.
This icon is from the batch of POTC Dead Man's Chest icons I made.
In this tutorial we'll be going from
this
to this

[x]First you start off with your screencap. Sharpen/Resize. You know the drill. I got this screencap from edele you can find the link to POTC screencaps and other screencaps in the Resources.
So you have something that looks like this--

[x]Make three copies of your base you made and set all of the copies to Screen.

[x]Next take this color: #c76854

and set it to Soft Light, Opacity at 50%.

[x]Next, take this texture made by pfefferminzchen

and set it as Mulitply.
[x]Make a copy of your base and bring it to the top. Set it as Soft Light.

[x]Then take this texture made by gender

and set it as Color Burn. It'll look like this;

[x]Lastly, Go to Layer : New Adjustment Layer : Selective Color... and type in the following settings:
Red
Cyan: -100
Magenta: +5
Yellow: +23
Yellows
Cyan: -100
Yellow: -66
Whites
Black: -57
Neutrals
Cyan: +14
Yellow: -18
Black: -27
And you're done!

Comment if you have any questions!
This icon is from the batch of POTC Dead Man's Chest icons I made.
In this tutorial we'll be going from
this

to this


[x]First you start off with your screencap. Sharpen/Resize. You know the drill. I got this screencap from edele you can find the link to POTC screencaps and other screencaps in the Resources.
So you have something that looks like this--

[x]Make three copies of your base you made and set all of the copies to Screen.

[x]Next take this color: #c76854

and set it to Soft Light, Opacity at 50%.

[x]Next, take this texture made by pfefferminzchen

and set it as Mulitply.
[x]Make a copy of your base and bring it to the top. Set it as Soft Light.

[x]Then take this texture made by gender

and set it as Color Burn. It'll look like this;

[x]Lastly, Go to Layer : New Adjustment Layer : Selective Color... and type in the following settings:
Red
Cyan: -100
Magenta: +5
Yellow: +23
Yellows
Cyan: -100
Yellow: -66
Whites
Black: -57
Neutrals
Cyan: +14
Yellow: -18
Black: -27
And you're done!

Comment if you have any questions!