Using channels to help select fine details
A number of people have been asking variations of this question in my graphics communities lately.
This is a trick I use that can help with making colorizations or when removing backgrounds in Photoshop.
It's good when there are little details (like wisps of hair) that you want to keep.
I use PS CS at the moment, but I've been using this trick since PS5,
so most versions should be able to do it. I don't know anything about PSP,
so I can't say if it will transfer.


Using channels to help select fine details

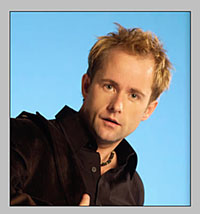
I started with the photo of Billy Boyd on blue.
I want to remove the background, but preserve as much fuzzy hair detail as possible.
(This background is fairly straightforward, but this should work on busy or patterned backgrounds, too)
Working at full size, I go to my channels palette
(there should be a tab next to your layers tab unless you have changed your layout)

you have an RGB merged channel, a Red channel, a Green and a Blue
Click to turn off two of the colors,
(the RGB should turn off when you do this; if it doesn't, click it off now)

try the channels one at a time. You are looking for the channel that gives you the most
contrast between what you want to keep and what you want to remove.
In this case, I picked the Blue channel.

right click on the channel and duplicate it

go up to the menu bar and select Image > Adjustments > Levels
that will open your level selector

Use the levels command to increase the contrast (use the three sliders under the graph
- moving the black triangle to the right makes the blacks blacker,
moving the white triangle left makes the whites whiter)
Your goal is to eliminate the grey and get a black and white image -
the edge is what matters here, not the interior because-

once you have good contrast, you can use your brush tool
(or other selection tools) and touch up any areas that need it

Drag the new channel down to Load Channel As Selection

click back to layers view, and the background will be selected
(If the part you are trying to keep is selected, invert the selection)

Press Delete, and there you are. If you still need to work on the details,
use a layer mask and a small brush - but this will give you a good start.
This is a trick I use that can help with making colorizations or when removing backgrounds in Photoshop.
It's good when there are little details (like wisps of hair) that you want to keep.
I use PS CS at the moment, but I've been using this trick since PS5,
so most versions should be able to do it. I don't know anything about PSP,
so I can't say if it will transfer.


Using channels to help select fine details

I started with the photo of Billy Boyd on blue.
I want to remove the background, but preserve as much fuzzy hair detail as possible.
(This background is fairly straightforward, but this should work on busy or patterned backgrounds, too)
Working at full size, I go to my channels palette
(there should be a tab next to your layers tab unless you have changed your layout)

you have an RGB merged channel, a Red channel, a Green and a Blue
Click to turn off two of the colors,
(the RGB should turn off when you do this; if it doesn't, click it off now)

try the channels one at a time. You are looking for the channel that gives you the most
contrast between what you want to keep and what you want to remove.
In this case, I picked the Blue channel.

right click on the channel and duplicate it

go up to the menu bar and select Image > Adjustments > Levels
that will open your level selector

Use the levels command to increase the contrast (use the three sliders under the graph
- moving the black triangle to the right makes the blacks blacker,
moving the white triangle left makes the whites whiter)
Your goal is to eliminate the grey and get a black and white image -
the edge is what matters here, not the interior because-

once you have good contrast, you can use your brush tool
(or other selection tools) and touch up any areas that need it

Drag the new channel down to Load Channel As Selection

click back to layers view, and the background will be selected
(If the part you are trying to keep is selected, invert the selection)

Press Delete, and there you are. If you still need to work on the details,
use a layer mask and a small brush - but this will give you a good start.