HTML Tables Tutorial
HTML TABLES TUTORIAL
This tutorial will teach you how to make those nifty tables that icon-makers like to showcase their icons on. I wrote it for people over at iconfiend100 originally, but thought that this might come in handy for others as well.
TIP: I like to write my coding in the 'Update Journal' window in my LJ. The 'preview entry' option lets me see if I'm putting in the codes correctly, and allows me to tweak the codes as I go to get different effects (i.e: borders, colors, fonts).
NOTE: At some points, I had to use text boxes to keep the coding from actually showing up as a table. Also, I had to add a space between the tags and ther brackets to keep them from messing up the entry. There are no spaces between the < > brackets and the tag name in real HTML. Example: < TABLE > should not have the spaces between the < T and the E >, I just had to do it for the tutorial to show up right.
BASICS
This is what a HTML table looks like:
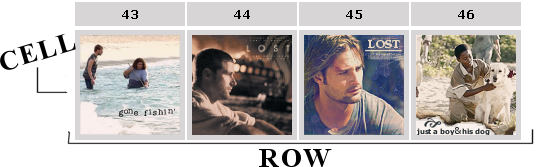
We're going to learn how to make something like it.
This is the most basic of coding for a table:
See the words in the < > brackets? Those are called TAGS. They are what allow all your coding to work. Here's a small glossary of the tags you just saw in the code above:
< TABLE > = table; this tag signals the beginning of a HTML table
< TR > = table row; this tag signals a new row on a table
< TD > = table data; this tag signals a new cell on a table
Now, those are what we call opening tags. They signal the beginning of something in the coding. Each opening tag must always be followed by an ending tag. Ending tags signal the end of something in a code, and they don't look much different than their opening tag. For example, the ending tag for < TABLE > is < /TABLE > - it's just the same opening tag, with a / (slash) directly after the opening bracket (the <).
So in the code < TD > < /TD >, the < TD > tag shows the beginning of a cell, and the < /TD > ends it.
Now that you know a little bit about tags, it's time to start working on a table!
MAKING A TABLE
TIP: After I finish with one set of tags, I like to hit the enter key, to put some space between my tags (i.e: after the < TABLE > tag, I hit enter, so I begin the new row (< TR >) on the next line). It really helps organize and keep me aware of where I'm at. It also helps when I'm looking for mistakes.
The first tag that needs to be typed in when creating a table is the opening table tag - < TABLE >. This signals the beginning of the table and its code.
The second tag needed is < TR >. This starts a new row in the table.
The third tag is < TD >, table data, a cell in the table. Following this tag will be whatever I want in the cell, such as text or an image src.
So far, your coding should look like this:
This tutorial will teach you how to make those nifty tables that icon-makers like to showcase their icons on. I wrote it for people over at iconfiend100 originally, but thought that this might come in handy for others as well.
TIP: I like to write my coding in the 'Update Journal' window in my LJ. The 'preview entry' option lets me see if I'm putting in the codes correctly, and allows me to tweak the codes as I go to get different effects (i.e: borders, colors, fonts).
NOTE: At some points, I had to use text boxes to keep the coding from actually showing up as a table. Also, I had to add a space between the tags and ther brackets to keep them from messing up the entry. There are no spaces between the < > brackets and the tag name in real HTML. Example: < TABLE > should not have the spaces between the < T and the E >, I just had to do it for the tutorial to show up right.
BASICS
This is what a HTML table looks like:
We're going to learn how to make something like it.
This is the most basic of coding for a table:
| Info, image src, etc. |
See the words in the < > brackets? Those are called TAGS. They are what allow all your coding to work. Here's a small glossary of the tags you just saw in the code above:
< TABLE > = table; this tag signals the beginning of a HTML table
< TR > = table row; this tag signals a new row on a table
< TD > = table data; this tag signals a new cell on a table
Now, those are what we call opening tags. They signal the beginning of something in the coding. Each opening tag must always be followed by an ending tag. Ending tags signal the end of something in a code, and they don't look much different than their opening tag. For example, the ending tag for < TABLE > is < /TABLE > - it's just the same opening tag, with a / (slash) directly after the opening bracket (the <).
So in the code < TD > < /TD >, the < TD > tag shows the beginning of a cell, and the < /TD > ends it.
Now that you know a little bit about tags, it's time to start working on a table!
MAKING A TABLE
TIP: After I finish with one set of tags, I like to hit the enter key, to put some space between my tags (i.e: after the < TABLE > tag, I hit enter, so I begin the new row (< TR >) on the next line). It really helps organize and keep me aware of where I'm at. It also helps when I'm looking for mistakes.
The first tag that needs to be typed in when creating a table is the opening table tag - < TABLE >. This signals the beginning of the table and its code.
The second tag needed is < TR >. This starts a new row in the table.
The third tag is < TD >, table data, a cell in the table. Following this tag will be whatever I want in the cell, such as text or an image src.
So far, your coding should look like this:
| Info, image src, etc. Now, we need to add the closing tags for the code, or it won't work.
So, your code should look like this:
And it will look like this when you submit your entry into LJ: Info, image src, etc. (I know, I know, it doesn't look all that great. In fact, it doesn't even look like a table. That's just because there is no border on it yet. We'll learn about that in a little bit.) Congratulations, you just made a table! ADDING CELLS AND ROWS With just one row and cell on the table, you can't really get much into it. Adding more cells and rows is easy! ADDING ANOTHER CELL Adding another cell simply requires putting another set of < TD > < /TD > (table data) tags into the code. Adding a second cell would make your code now look like this:
And thus your table will now look like this: Info, image src, etc. Info, image src, etc. (Once again, it only doesn't look like a table because there is no border to separate the cells and rows. But that's coming up.) To add more cells, just add more < TD > < /TD > tags into the row. ADDING ANOTHER ROW Adding another row is just as simple. Once you have the desired amount of cells in one row, and would like to add another row, just add another < TR >< /TR > (table row) set of tags to the code. They will go AFTER the ending tag of the first row, but BEFORE the ending tag of the table. Example:
And like before, add as many < TD > < /TD > tags in between the < TR > < /TR > tags as you want. So after adding a new row with more cells in it, your coding should look like this (I added five cells per row):
And your table will look like this: STUFF STUFF STUFF STUFF STUFF STUFF STUFF STUFF STUFF STUFF (Yes, still not looking too cool. Borders will help, and they're coming up right next!) And now you know how to make a basic table! Keep adding rows and cells until you're satisfied! RECAP: Here's a summary of what you do to make a table: # open the table # open the first row # open and close each cell in the row # close the first row # open the next row, then open and close its cells, then close the row... # repeat, repeat... # close the table TAKING IT TO THE NEXT LEVEL Not happy with a plain table like the one I showed you how to make? Ok, well, now I'm going to teach you how to spice it up. ADDING A BORDER, TABLE WIDTH, CELLSPACING AND CELLPADDING At the beginning of my tables, I usually have a code that looks like this:
Table: STUFF STUFF STUFF STUFF STUFF STUFF STUFF STUFF STUFF STUFF ADDING A HEADER Want people to know the name of whatever is in your table? There's a simple code you can add to the top of your code that will make that happen. After your < TABLE > < /TABLE > tag set, start a new row. The code you will be adding is: YOUR TITLE HERE | . Then end your row with a < /TR > command. The COLSPAN="number" will make your header cell the same length as the table. The ALIGNMENT="place" will place the text in the respective place along the top. I made an example using the border code from the last section, and the header one we learned just now: Code:
Table: B L E A C H STUFF STUFF STUFF STUFF STUFF STUFF STUFF STUFF STUFF STUFF ADDING COLOR Want a table that has cells colored? Well, all you need to do that is add one little thing to your code. That tag is: It will make the entire row have a background of the color of your choosing. Add it into your coding AFTER the < TR > command, but BEFORE the < TD > command. Example:
NOTE: You CAN type in color names (red, blue, green), but I like to use more complicated colors. So instead of a color name, you can put in the hex color codes instead. So normally my color tags look like this: Putting in a color name (I'll be using 'red') will make it look like this: INFO YADDA YADDA INFO BLAAH BLAH INFO YADDA YADDA INFO BLAAH BLAH TEXT EFFECTS Want to change the text in your table? Well, here's a small list of codes to do that. All these codes will go within your cell tags (< TD > < /TD >), around the text within the cell. Color TEXT Bold, Italicize, Underline TEXT TEXT TEXT Size TEXT And this is where I end my teachings. If you have ANY questions, don't hesistate to ask me. I know I must have made a slip up somewhere, as I've been writing this for more than two hours, so I'm tired, and I'm no HTML pro. And in case anyone wants this for offline study, leave me your email in a comment, or email me, and I'll send you the word document through email. :) Happy HTML writing, everyone! | |||||||||||||||||||||||||||||||||||||||||||