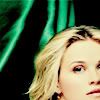
Tutorial
My first tutorial. Ohkk, we will be going from
Here
to here
So, ohkk….
1. Take your picture, crop it to 100 pixels by 100 pixels. Don’t sharpen it yet.
2. Hmm…as Reese has a rough skin, I had to run the blur tool all over her face. The strength was set on 20%.
3. Next I took the sharpen tool and ran it over her eyes and lips. I think that gives a nice definition to the face, specially when the icon is complete.
4. Duplicate the base and set on screen, 50%.
5. Take a new layer, fill it with a dark blue (any dark blue really) and set this layer on exclusion 100%.(I used #0F1B45)
6. Take another new layer and fill it with a light blue (lighter than sky blue,I used #CFFCFF) and set this on soft light, 100%.
7. Create a new layer.
8. Press ctrl+shft+alt+E. This merges all the visible layers into a new one that you created in the step above.
9. Set this layer on colorburn. 100%
10. Duplicate the layer and set this on colorburn 50%.
11. Duplicate this new layer and set this on soft light 100%.
And you are done.
Any questions, feel free to ask.
A few more examples of this technique.

...
...
Here
to here
So, ohkk….
1. Take your picture, crop it to 100 pixels by 100 pixels. Don’t sharpen it yet.
2. Hmm…as Reese has a rough skin, I had to run the blur tool all over her face. The strength was set on 20%.
3. Next I took the sharpen tool and ran it over her eyes and lips. I think that gives a nice definition to the face, specially when the icon is complete.
4. Duplicate the base and set on screen, 50%.
5. Take a new layer, fill it with a dark blue (any dark blue really) and set this layer on exclusion 100%.(I used #0F1B45)
6. Take another new layer and fill it with a light blue (lighter than sky blue,I used #CFFCFF) and set this on soft light, 100%.
7. Create a new layer.
8. Press ctrl+shft+alt+E. This merges all the visible layers into a new one that you created in the step above.
9. Set this layer on colorburn. 100%
10. Duplicate the layer and set this on colorburn 50%.
11. Duplicate this new layer and set this on soft light 100%.
And you are done.
Any questions, feel free to ask.
A few more examples of this technique.
...
...