Tutorial: Extracting & Packaging Sims
Well we all know the Pixel_trade community is all about sharing sims that its members have either created or bred in game. And then installing what we download from others into our games to create stories, or play challenges with. But in order to extract or package a sim, you first need to know how to do it in a way that wont create issues for someone else's game when it's installed.
I've noticed there have been a few people sharing .package files from SimPE extraction. This is not good; they cause issues in the games they get installed into.
Body Shop makes the packaging process take a bit longer, but it means it that all the necessary data is embedded with the shared Sim.
This tutorial shows how to package a sim that is born in game & how to correctly package it, as well as how to include its custom content should you wish to.
First of all, you need SimPE. Get it here.
In order to run SimPE, you will need to have Mircosoft's .NET framework 2 installed in Windows. You can get that here, or alternatively, you should be able to select it in your Windows Update choices. I find the direct link is quicker =P
Ready to go? Let's go.
Born in Game Sim Extraction
Open up your SimPE.
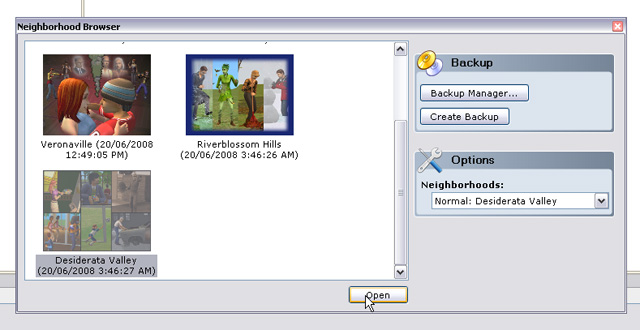
In the top bar menu, select Tools, Neighbourhood & then Neighbourhood Browser.

There will be a pop up to select which neighbourhood you want to open, select the one that the sim you want to extract is in.
This will take a little while. The program is loading every single character file in that neighbourhood, complete with genetics, relationships, memories & skills etc etc etc. There's a little green load progress bar at the bottom left of screen which you can watch while you attempt patience =P
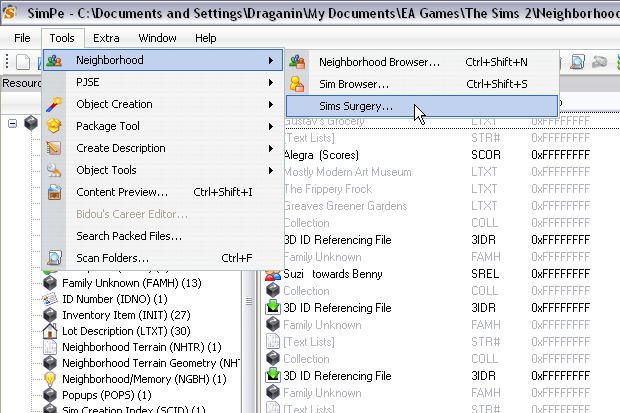
When it's loaded, go back up to the tools menu. This time go Neighbourhoods, Sim Surgery.
Sim Surgery is a pop up box. On the left is a column of sim image thumbnails, sorted alphabetically by first name. Scroll down until you find the sim you want to extract (you can jump to the start of a letter by pressing it on your keyboard).
Single left-click the image of the sim you want to extract. On the right hand section of that box is the blue word "Use". With the image of the sim highlighted, left-click that word.
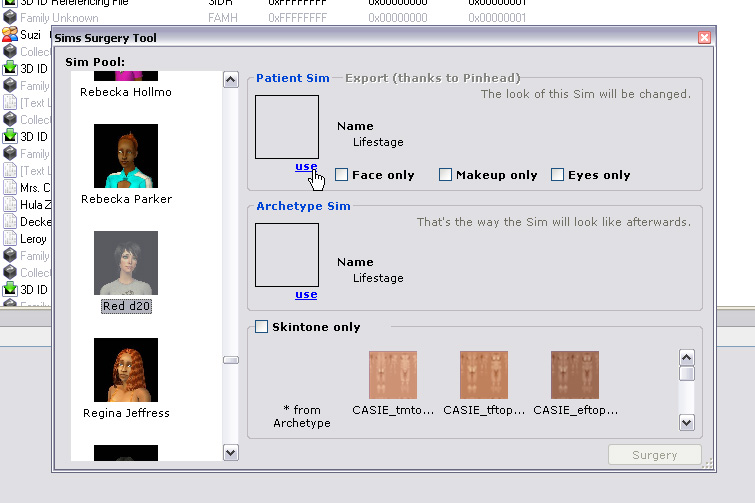
The image of the Sim you are exporting will now be displayed on the right hand side above the word "Use".
You'll see that the word "Export" is now blue & clickable. Left click "Export".

Name the exported file something that you will remember. You're best to change the file name as leaving it with the original name may cause Body Shop to crash & fail (thanks skittlebox).
This is being saved into your 'Saved Sims' folder in My Documents/EA Games/Sims 2 & will be readable by body shop.

IMPORTANT NOTE:
The .package file created by SimPE is only good on the same computer it was extracted from.
This is because instead of embedding the complete data about the sim you exported, it has created internal links & references to the relevant places in your personal My Documents folder on your PC.
Installing these files onto a different machine will create problems for that game. Not a good idea.
[takes needle off broken record]
[grins]
So in light of this information, we move ever onwards (as we can't find reverse).
Body Shop: Cloning & Packaging
And so we enter the Body shop section of this tutorial.
If you don't want to package your sim with any custom content, you can skip the cloning step. But if you want to package it with hair (& mesh), clothing etc, then you will need to complete the full tutorial below.
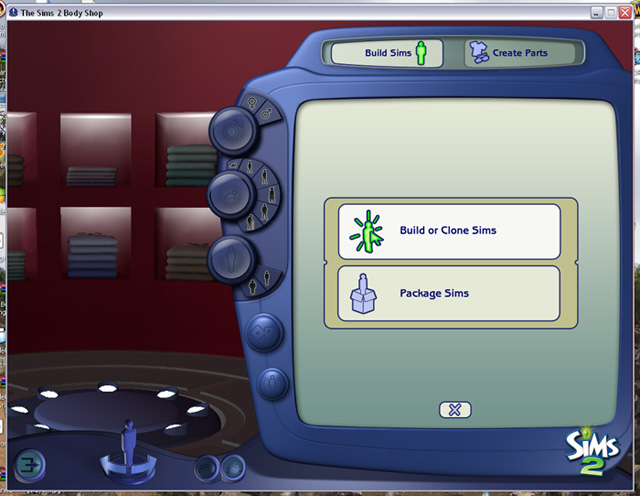
Open the Body Shop for the most recently released Expansion Pack you have installed. The same body shop as the EP you run to play the game.
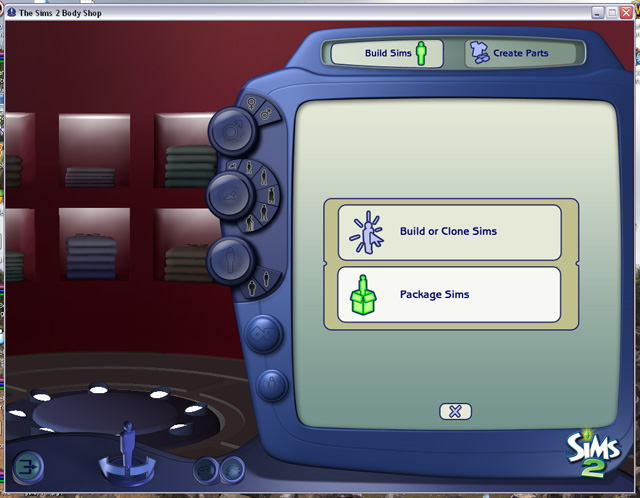
Select Build or Clone Sims.
Your saved sims folder & other installed sims will be loaded. My PC makes a wicked groan as it loads all of them (it would roll its eyes too if it had any) - there's a lot of pixel_trade goodness in there.
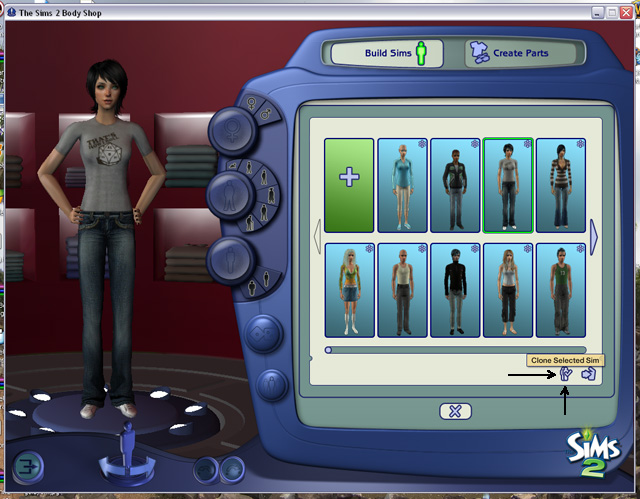
There is the Sim we extracted with SimPE a moment ago.
Single left-click the sim & then left-click the 'Clone Selected Sim' icon on the bottom right.
Exit back to the build or package menu.
Select Package Sims.
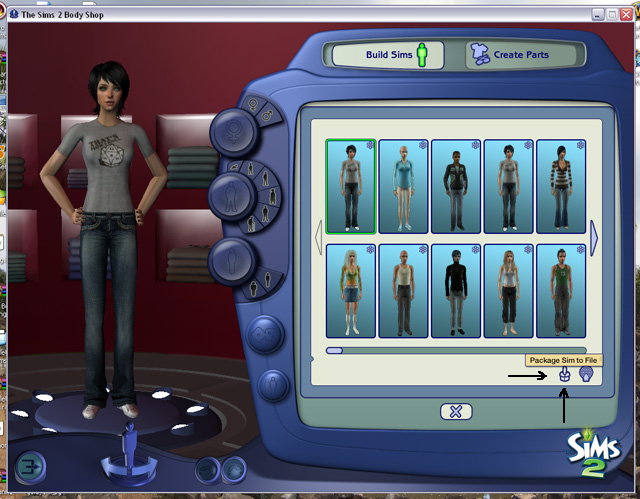
The sim we extracted is in the loaded list twice. If you want to package the custom content with your Sim, select the newer one (the one in the top left corner) by single left-clicking the sim's image.
With that sim selected, left click the 'Package Sim to File' icon on the bottom right.
Name the file. I tend to use the Sim's name (which in this case is my name) so that I can keep track of their files easier.
If you want, fill in the description field too. The description will be viewable to anyone installing this sim via Body Shop (though I've noticed not when installing via clean installer).
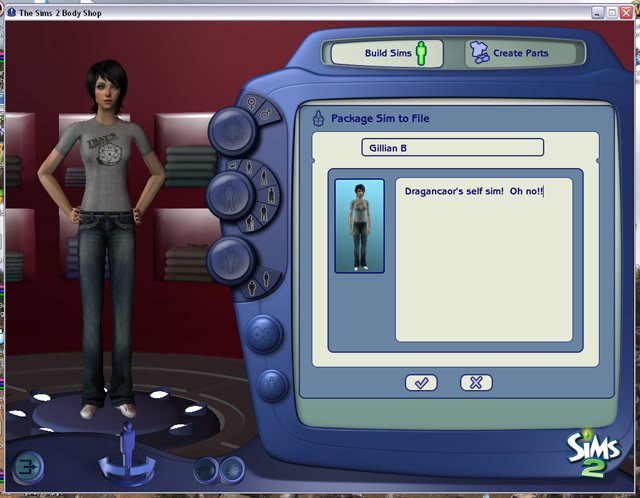
Voila!
Your extracted Sim has been saved to your desktop.

Now you can zip/rar/7z it & upload it to your hosting server & share your evil genius wonderful creations with the world!
I've noticed there have been a few people sharing .package files from SimPE extraction. This is not good; they cause issues in the games they get installed into.
Body Shop makes the packaging process take a bit longer, but it means it that all the necessary data is embedded with the shared Sim.
This tutorial shows how to package a sim that is born in game & how to correctly package it, as well as how to include its custom content should you wish to.
First of all, you need SimPE. Get it here.
In order to run SimPE, you will need to have Mircosoft's .NET framework 2 installed in Windows. You can get that here, or alternatively, you should be able to select it in your Windows Update choices. I find the direct link is quicker =P
Ready to go? Let's go.
Born in Game Sim Extraction
Open up your SimPE.
In the top bar menu, select Tools, Neighbourhood & then Neighbourhood Browser.
There will be a pop up to select which neighbourhood you want to open, select the one that the sim you want to extract is in.
This will take a little while. The program is loading every single character file in that neighbourhood, complete with genetics, relationships, memories & skills etc etc etc. There's a little green load progress bar at the bottom left of screen which you can watch while you attempt patience =P
When it's loaded, go back up to the tools menu. This time go Neighbourhoods, Sim Surgery.
Sim Surgery is a pop up box. On the left is a column of sim image thumbnails, sorted alphabetically by first name. Scroll down until you find the sim you want to extract (you can jump to the start of a letter by pressing it on your keyboard).
Single left-click the image of the sim you want to extract. On the right hand section of that box is the blue word "Use". With the image of the sim highlighted, left-click that word.
The image of the Sim you are exporting will now be displayed on the right hand side above the word "Use".
You'll see that the word "Export" is now blue & clickable. Left click "Export".
Name the exported file something that you will remember. You're best to change the file name as leaving it with the original name may cause Body Shop to crash & fail (thanks skittlebox).
This is being saved into your 'Saved Sims' folder in My Documents/EA Games/Sims 2 & will be readable by body shop.
IMPORTANT NOTE:
The .package file created by SimPE is only good on the same computer it was extracted from.
This is because instead of embedding the complete data about the sim you exported, it has created internal links & references to the relevant places in your personal My Documents folder on your PC.
Installing these files onto a different machine will create problems for that game. Not a good idea.
[takes needle off broken record]
[grins]
So in light of this information, we move ever onwards (as we can't find reverse).
Body Shop: Cloning & Packaging
And so we enter the Body shop section of this tutorial.
If you don't want to package your sim with any custom content, you can skip the cloning step. But if you want to package it with hair (& mesh), clothing etc, then you will need to complete the full tutorial below.
Open the Body Shop for the most recently released Expansion Pack you have installed. The same body shop as the EP you run to play the game.
Select Build or Clone Sims.
Your saved sims folder & other installed sims will be loaded. My PC makes a wicked groan as it loads all of them (it would roll its eyes too if it had any) - there's a lot of pixel_trade goodness in there.
There is the Sim we extracted with SimPE a moment ago.
Single left-click the sim & then left-click the 'Clone Selected Sim' icon on the bottom right.
Exit back to the build or package menu.
Select Package Sims.
The sim we extracted is in the loaded list twice. If you want to package the custom content with your Sim, select the newer one (the one in the top left corner) by single left-clicking the sim's image.
With that sim selected, left click the 'Package Sim to File' icon on the bottom right.
Name the file. I tend to use the Sim's name (which in this case is my name) so that I can keep track of their files easier.
If you want, fill in the description field too. The description will be viewable to anyone installing this sim via Body Shop (though I've noticed not when installing via clean installer).
Voila!
Your extracted Sim has been saved to your desktop.
Now you can zip/rar/7z it & upload it to your hosting server & share your evil genius wonderful creations with the world!