Tutorial: Blending
After a hiatus that lasted a bit over a month, I'm back! Yay!
But still, I can't make updates as often as I'd like to. I still have other work to do, as well as everything else that's part of everyday life and my extracurricular schedule. But I did have a bit of time to write a Photoshop tutorial.
antios suggested that I write this tutorial a few weeks ago. (Sorry it's so long in coming! I really didn't get enough time to sit down and write it until now.) I suppose everyone has their own way of blending, and this is mine.
(This tutorial is for Photoshop, so I'm not sure if it'll translate to other programs, though it might.)
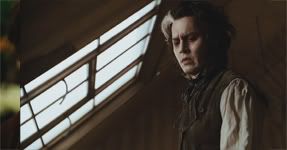
Start out by cropping and resizing your images of choice to your liking (I'll be using some caps from the AWESOME Sweeney Todd trailer). This blending method usually works best with just two images when you're new to it. (The cropped images should be the same height when you're done, though they SHOULD NOT be the same length.) Open a new document, whatever size you wish as long as the height is the same as your images and it's short enough so that the images will overlap (in my case, 425 x 150), and paste the images into this new document. Move them around to your liking. This is what my workspace looks like now:

Once your base is to your liking for now, choose the gradient tool from the toolbar on the side. Choose the black-to-white gradient from the gradient menu, and make sure the linear gradient option is selected. Your toolbar should now look like this or similar:

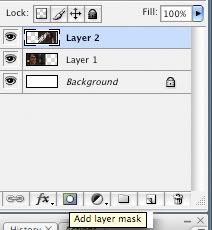
Now go to your layers palette. Select the top layer, and then click the little layer mask symbol at the bottom of the palette, as seen here (it's the rectangle with a circle in it):

Make sure the layer mask (the little window now open next to the top layer in your layers palette) is selected, then click somewhere on your base, hold the mouse down, and drag it across, like this:

Release, and your base is blended!

Then you can work on your base and make it a full-fledged piece. I came up with this:

Like all methods of blending, using layer masks to blend is very much a trial-and-error process. It doesn't always look right the first time, so you may have to keep undoing and redoing the gradient blend to make it just right.
One last little thing: You can also use layer masks to blend with brushes instead of gradients. For this, I'll put the same images closer together and overlapping more in a new 287 x 150 window:

Gasp! Oh no! The Sweeney layer is now covering Benjamin Barker! But no worries, we'll fix that now.
Put another layer mask on your top layer, but this time select the brush tool. Make sure your foreground color in the colors palette is black and that the layer mask is again selected. Select a soft round brush from your default brush selections, and use the brush tool to erase part of the top layer, like this:

It isn't as smooth as using a gradient, but using a brush can work better for some pieces. I always use the brush method for my manips.
I hope this tutorial was helpful! PLEASE tell me if it's unclear in any way. I always hate unclear tutorials myself, so please, ask me any questions that you have. :)
But still, I can't make updates as often as I'd like to. I still have other work to do, as well as everything else that's part of everyday life and my extracurricular schedule. But I did have a bit of time to write a Photoshop tutorial.
antios suggested that I write this tutorial a few weeks ago. (Sorry it's so long in coming! I really didn't get enough time to sit down and write it until now.) I suppose everyone has their own way of blending, and this is mine.
(This tutorial is for Photoshop, so I'm not sure if it'll translate to other programs, though it might.)
Start out by cropping and resizing your images of choice to your liking (I'll be using some caps from the AWESOME Sweeney Todd trailer). This blending method usually works best with just two images when you're new to it. (The cropped images should be the same height when you're done, though they SHOULD NOT be the same length.) Open a new document, whatever size you wish as long as the height is the same as your images and it's short enough so that the images will overlap (in my case, 425 x 150), and paste the images into this new document. Move them around to your liking. This is what my workspace looks like now:

Once your base is to your liking for now, choose the gradient tool from the toolbar on the side. Choose the black-to-white gradient from the gradient menu, and make sure the linear gradient option is selected. Your toolbar should now look like this or similar:

Now go to your layers palette. Select the top layer, and then click the little layer mask symbol at the bottom of the palette, as seen here (it's the rectangle with a circle in it):

Make sure the layer mask (the little window now open next to the top layer in your layers palette) is selected, then click somewhere on your base, hold the mouse down, and drag it across, like this:

Release, and your base is blended!

Then you can work on your base and make it a full-fledged piece. I came up with this:

Like all methods of blending, using layer masks to blend is very much a trial-and-error process. It doesn't always look right the first time, so you may have to keep undoing and redoing the gradient blend to make it just right.
One last little thing: You can also use layer masks to blend with brushes instead of gradients. For this, I'll put the same images closer together and overlapping more in a new 287 x 150 window:

Gasp! Oh no! The Sweeney layer is now covering Benjamin Barker! But no worries, we'll fix that now.
Put another layer mask on your top layer, but this time select the brush tool. Make sure your foreground color in the colors palette is black and that the layer mask is again selected. Select a soft round brush from your default brush selections, and use the brush tool to erase part of the top layer, like this:

It isn't as smooth as using a gradient, but using a brush can work better for some pieces. I always use the brush method for my manips.
I hope this tutorial was helpful! PLEASE tell me if it's unclear in any way. I always hate unclear tutorials myself, so please, ask me any questions that you have. :)