tutorial time!
Well, blessed_beast FORCED me to make a tutorial for this Anya icon (which I haven't even posted yet), so here's a simple tutorial:
from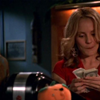
to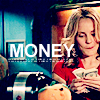
Original image is here, from Screencap-Paradise.
[01] Get your base. Don't sharpen it yet.
[02] Duplicate your base and set it to "screen", 100% opacity. Sharpen this layer (not the base).

[03] Duplicate that layer 4 times. You should now have 5 "screen" layers above your base.

[04] Underneath the very top screen layer, make 2 new layers and fill them both with #011537. Set them both to "exclusion".

[05] Now go to "select" and choose "select all". Then go to "edit" and choose "copy merged". Copy your merged layers and paste your merged layer above everything. Basically you're making a copy of how everything looks together. Set this layer to "soft light". I also decreased the saturation by about 25% (but you don't have to do this). Another way you could do this step would be to simply flatten the image, duplicate it, and set it to soft light.

[06] Make 2 new layers UNDER the "soft light" layer and fill them both with #A4DDF4. Set them both to "color burn". Set the first one to 100% and the second one to 75% opacity.


[07] Make a new layer on top of the 2 color burn layers, but still below your "soft light" layer. Fill it with #EADCCD and set it to "color burn", 49% opacity.


[08] Make a new layer on top of the 3 color burn layers, but still below your "soft light" layer. Fill it with #E6E6E6 and set it to "color burn", 100% opacity.

[09] Now just add text (I used 18pt Arial bolded) and some tiny text and you're done!
You can't copy this tutorial completely, as it works differently on each icon, but I use this style of coloring on almost all my icons these days. Sometimes I use gradients instead of solid colors, but I made this one in a hurry. Just play around with more/less screen layers, more/less color burn layers, etc., and you'll find something you like. :D
If you have any questions, don't hesitate to ask (I can be very confusing)! :D
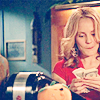
from
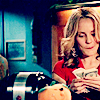
to
Original image is here, from Screencap-Paradise.
[01] Get your base. Don't sharpen it yet.
[02] Duplicate your base and set it to "screen", 100% opacity. Sharpen this layer (not the base).
[03] Duplicate that layer 4 times. You should now have 5 "screen" layers above your base.
[04] Underneath the very top screen layer, make 2 new layers and fill them both with #011537. Set them both to "exclusion".
[05] Now go to "select" and choose "select all". Then go to "edit" and choose "copy merged". Copy your merged layers and paste your merged layer above everything. Basically you're making a copy of how everything looks together. Set this layer to "soft light". I also decreased the saturation by about 25% (but you don't have to do this). Another way you could do this step would be to simply flatten the image, duplicate it, and set it to soft light.
[06] Make 2 new layers UNDER the "soft light" layer and fill them both with #A4DDF4. Set them both to "color burn". Set the first one to 100% and the second one to 75% opacity.
[07] Make a new layer on top of the 2 color burn layers, but still below your "soft light" layer. Fill it with #EADCCD and set it to "color burn", 49% opacity.
[08] Make a new layer on top of the 3 color burn layers, but still below your "soft light" layer. Fill it with #E6E6E6 and set it to "color burn", 100% opacity.
[09] Now just add text (I used 18pt Arial bolded) and some tiny text and you're done!
You can't copy this tutorial completely, as it works differently on each icon, but I use this style of coloring on almost all my icons these days. Sometimes I use gradients instead of solid colors, but I made this one in a hurry. Just play around with more/less screen layers, more/less color burn layers, etc., and you'll find something you like. :D
If you have any questions, don't hesitate to ask (I can be very confusing)! :D